
Normal view

Test your Drupal website with Cypress

Test your Drupal website with Cypress cobadger

If you don't include tests in your Drupal development, chances are it's because you think it adds complexity and expense without benefit. Cypress is an open source tool with many benefits:

  • Reliably tests anything that runs in a web browser
  • Works on any web platform (it's great for testing projects using front-end technologies like React)
  • Highly extensible
  • Increasingly popular
  • Easy to learn and implement
  • Protects against regression as your projects become more complex
  • Can make your development process more efficient

This article covers three topics to help you start testing your Drupal project using Cypress:

  1. Installing Cypress
  2. Writing and running basic tests using Cypress
  3. Customizing Cypress for Drupal

Install Cypress

For the purposes of this tutorial I'm assuming that you have built a local dev environment for your Drupal project using the `drupal/recommended-project` project. Although details on creating such a project are outside of the scope of this piece, I recommend Getting Started with Lando and Drupal 9.

Your project has at least this basic structure:

vendor/
web/
.editorconfig
.gitattributes
composer.json
composer.lock

The cypress.io site has complete installation instructions for various environments. For this article, I installed Cypress using npm.

Initialize your project using the command npm init. Answer the questions that Node.js asks you, and then you will have a package.json file that looks something like this:

{
  "name": "cypress",
  "version": "1.0.0",
  "description": "Installs Cypress in a test project.",
  "main": "index.js",
  "scripts": {
    "test": "echo \"Error: no test specified\" && exit 1"
  },
  "author": "",
  "license": "ISC"
}

Install Cypress in your project:

$ npm install cypress --save-dev

Run Cypress for the first time:

$ npx cypress open

Because you haven't added a config or any scaffolding files to Cypress, the Cypress app displays the welcome screen to help you configure the project. To configure your project for E2E (end-to-end) testing, click the Not Configured button for E2E Testing. Cypress adds some files to your project:

cypress/
node_modules/
vendor/ 
web/
.editorconfig
.gitattributes
composer.json
composer.lock
cypress.config.js
package-lock.json
package.json

Click Continue and choose your preferred browser for testing. Click Start E2E Testing in [your browser of choice]. I'm using a Chromium-based browser for this article.

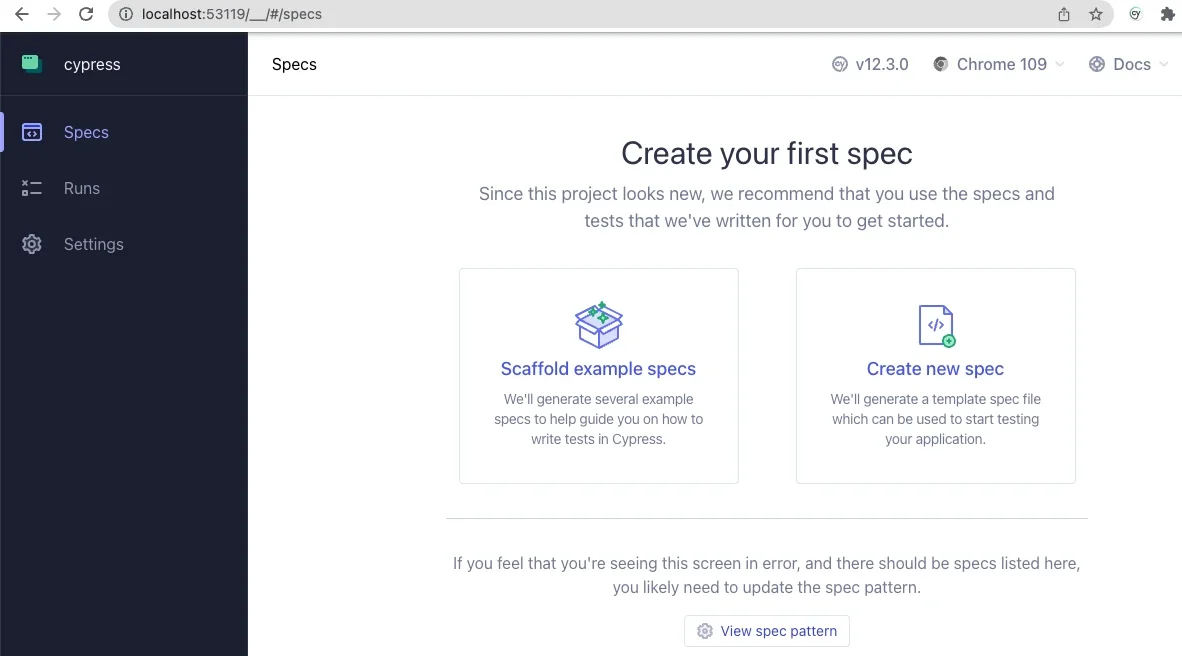
In a separate window, a browser opens to the Create your first spec page:

Cypress in a web browser
Image by:

(Jordan Graham, CC BY-SA 4.0)

Click on the Scaffold example specs button to create a couple of new folders with example specs to help you understand how to use Cypress. Read through these in your code editor, and you'll likely find the language (based on JavaScript) intuitive and easy to follow.

Click on any in the test browser. This reveals two panels. On the left, a text panel shows each step in the active spec. On the right, a simulated browser window shows the actual user experience as Cypress steps through the spec.

Open the cypress.config.js file in your project root and change it as follows:

const { defineConfig } = require("cypress");
 
module.exports = defineConfig({
  component: {
    fixturesFolder: "cypress/fixtures",
    integrationFolder: "cypress/integration",
    pluginsFile: "cypress/plugins/index.js",
    screenshotsFolder: "cypress/screenshots",
    supportFile: "cypress/support/e2e.js",
    videosFolder: "cypress/videos",
    viewportWidth: 1440,
    viewportHeight: 900,
  },

  e2e: {
    setupNodeEvents(on, config) {
      // implement node event listeners here
    },
    baseUrl: "https://[your-local-dev-url]",
    specPattern: "cypress/**/*.{js,jsx,ts,tsx}",
    supportFile: "cypress/support/e2e.js",
    fixturesFolder: "cypress/fixtures"
   },
 });

Change the baseUrl to your project's URL in your local dev environment.

These changes tell Cypress where to find its resources and how to find all of the specs in your project.

Write and run basic tests using Cypress

Create a new directory called integration in your /cypress directory. Within the integration directory, create a file called test.cy.js:

cypress/
├─ e2e/
├─ fixtures/
├─ integration/ 
│  ├─ test.cy.js
├─ support/ 
node_modules/
vendor/
web/
.editorconfig
.gitattributes
composer.json
composer.lock
cypress.config.js
package-lock.json
package.json

Add the following contents to your test.cy.js file:

describe('Loads the front page', () => {
  it('Loads the front page', () => {
    cy.visit('/')
    cy.get('h1.page-title')
      .should('exist')
  });
});
 
describe('Tests logging in using an incorrect password', () => {
  it('Fails authentication using incorrect login credentials', () => {
    cy.visit('/user/login')
    cy.get('#edit-name')
      .type('Sir Lancelot of Camelot')
    cy.get('#edit-pass')
      .type('tacos')
    cy.get('input#edit-submit')
      .contains('Log in')
      .click()
    cy.contains('Unrecognized username or password.')
  });
});

When you click on test.cy.js in the Cypress application, watch each test description on the left as Cypress performs the steps in each describe() section.

This spec demonstrates how to tell Cypress to navigate your website, access HTML elements by ID, enter content into input elements, and submit the form. This process is how I discovered that I needed to add the assertion that the <input id="edit-submit"> element contains the text Log in before the input was clickable. Apparently, the flex styling of the submit input impeded Cypress' ability to "see" the input, so it couldn't click on it. Testing really works!

Customize Cypress for Drupal

You can write your own custom Cypress commands, too. Remember the supportFile entry in the cypress.config.js file? It points to a file that Cypress added, which in turn imports the ./commands files. Incidentally, Cypress is so clever that when importing logic or data fixtures, you don't need to specify the file extension, so you import ./commands, not ./commands.js. Cypress looks for any of a dozen or so popular file extensions and understands how to recognize and parse each of them.

Enter commands into commands.js to define them:

/**
 * Logs out the user.
 */
 
Cypress.Commands.add('drupalLogout', () => {
  cy.visit('/user/logout');
})
 
/**
 * Basic user login command. Requires valid username and password.
 *
 * @param {string} username
 *   The username with which to log in.
 * @param {string} password
 *   The password for the user's account.
 */
 
Cypress.Commands.add('loginAs', (username, password) => {
  cy.drupalLogout();
  cy.visit('/user/login');
  cy.get('#edit-name')
    .type(username);
  cy.get('#edit-pass').type(password, {
    log: false,
  });
 
  cy.get('#edit-submit').contains('Log in').click();
});

This example defines a custom Cypress command called drupalLogout(), which you can use in any subsequent logic, even other custom commands. To log a user out, call cy.drupalLogout(). This is the first event in the custom command loginAs to ensure that Cypress is logged out before attempting to log in as a specific user.

Using environment variables, you can even create a Cypress command called drush(), which you can use to execute Drush commands in your tests or custom commands. Look at how simple this makes it to define a custom Cypress command that logs a user in using their UID:

/**
* Logs a user in by their uid via drush uli.
*/
 
Cypress.Commands.add('loginUserByUid', (uid) => {
 cy.drush('user-login', [], { uid, uri: Cypress.env('baseUrl') })
   .its('stdout')
   .then(function (url) {
     cy.visit(url);
   });
});

This example uses the drush user-login command (drush uli for short) and takes the authenticated user to the site's base URL.

Consider the security benefit of never reading or storing user passwords in your testing. Personally, I find it amazing that a front-end technology like Cypress can execute Drush commands, which I've always thought of as being very much on the back end.

Testing, testing

There's a lot more to Cypress, like fixtures (files that hold test data) and various tricks for navigating the sometimes complex data structures that produce a website's user interface. For a look into what's possible, watch the Cypress Testing for Drupal Websites webinar, particularly the section on fixtures that begins at 18:33. That webinar goes into greater detail about some interesting use cases, including an Ajax-enabled form. Once you start using it, feel free to use or fork Aten's public repository of Cypress Testing for Drupal.

Happy testing!


This article originally appeared on the Aten blog and is republished with permission.

Testing makes everything better. Learn how to use Cypress for your Drupal website.

What to read next
Creative Commons LicenseThis work is licensed under a Creative Commons Attribution-Share Alike 4.0 International License.

Comments are closed.

These comments are closed.

5 open ways to help UX designers and developers collaborate better

5 open ways to help UX designers and developers collaborate better kriker

Ideally, designers have a good relationship with their product team and users. However, the relationship between designers and developers is more difficult to build and maintain. The lack of a close relationship makes it difficult to solve problems or improve.

In my experience, the open source Open Decision Framework can overcome many of these obstacles.

The Open Decision Framework asserts that open decision-making is transparent, inclusive, and customer-centric. It involves clearly sharing problems, requirements, and constraints with affected parties. It enables collaboration with multiple stakeholders to secure diverse opinions and comprehensive feedback. Most importantly, it manages relationships and expectations across competing needs and priorities.

These principles probably resonate with anyone involved in the many decisions around designing a product, feature, or service. For a designer, developers are key stakeholders in making the best design decisions. If you're a designer, it's time to embrace the opportunity to get diverse opinions.

The backend and the user experience

Developers are key stakeholders because a user's product or service experience is more than just the pixels on the screen or the workflow designs. It encompasses the service's performance, the speediness of API calls, the way user data is treated, and even the design of the data for scalability. When they're considered full stakeholders in the design, developers can contribute their expertise on the backend and architecture of services to assist the overall design of the experience.

A user experience (UX) designer is a stakeholder for the items the dev team is responsible for. A performance deficit, or the effects of an architecture on what data is available, can hinder the user experience. An open, collaborative relationship between dev and design allows for trust and transparency in all areas.

Make space for collaboration

An open and transparent relationship between developers and design is not as common as it should be. This way of working may be new to both sides. Here are my top five tips for making collaboration a success:

  1. Set up a recurring time to collaborate: Establish a recurring time for design and development to meet between once a week and once a month. The invitation should at least include UX, lead engineering, and quality engineering. Ideally, all developers on the team should be invited to attend as schedules permit.

  2. Make sharing the main agenda: UX should share the current use cases and features they are working on, along with any relevant user research data. UX designers should demonstrate workflow designs, wireframes, and high-fidelity mockups to the development team. Development should share any design decisions made on their side that may affect how the user experience works.

  3. Encourage questions: Collaboration is the ideal scenario. Encourage all attendees to ask questions and give feedback. Answers to questions and responses to feedback are opportunities to discuss design and direction, as well as a chance to learn from one another.

  4. Embrace a learning mindset: Avoid lecturing or "telling." Instead, aim to learn from each other. Use mutual expertise to design and build a great experience for users and customers. Ask for explanations of unfamiliar technology or concepts.

  5. Consider formal learning: A collaborative relationship can be easier when groups speak the same language. Consider formal learning paths, such as:

    • Designers: A coding foundations course, such as the open source Odin Project, can be helpful for learning the fundamentals of how a service is constructed and built.
    • Developers: An understanding of UX principles can help guide questions and feedback. You can find a good overview at UX design principles or in various books and articles.

An example of open collaboration

In an early design review with a developer on my team, I showed a specific interaction for displaying more data about an object. I communicated the user's need and demonstrated the interaction when the developer asked, "Does it need to be done in exactly this way?"

He mentioned that with a few minor design changes, the effort to develop it would be significantly lower. We agreed that the changes would not negatively affect the user experience, and the user would still be able to achieve their goals.

This feedback saved the development team time, leaving more opportunity to address bugs, build additional features, and preserve a healthy work-life balance. The user experience remained strong, and the team was even stronger. This result would not have been possible without the early feedback from a developer with whom I had a strong working relationship.

Your next steps

Creating an experience is a series of decisions made by a collaborative team. Product, design, and development need to work together as experts in their respective fields and stakeholders in the others. I encourage you to engage development and design for more collaborative feedback and work together to create the best product with the best user experience.

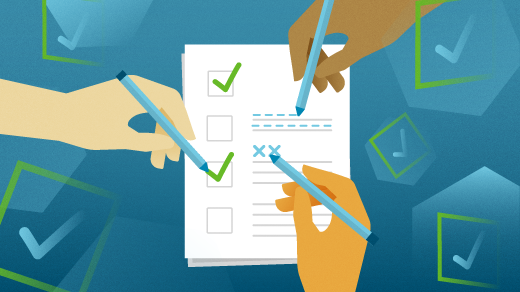
Designing with open decisions can help increase collaboration between user experience and dev teams.

a checklist for a team
Image by:

Opensource.com

What to read next
Creative Commons LicenseThis work is licensed under a Creative Commons Attribution-Share Alike 4.0 International License.

Comments are closed.

These comments are closed.

What's new in GNOME 44?

What's new in GNOME 44? Jim Hall

I use GNOME as my primary desktop environment on my Linux PC at home. GNOME gives me an easy-to-use graphical desktop that provides the flexibility I need yet doesn't get in my way when I focus on my work.

GNOME recently released GNOME 44 with a bunch of new features. I reached out to the GNOME team to ask about the latest version and what was in it. Here's what team members Caroline Henriksen (brand manager), Matthias Clasen (GNOME developer and release team member), and Allan Day (design team) had to share.

New GNOME features

Jim Hall: What are some of the new and updated features in GNOME 44 that you're most excited about?

GNOME Team: I am very excited to see how fresh and modern our user interfaces look. Not just in the core apps like Files (the file manager, Nautilus) but also in our Settings, which have seen a lot of work in the last cycle—many Settings panels have been improved. If you have a chance, you should try the new Mouse & Touchpad panel and enjoy the animated illustrations.

There's a lot to like in GNOME 44. For example, I think that a lot of people are going to be really happy about the new grid view in the file chooser, as well as being able to easily connect devices from the new Bluetooth menu in the quick settings.

Jim: The release notes mention GNOME Circle and that a few new apps have been added. What is GNOME Circle?

Team: GNOME Circle is a collection of fantastic apps that use the GNOME platform. It's GNOME's way of promoting the best apps that use our technologies and supporting app developers.

To be included in GNOME Circle, an app has to meet a set of requirements. Once it does, the developers get things like extra publicity and GNOME Foundation membership. That, in turn, gives them access to additional infrastructure and travel sponsorship. More information and how to apply can be found on the GNOME Circle page.

We're thrilled with how successful GNOME Circle has been. It contains more than 50 apps now! I particularly like that not all of these apps revolve around computing. You can find apps like a health tracker, a metronome, or a chess clock.

Jim: GNOME is the standard desktop in several Linux distributions. Where can we expect to see GNOME 44?

Team: The upcoming Fedora 38 release will include GNOME 44 and should be out sometime in April, as will Ubuntu 23.04. And GNOME 44 builds have already landed in openSUSE's Tumbleweed and MicroOS, to name just a few of the major distros.

The GNOME community

Jim: The release name for GNOME 44 is Kuala Lumpur. Where does this name come from?

Team: GNOME has two major yearly conferences, GUADEC in the middle of the year (the next conference will take place in Latvia in July 2023) and GNOME Asia towards the end of the year. We are very thankful to the local team in Malaysia who welcomed us for GNOME Asia 2022 in Kuala Lumpur.

Organizing these events takes a lot of effort and commitment from the GNOME staff and the local teams. As a small sign of our appreciation, GNOME releases are named after the location of the most recent conference. This naming scheme was introduced a number of years ago. GNOME 3.18, Gothenburg, was the first.

Jim: GNOME has a strong user community with active members. How does GNOME keep the community so engaged?

Team: GNOME has always been a community-driven project with a strong sense of collaboration and inclusivity. That's part of what makes being a GNOME contributor and user so rewarding. Being a member of the GNOME community means that you get to interact with people from all over the world to work on common goals and exchange ideas. It is an enriching and inspiring experience, and I think that is what helps keep our community excited and engaged.

One important aspect of fostering that engagement is meeting our community where they're at and making our events more accessible to people from all over the world. For example, our flagship conference, GUADEC, was hosted in Guadalajara, Mexico, last year. This was the first time GUADEC happened outside of Europe, and this helped make it easier for GNOME users and contributors in Latin America to attend.

We also make an effort to meet our community members not just online and at our own conferences but at other events such as Linux Application Summit, FOSDEM, or SCaLE. If you see a GNOME booth at any of these events, please stop by and say hi. You'll often find developers, designers, foundation staff, and board members all happy to chat and answer questions.

Get involved with GNOME

Jim: How can folks get started with writing their own apps for GNOME? If I wanted to learn how to write my first "hello world" app for GNOME, is there a tutorial I can follow?

Team: The Get started developing for GNOME site includes a collection of tutorials, including a guide on quickly creating your first app. With new technologies like Flatpak and GNOME Builder, it's amazing just how easy it is to create your own app nowadays. Fire up Builder, click "new project," fill in some details, and you'll have your own running GNOME app. It really is that easy.

Jim: What are some ways that people can contribute?

Team: If someone is interested in GNOME and is motivated to get involved, there are definitely things they can do to help. Participating in discussions on our Discourse instance or reporting issues is a great place to start if you're a beginner. There are also lots of non-technical jobs that need doing, like helping with our documentation, translating GNOME into different languages, or even helping organize our annual conferences. A lot of these activities have friendly teams working on them who will help you to get started.

Alternatively, if you have coding experience, you can browse our "newcomer" tickets for tasks that might interest you.

Another way to contribute is through donating to GNOME. As an open source project and a non-profit foundation, regular donations help us continue to build up GNOME, provide necessary infrastructure, and power new initiatives.

[ Get the guide to installing applications on Linux ]

The GNOME Linux desktop's latest release is now available. Find out about the new and improved Bluetooth, user interface, apps, and other features in GNOME 44.

GNOME
Image by:

Gunnar Wortmann via Pixabay. Modified by Opensource.com. CC BY-SA 4.0.

What to read next
Creative Commons LicenseThis work is licensed under a Creative Commons Attribution-Share Alike 4.0 International License.

Comments are closed.

These comments are closed.
❌