Svetlana Alexievich, winner of the Nobel Prize in Literature, gives the Elliott Lecture at St Antony's College Oxford, taking as her subject "The history of the Russian-Soviet soul".
Matthew Beaumont, Michael Caines, Chloe Houston and Nicole Pohl discuss Thomas More's Utopia, first published 500 years ago in 1516, and utopianism in its many and varied forms.Find out more: www.the-tls.co.uk
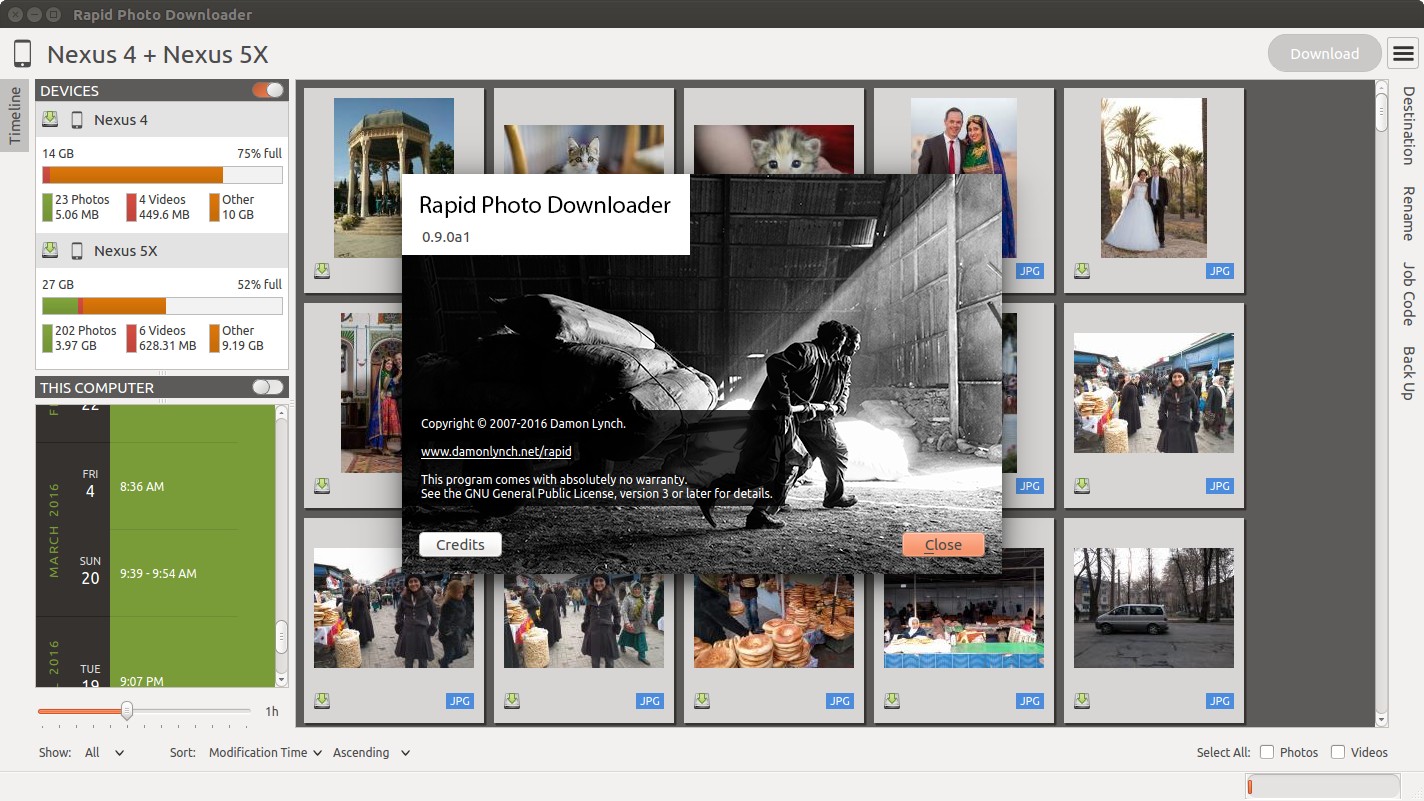
Community member Damon Lynch happens to make an awesome program called Rapid Photo Downloader in his “spare” time. In fact you may have heard mention of it as part of Riley Brandt’s“The Open Source Photography Course”*. It is a program that specializes in downloading photo and video from media in as efficient a manner as possible while extending the process with extra functionality.
* Riley donates a portion of the proceeds from his course to various projects, and Rapid Photo Downloader is one of them!
Some of the neat new features include being able to preview the download subfolder and storage space of devices before you download:
Also being able to download from multiple devices in parallel, including from all cameras supported by gphoto2:
There is much, much more in this release. Damon goes into much further detail on his post in the forum, copied here:
How about its Timeline, which groups photos and videos based on how much time elapsed between consecutive shots. Use it to identify photos and videos taken at different periods in a single day or
over consecutive days.
You can adjust the time elapsed between consecutive shots that is used to build the Timeline to match your shooting sessions.
For those who’ve used the older version, I’m copying and pasting from the ChangeLog, which covers most but not all changes:
New features compared to the previous release, version 0.4.11:
Every aspect of the user interface has been revised and modernized.
Files can be downloaded from all cameras supported by gPhoto2,
including smartphones. Unfortunately the previous version could download
from only some cameras.
Files that have already been downloaded are remembered. You can still select
previously downloaded files to download again, but they are unchecked by
default, and their thumbnails are dimmed so you can differentiate them
from files that are yet to be downloaded.
The thumbnails for previously downloaded files can be hidden.
Unique to Rapid Photo Downloader is its Timeline, which groups photos and
videos based on how much time elapsed between consecutive shots. Use it
to identify photos and videos taken at different periods in a single day
or over consecutive days. A slider adjusts the time elapsed between
consecutive shots that is used to build the Timeline. Time periods can be
selected to filter which thumbnails are displayed.
Thumbnails are bigger, and different file types are easier to
distinguish.
Thumbnails can be sorted using a variety of criteria, including by device
and file type.
Destination folders are previewed before a download starts, showing which
subfolders photos and videos will be downloaded to. Newly created folders
have their names italicized.
The storage space used by photos, videos, and other files on the devices
being downloaded from is displayed for each device. The projected storage
space on the computer to be used by photos and videos about to be
downloaded is also displayed.
Downloading is disabled when the projected storage space required is more
than the capacity of the download destination.
When downloading from more than one device, thumbnails for a particular
device are briefly highlighted when the mouse is moved over the device.
The order in which thumbnails are generated prioritizes representative
samples, based on time, which is useful for those who download very large
numbers of files at a time.
Thumbnails are generated asynchronously and in parallel, using a load
balancer to assign work to processes utilizing up to 4 CPU cores.
Thumbnail generation is faster than the 0.4 series of program
releases, especially when reading from fast memory cards or SSDs.
(Unfortunately generating thumbnails for a smartphone’s photos is painfully
slow. Unlike photos produced by cameras, smartphone photos do not contain
embedded preview images, which means the entire photo must be downloaded
and cached for its thumbnail to be generated. Although Rapid Photo Downloader
does this for you, nothing can be done to speed it up).
Thumbnails generated when a device is scanned are cached, making thumbnail
generation quicker on subsequent scans.
Libraw is used to render RAW images from which a preview cannot be extracted,
which is the case with Android DNG files, for instance.
Freedesktop.org thumbnails for RAW and TIFF photos are generated once they
have been downloaded, which means they will have thumbnails in programs like
Gnome Files, Nemo, Caja, Thunar, PCManFM and Dolphin. If the path files are being
downloaded to contains symbolic links, a thumbnail will be created for the
path with and without the links. While generating these thumbnails does slow the
download process a little, it’s a worthwhile tradeoff because Linux desktops
typically do not generate thumbnails for RAW images, and thumbnails only for
small TIFFs.
The program can now handle hundreds of thousands of files at a time.
Tooltips display information about the file including name, modification
time, shot taken time, and file size.
Right click on thumbnails to open the file in a file browser or copy the
path.
When downloading from a camera with dual memory cards, an emblem beneath the
thumbnail indicates which memory cards the photo or video is on
Audio files that accompany photos on professional cameras like the Canon
EOS-1D series of cameras are now also downloaded. XMP files associated with
a photo or video on any device are also downloaded.
Comprehensive log files are generated that allow easier diagnosis of
program problems in bug reports. Messages optionally logged to a
terminal window are displayed in color.
When running under Ubuntu‘s Unity desktop, a progress bar and count of files
available for download is displayed on the program’s launcher.
Status bar messages have been significantly revamped.
Determining a video’s correct creation date and time has been improved, using a
combination of the tools MediaInfo and ExifTool. Getting the right date and time
is trickier than it might appear. Depending on the video file and the camera that
produced it, neither MediaInfo nor ExifTool always give the correct result.
Moreover some cameras always use the UTC time zone when recording the creation
date and time in the video’s metadata, whereas other cameras use the time zone
the video was created in, while others ignore time zones altogether.
The time remaining until a download is complete (which is shown in the status
bar) is more stable and more accurate. The algorithm is modelled on that
used by Mozilla Firefox.
The installer has been totally rewritten to take advantage of Python‘s
tool pip, which installs Python packages. Rapid Photo Downloader can now
be easily installed and uninstalled. On Ubuntu, Debian and Fedora-like
Linux distributions, the installation of all dependencies is automated.
On other Linux distrubtions, dependency installation is partially
automated.
When choosing a Job Code, whether to remember the choice or not can be
specified.
Removed feature:
Rotate Jpeg images - to apply lossless rotation, this feature requires the
program jpegtran. Some users reported jpegtran corrupted their jpegs’
metadata – which is bad under any circumstances, but terrible when applied
to the only copy of a file. To preserve file integrity under all circumstances,
unfortunately the rotate jpeg option must therefore be removed.
Under the hood, the code now uses:
PyQt 5.4 +
gPhoto2 to download from cameras
Python 3.4 +
ZeroMQ for interprocess communication
GExiv2 for photo metadata
Exiftool for video metadata
Gstreamer for video thumbnail generation
Please note if you use a system monitor that displays network activity,
don’t be alarmed if it shows increased local network activity while the
program is running. The program uses ZeroMQ over TCP/IP for its
interprocess messaging. Rapid Photo Downloader’s network traffic is
strictly between its own processes, all running solely on your computer.
Missing features, which will be implemented in future releases:
Components of the user interface that are used to configure file
renaming, download subfolder generation, backups, and miscellaneous
other program preferences. While they can be configured by manually
editing the program’s configuration file, that’s far from easy and is
error prone. Meanwhile, some options can be configured using the command
line.
There are no full size photo and video previews.
There is no error log window.
Some main menu items do nothing.
Files can only be copied, not moved.
Of course, Damon doesn’t sit still. He quickly followed up the 0.9.0a1 announcement by announcing 0.9.0a2 which included a few bug fixes from the previous release:
Added command line option to import preferences from from an old program
version (0.4.11 or earlier).
Implemented auto unmount using GIO (which is used on most Linux desktops) and
UDisks2 (all those desktops that don’t use GIO, e.g. KDE).
Fixed bug while logging processes being forcefully terminated.
Fixed bug where stored sequence number was not being correctly used when
renaming files.
Fixed bug where download would crash on Python 3.4 systems due to use of Python
3.5 only math.inf
If you’ve been considering optimizing your workflow for photo import and initial sorting now is as good a time as any - particularly with all of the great new features that have been packed into this release! Head on over to the Rapid Photo Downloader website to have a look and see the instructions for getting a copy:
Remember, this is Alpha software still (though most of the functionality is all in place). If you do run into any problems, please drop in and let Damon know in the forums!
When the flowers are blooming, image filters abound!
A new version 1.7.1 “Spring 2016” of G’MIC (GREYC’s Magic for Image Computing),
the open-source framework for image processing, has been released recently (26 April 2016).
This is a great opportunity to summarize some of the latest advances and features over the last 5 months.
G’MIC is an open-source project started in August 2008. It has been developed in the
IMAGE team of the GREYC laboratory
from the CNRS (one of the major French public research institutes).
This team is made up of researchers and teachers specializing in the algorithms and mathematics of image processing.
G’MIC is released under the free software licence CeCILL
(GPL-compatible) for various platforms (Linux, Mac and Windows). It provides a set of various user interfaces
for the manipulation of generic image data, that is images or image sequences of
multispectral data being _2D_ or _3D_, and with high-bit precision
(up to 32bits floats per channel). Of course, it manages “classical” color images as well.
Logo and (new) mascot of the G’MIC project, the open-source framework for image processing.
Note that the project just got a redesign of its mascot Gmicky, drawn by David Revoy, a French illustrator well-known to free graphics lovers for being responsible for the great libre webcomics Pepper&Carott.
G’MIC is probably best known for it’s GIMPplug-in,
first released in 2009. Today, this popular GIMP extension proposes more than 460 customizable filters and effects
to apply on your images.
Overview of the G’MIC plug-in for GIMP.
But G’MIC is not a plug-in for GIMP only. It also offers a command-line interface, that can
be used in addition with the CLI tools from ImageMagick or
GraphicsMagick
(this is undoubtly the most powerful and flexible interface of the framework).
G’MIC also has a web service G’MIC Online to apply effects on your images
directly from a web browser. Other G’MIC-based interfaces also exist (ZArt,
a plug-in for Krita, filters for Photoflow…).
All these interfaces are based on the generic C++ libraries CImg and
libgmic which are portable, thread-safe and multi-threaded
(through the use of OpenMP).
Today, G’MIC has more than 900 functions to process images, all being
fully configurable, for a library of only approximately 150 kloc of source code.
It’s features cover a wide spectrum of the image processing field, with algorithms for
geometric and color manipulations, image filtering (denoising/sharpening with spectral, variational or
patch-based approaches…), motion estimation and registration, drawing of graphic primitives (up to 3d vector objects),
edge detection, object segmentation, artistic rendering, etc.
This is a versatile tool, useful to visualize and explore complex image data,
as well as elaborate custom image processing pipelines (see these
slides to get more information about
the motivations and goals of the G’MIC project).
Here we look at the descriptions of some of the most significant filters recently added. We illustrate their usage
from the G’MIC plug-in for GIMP. All of these filters are of course available from other interfaces as well
(in particular within the CLI tool gmic).
The filter Artistic / Brushify tries to transform an image into a painting.
Here, the idea is to simulate the process of painting with brushes on a white canvas. One provides a template image
and the algorithm first analyzes the image geometry (local contrasts and orientations of the contours), then
attempt to reproduce the image with a single brush that will be locally rotated and scaled accordingly to the
contour geometry.
By simulating enough of brushstrokes, one gets a “painted” version of the template image, which is more or less close to the original one,
depending on the brush shape, its size, the number of allowed orientations, etc.
All these settings being customizable by the user as parameters of the algorithm:
This filter allows thus to render a wide variety of painting effects.
Overview of the filter “Brushify” in the G’MIC plug-in GIMP. The brush that will be used by the algorithmis visible on the top left.
The animation below illustrates the diversity of results one can get with this filter, applied on the same
input picture of a lion. Various brush shapes and geometries have been supplied to the algorithm.
Brushify is computationally expensive so its implementation is parallelized (each core gives several brushstrokes simultaneously).
A few examples of renderings obtained with “Brushify” from the same template image, but with different brushes and parameters.
Note that it’s particularly fun to invoke this filter from the command line interface (using the option -brushify
available in gmic) to process a sequence of video frames
(see this example of “ brushified “ video):
G’MIC gets a new algorithm to reconstruct missing data in images. This is a classical problem in image processing,
often named “Image Inpainting“, and G’MIC already had a lot of
useful filters to solve this problem.
Here, the newly added interpolation method assumes only a sparse set of image data is known, for instance a few scattered pixels
over the image (instead of continuous chuncks of image data). The analysis and the reconstruction of the global
image geometry is then particularly tough.
The new option -solidify in G’MIC allows the reconstruction of dense image data from such a sparse sampling,
based on a multi-scale diffusion PDE’s-based technique.
The figure below illustrates the ability of the algorithm with an example of image reconstruction. We start from
an input image of a waterdrop,
and we keep only 2.7% of the image data (a very little amount of data!). The algorithm is able to reconstruct
a whole image that looks like the input, even if all the small details have not been
fully reconstructed (of course!). The more samples we have, the finer details we can recover.
Reconstruction of an image from a sparse sampling.
As this reconstruction technique is quite generic, several new G’MIC filters takes advantage of it:
Filter Repair / Solidify applies the algorithm in a direct manner, by reconstructing transparent areas
from the interpolation of opaque regions.
The animation below shows how this filter can be used to create an artistic blur on the image borders.
Overview of the “Solidify” filter, in the G’MIC plug-in for GIMP.
From an artistic point of view, there are many possibilities offered by this filters.
For instance, it becomes really easy to generate color gradients with complex shapes, as shown with the two examples below
(also in this video that details the whole process).
Using the “Solidify” filter of G’MIC to easily create color gradients with complex shapes (input images on the left, filter results on the right).
Filter Artistic / Smooth abstract uses same idea as the one with the waterdrop image:
it purposely sub-samples the image in a sparse way, by choosing keypoints mainly on the image edges, then use the reconstruction
algorithm to get the image back. With a low number of samples, the filter can only render a piecewise smooth image,
i.e. a smooth abstraction of the input image.
Overview of the “Smooth abstract” filter in the G’MIC plug-in for GIMP.
Filter Rendering / Gradient [random] is able to synthetize random colored backgrounds. Here again, the filter initializes
a set of colors keypoints randomly chosen over the image, then interpolate them with the new reconstruction algorithm.
We end up with a psychedelic background composed of randomly oriented color gradients.
Overview of the “Gradient [random]” filter in the G’MIC plug-in for GIMP.
Simulation of analog films : the new reconstruction algorithm also allowed a major improvement
for all the analog film emulation filters that have been present in G’MIC for years.
The section Film emulation/ proposes a wide variety of filters for this purpose. Their goal is to apply color transformations
to simulate the look of a picture shot by an analogue camera with a certain kind of film.
Below, you can see for instance a few of the 300 colorimetric transformations that are available in G’MIC.
A few of the 300+ color transformations available in G’MIC.
From an algorithmic point of view, such a color mapping is extremely simple to implement :
for each of the 300+ presets, G’MIC actually has an HaldCLUT, that is
a function defining for each possible color (R,G,B) (of the original image), a new color (R’,G’,B’) color to set
instead. As this function is not necessarily analytic, a HaldCLUT is stored in a discrete manner as a lookup table that gives
the result of the mapping for all possible colors of the RGB cube (that is 2^24 = 16777216 values
if we work with a 8bits precision per color component). This HaldCLUT-based color mapping is illustrated below for all values of the RGB color cube.
Principle of an HaldCLUT-based colorimetric transformation.
This is a large amount of data: even by subsampling the RGB space (e.g. with 6 bits per component) and compressing the corresponding HaldCLUT file,
you ends up with approximately 200 and 300 kB for each mapping file.
Multiply this number by 300+ (the number of available mappings in G’MIC), and you get a total of 85MB of data, to store all these color transformations.
Definitely not convenient to spread and package!
The idea was then to develop a new lossy compression technique focused on HaldCLUT files, that is volumetric discretised vector-valued functions which are piecewise smooth by nature.
And that what has been done in G’MIC, thanks to the new sparse reconstruction algorithm. Indeed, the reconstruction technique also works with _3D_ image data (such as a HaldCLUT!), so
one simply has to extract a sufficient number of significant keypoints in the RGB cube and interpolate them afterwards to allow the reconstruction of a whole HaldCLUT
(taking care to have a reconstruction error small enough to be sure that
the color mapping we get with the compressed HaldCLUT is indistinguishable from the non-compressed one).
How the decompression of an HaldCLUT now works in G’MIC, from a set of colored keypoints located in the RGB cube.
Thus, G’MIC doesn’t need to store all the color data from a HaldCLUT, but only a sparse sampling of it (i.e. a sequence of { rgb_keypoint, new_rgb_color }).
Depending on the geometric complexity of the HaldCLUTs to encode, more or less keypoints are necessary (roughly from _30_ to 2000).
As a result, the storage of the 300+HaldCLUTs in G’MIC requires now only 850 KiB of data (instead of 85 MiB), that is a compression gain of 99% !
That makes the whole HaldCLUT data storable in a single file that is easy to ship with the G’MIC package. Now, a user can then apply all the G’MIC color transformations
while being offline (previously, each HaldCLUT had to be downloaded separately from the G’MIC server when requested).
It looks like this new reconstruction algorithm from sparse samples is really great, and no doubts it will be used in other filters in the future.
Filter Arrays & tiles / Make seamless [patch-based] tries to transform an input texture to make it tileable, so that it can be duplicated as tiles along the horizontal and vertical axes
without visible seams on the borders of adjacent tiles.
Note that this is something that can be extremely hard to achieve, if the input texture has few auto-similarity or glaring luminosity changes spatially.
That is the case for instance with the “Salmon” texture shown below as four adjacent tiles (configuration 2x2) with a lighting that goes from dark (on the left) to bright (on the right).
Here, the algorithm modifies the texture so that the tiling shows no seams, but where the aspect of the original texture is preserved as much as possible
(only the texture borders are modified).
Overview of the “Make Seamless” filter in the G’MIC plug-in for GIMP.
We can imagine some great uses of this filter, for instance in video games, where texture tiling is common to render large virtual worlds.
Result of the “Make seamless” filter of G’MIC to make a texture tileable.
A “new” filter Details / Split details [wavelets] has been added to decompose an image into several levels of details.
It is based on the so-called “à trous” wavelet decomposition.
For those who already know the popular Wavelet Decompose plug-in for GIMP, there won’t be so much novelty here, as it is mainly the same kind of
decomposition technique that has been implemented.
Having it directly in G’MIC is still a great news: it offers now a preview of the different scales that will be computed, and the implementation is parallelized to take advantage of multiple cores.
Overview of the wavelet-based image decomposition filter, in the G’MIC plug-in for GIMP.
The filter outputs several layers, so that each layer contains the details of the image at a given scale. All those layers blended together gives the original image back.
Thus, one can work on those output layers separately and modify the image details only for a given scale. There are a lot of applications for this kind of image decomposition,
one of the most spectacular being the ability to retouch the skin in portraits : the flaws of the skin are indeed often present in layers with middle-sized scales, while
the natural skin texture (the pores) are present in the fine details. By selectively removing the flaws while keeping the pores, the skin aspect stays natural after the retouch
(see this wonderful link for a detailed tutorial about skin retouching techniques, with GIMP).
Using the wavelet decomposition filter in G’MIC for removing visible skin flaws on a portrait.
G’MIC is also well known to offer a wide range of algorithms for image denoising and smoothing (currently more than a dozen). And he got one more !
Filter Repair / Smooth [patch-pca] proposed a new image denoising algorithm that is both efficient and computationally intensive (despite its multi-threaded implementation, you
probably should avoid it on a machine with less than 8 cores…).
In return, it sometimes does magic to suppress noise while preserving small details.
Result of the new patch-based denoising algorithm added to G’MIC.
The Droste effect (also known as “mise en abyme“ in art) is the effect of a picture appearing within itself recursively.
To achieve this, a new filter Deformations / Continuous droste has been added into G’MIC. It’s actually a complete rewrite of the popular Mathmap’s
Droste filter that has existed for years.
Mathmap was a very popular plug-in for GIMP, but it seems to be not maintained anymore. The Droste effect was one of its most iconic and complex filter.
Martin “Souphead”, one former user of Mathmap then took the bull by the horns and converted the complex code of this filter specifically into a G’MIC script,
resulting in a parallelized implementation of the filter.
Overview of the converted “Droste” filter, in the G’MIC plug-in for GIMP.
This filter allows all artistic delusions. For instance, it becomes trivial to create the result below in a few steps: create a selection around the clock, move it on a transparent background, run the Droste filter,
et voilà!.
A simple example of what the G’MIC “Droste” filter can do.
The filter Deformations / Equirectangular to nadir-zenith is another filter converted from Mathmap to G’MIC.
It is specifically used for the processing of panoramas: it reconstructs both the
Zenith and the
Nadir regions of a panorama so that they can be easily modified
(for instance to reconstruct missing parts), before being reprojected back into the input panorama.
Overview of the “Deformations / Equirectangular to nadir-zenith” filter in the G’MIC plug-in for GIMP.
Morgan Hardwood has wrote a quite detailled tutorial,
here on pixls.us,
about the reconstruction of missing parts in the Zenith/Nadir of an equirectangular panorama. Check it out!
Finally, here are other highlights about the G’MIC project:
Filter Rendering / Kitaoka Spin Illusion is another Mathmap filter converted to G’MIC by Martin “Souphead”. It generates a certain kind of
optical illusions as shown below (close your eyes if you are epileptic!)
Result of the “Kitaoka Spin Illusion” filter.
Filter Colors / Color blindness transforms the colors of an image to simulate different types of color blindness.
This can be very helpful to check the accessibility of a web site or a graphical document for colorblind people.
The color transformations used here are the same as defined on Coblis,
a website that proposes to apply this kind of simulation online. The G’MIC filter gives strictly identical results, but it ease
the batch processing of several images at once.
Overview of the colorblindness simulation filter, in the G’MIC plug-in for GIMP.
Since a few years now, G’MIC has its own parser of mathematical expression, a really convenient module to perform complex calculations when applying image filters
This core feature gets new functionalities: the ability to manage variables that can be complex, vector or matrix-valued, but also the creation of
user-defined mathematical functions. For instance, the classical rendering of the Mandelbrot fractal set
(done by estimating the divergence of a sequence of complex numbers) can be implemented like this, directly on the command line:
$ gmic 512,512,1,1,"c = 2.4*[x/w,y/h] - [1.8,1.2]; z = [0,0]; for (iter = 0, cabs(z)<=2 && ++iter<256, z = z**z + c); 6*iter" -map 7,2
Using the G’MIC math evaluator to implement the rendering of the Mandelbrot set, directly from the command line!_
This clearly enlarge the math evaluator ability, as you are not limited to scalar variables anymore. You can now create complex filters which are able to
solve linear systems or compute eigenvalues/eigenvectors, and this, for each pixel of an input image.
It’s a bit like having a micro-(micro!)-Octave inside G’MIC.
Note that the Brushify filter described earlier uses these new features extensively.
It’s also interesting to know that the G’MIC math expression evaluator has its own JIT compiler
to achieve a fast evaluation of expressions when applied on thousands of image values simultaneously.
Another great contribution has been proposed by Tobias Fleischer, with the creation of a new _C_
API to invoke the functions of the libgmic library
(which is the library containing all the G’MIC features, initially available through a C++API only).
As the _C_ ABI is standardized (unlike C++),
this basically means G’MIC can be interfaced more easily with languages other than C++.
In the future, we can imagine the development of G’MICAPIs for languages such as Python for instance.
Tobias is currently using this new _C_ API to develop G’MIC-based plug-ins compatible with the OpenFX standard.
Those plug-ins should be usable indifferently in video editing software such as After effects, Sony Vegas Pro
or Natron. This is still an on-going work though.
Overview of some G’MIC-based OpenFX plug-ins, running under Natron.
Another contributor Robin “Starfall Robles” started to develop a Python script
to provide some of the G’MIC filters directly in the Blender video sequence editor.
This work is still in a early stage, but you can already apply different G’MIC effects on image sequences (see this video for a demonstration).
Overview of a dedicated G’MIC script running within the Blender VSE.
You can find out G’MIC filters also in the opensource nonlinear video editor Flowblade, thanks to the hard work of
Janne Liljeblad (Flowblade project leader).
Here again, the goal is to allow the application of G’MIC effects and filters directly on image sequences, mainly for artistic purposes
(as shown in this video or this one).
Overview of a G’MIC filter applied under Flowblade, a nonlinear video editor.
As you see, the G’MIC project is doing well, with an active development and cool new features added months after months.
You can find and use interfaces to G’MIC in more and more opensource software, as
GIMP,
Krita,
Blender,
Photoflow,
Flowblade,
Veejay,
EKD and
Natron in a near future (at least we hope so!).
At the same time, we can see more and more external resources available for G’MIC : tutorials, blog articles
(here,
here,
here,…),
or demonstration videos
(here,
here,
here,
here,…).
This shows the project becoming more useful to users of opensource software for graphics and photography.
The development of version 1.7.2 already hit the ground running, so stay tuned and visit the official G’MICforum on pixls.us
to get more info about the project developement and get answers to your questions.
Meanwhile, feel the power of free software for image processing!
Catharine Morris and Michael Caines take a look at the English essayist, best known for his Confessions of an English Opium-Eater.Find out more at the-tis.co.uk
This trip report is long overdue, but I wanted to process some of my images to share with everyone before I posted.
It had been a couple of years since I had an opportunity to travel and meet with the GIMP team again (Leipzig was awesome) so I was really looking forward to this trip. I missed the opportunity to head up to the great white North for last years meeting in Toronto.
Passport? Check! Magazine? Check! Ready to head to London!
I was going to attend the pre-LGM photowalk again this year so this time I decided to pack some bigger off-camera lighting modifiers for everyone to play with. Here’s a neat travelling photographer pro-tip: most airlines will let you carry on an umbrella as a “freebie” item. They just don’t specify that it has to be an umbrella to keep the rain off you. So I carried on my big Photek Softlighter II (luckily my light stands fit in my checked luggage). Just be sure not to leave it behind somewhere (which I was paranoid about for most of my trip). Luckily I was only changing planes in Atlanta.
The new ‘futristic’ looking Atlanta airport international terminal.
A couple of (bad) movies and hours later I was in Heathrow. I figured it wouldn’t be much trouble getting through border control.
I may have been a little optimistic about that.
The Border Force agent was quite nice and super inquisitive. So much so that I actually began to worry at some point (I think I must have spent almost 20 minutes talking to her) that she might not let me in!
She kept asking what I was coming to London for and I kept trying to explain to her what a “Libre Graphics Meeting“ was. This was almost a tragic comedy. The idea of Free Software did not seem to compute to her and I was sorry I had even made the passing mention. Her attention then turned to my umbrella and photography. What was I there to photograph? Who? Why? (Come to think of it, I should start asking myself those same questions more often… It was an existential visit to the border control.)
In the end I think she got bored with my answers and figured that I was far too awkward to be a threat to anything. Which pretty much sums up my entire college dating life.
In what I hope will become a tradition we had our photowalk the day before LGM officially kicked off and we could not have asked for a better day of weather! It was partly cloudy and just gorgeous (pretty much the complete opposite to what I was expecting for London weather).
I want to thank Ruth Catlow (http://ruthcatlow.net/) for allowing us to use the awesome space at Furtherfield Commons in Finsbury Park as a base for our photowalk! They were amazingly accommodating and we had a wonderful time chatting in general about art and what they were up to at the gallery and space.
They have some really neat things going on at the gallery and space so be sure to check them out if you can!
This is one of my favorite things about being able to attend LGM. I get to take a stroll and talk about photography with friends that I only usually get to interact with through an IRC window. I also feel like I can finally contribute something back to these awesome people that provide software I use every day.
Mairi between Simon and myself (I’m holding a reflector for him).
Photo by Michael Schumachercbna
We meandered through the park and chatted a bit about various things. Simon had brought along his external flash and wanted to play with off-camera lighting. So we convinced Liam to stand in front of a tree for us and Simon ended up taking one of my favorite images from the entire trip. This was Liam standing in front of the tree under the shade with me holding the flash slightly above him and to the camera right.
Liam by Simon
We even managed to run into Barrie Minney while on our way back to the Commons building. Aryeom and I started talking a little bit while walking when we crossed paths with some locals hanging out in the park. One man in particular was quite outgoing and let Aryeom take his photo, leading to another fun image!
Upon returning to the Commons building we experimented with some of the pretty window light coming into the building along with some black panels and a model (Mairi). This was quite fun as we were experimenting with various setups for the black panels and speedlights. Everyone had a chance to try some shots out and to direct Mairi (who was super patient and accommodating while we played).
I was having so much fun talking and trying things out with everyone that I didn’t even take that many photos of my own! This is one of my only images of Mairi inside the Commons. Mairi Natural Lightcba
Towards the end of our day I decided get my big Softlighter out and to try a few things in the lane outside the Commons building. Luckily Michael Schumacher grabbed an image of us while we were testing some shots with Mairi outside.
A nice behind-the-scenes image from schumaml of the lighting setup used below.
Yes, that’s darktable developer hanatos bracing the umbrella from the wind for me! Photo by Michael Schumachercbna
I loved the lane receding in the background and thought it might make for some fun images of Mairi. I had two YN-560 flashes in the Softlighter both firing around ¾ power. I had to balance the ambient sky with the softlighter so needed the extra power of a second flash (it also helps to keep the cycle times down).
Mairi waiting patiently while we set things up. Mairi Finsburycba
50mm f/8.0 1⁄200 ISO200
Mairi Finsbury Park (In the Lane)cba
The day was awesome and I really enjoyed being able to just hang out with everyone and take some neat photos. The evening at the pub was pretty great also (I got to hang out with Barrie and his friend and have a couple of pints - thanks again Barrie!).
It never fails to amaze me how every year the LGM organizers manage to put together such a great meeting for everyone. The venue was great and the people were just fantastic at the University of Westminster.
View of the lobby and meeting rooms (on the second floor).
Andrea Ferrero (@Carmelo_DrRaw) presenting PhotoFlow in the auditorium!
The opening “State of the Libre Graphics“ presentation was done by our (the GIMP teams) very own João Bueno who did a fantastic job! João will also be the local organizer for the 2017 LGM in Rio.
Thanks to contributions from community members Kees Guequierre, Jonas Wagner, and Philipp Haegi I had some great images to use for the PIXLS.US community slides for the “State of the Libre Graphics“. If anyone is curious, here is what I submitted:
These slides can be found on our Github PIXLS.US Presentations page (along with all of our other presentations that relate to PIXLS.US and promoting the community).
I was given some time to talk about and present our community to everyone at the meeting. (See embedded slides below):
I started by looking at what my primary motivation was to begin the site and what the state of free software photography was like at that time (or not like). Mainly that the majority of resources online for photographers that were high quality (and focused on high-quality results) were usually aimed at proprietary software users. Worse still, in some cases these websites locked away their best tutorials and learning content behind paywalls and subscriptions. I finished by looking at what was done to build this site and forum as a community for everyone to learn and share with each other freely.
A nice change this year was the inclusion of an exhibition space to display works by LGM members and artists. We even got an opportunity to hang a couple of prints (for some reason they really wanted my quad-print of pippin). I was particularly happy that we were able to print and display the Green Tiger Beetle by community member Kees Guequierre:
Hanatos and houz inspecting the prints at the exhibition.
View of the Exhibition. Well attended!
pippin x5
In Leipzig I thought it would be nice to offer portraits/headshots of folks that attended the meeting. I think it’s a great opportunity to get a (hopefully) nice photograph that people can use in social media, avatars, websites, etc. Here’s a sample of portraits from LGM2014 of the GIMP team that sat for me:
In 2014 I was lucky that houz had brought along an umbrella and stand to use, so this time I figured it was only fair that I bring along some gear myself. I had the Softlighter setup on the last couple of days for anyone that was interested in sitting for us. I say us because Marek Kubica (@Leonidas) from the community was right there to shoot with me along with the very famous @Ofnuts (well - famous to me - I’ve lost count of the neat things I’ve picked up from his advice)! Marek took quite a few portraits and managed the subjects very well - he was conversational, engaged, and managed to get some great personality from them.
A couple of samples from the images that I got are here as well, and they are the local organizer Lara with students from the University! I simply can’t thank them enough for the efforts and generosity in making us feel so welcome.
I’m still working through the portraits I took, but I’ll have them uploaded to my Flickr soon to share with everyone!
One of the best parts of attendance is getting to spend some time with the rest of the GIMP crew. Here’s an action shot during the GIMP meeting over lunch with a neat, glitchy schumaml:
There’s even some darktable nerds thrown in there!
It was great to see everyone at the flat on our last evening there as well…
Everyone spending the evening together! Mitch is missing from his seat in this shot (back there by pippin).
Overall this was another incredible meeting bringing together great folks who are building and supporting Free Software and Libre Graphics. Just my kind of crowd!
I even got a chance to speak a bit with the wonderful Susan Spencer of the Valentina project and we roughed out some thoughts about getting together at some point. It turns out she lives just up the same state as me (Alabama)! This is simply too great to not take advantage of - Free Software Fashion + Photography?! That will have to be a fun story (and photos) for another day…
Keep watching the blog for some more images from the trip - up next are the portraits of everyone and some more shots of the venue and exhibition!
Sam Graydon looks at the poet Robert Browning, exploring the major role he played in the development of the dramatic monologue, with a selection of readings from his works.
It’s that time of year again! The weather is turning mild, the days are smelling fresh, and a bunch of photography nerds are all going to get together in a new country to roam around and (possibly) annoy locals by taking a ton of photographs! It’s the Pre-Libre Graphics Meeting photowalk of 2016!
Come join us the day before LGM kicks off to have a stroll through a lovely park and get a chance to shoot some photos between making new friends and having a pint.
Thanks to the wonderful work by the local LGM organizing team, we are able to invite everyone out to the photowalk on Thursday, April 14th the day before LGM kicks off.
They were able to get us in touch with the kind folks at Furtherfield Gallery & Commons in Finsbury Park. They’ve graciously offered us the use of their facilities at the Furtherfield Commons as a base to start from. So we will meet at the Commons building at 10:00 on Thursday morning.
Pre-LGM Photowalk 10:00 (AM), Thursday, April 14th Furtherfield Commons Finsbury Gate - Finsbury Park Finsbury Park, London, N4 2NQ
An overview of the photowalk venue relative to the LGM venue at the University of Westminster, Harrow:
If you would like to join us but may not make it to the Commons by 10:00, email me and let me know. I’ll try my best to make arrangements to meet up so you can join us a little later. I can’t imagine we’d be very far away (likely somewhere relatively near by in the park).
We’ll plan on meandering through the park with frequent stops to shoot images that strike our fancy. I will personally be bringing along my off-camera lighting equipment and a model (Mairi) to pose for us during the day. In case anyone wanted to play/learn a little about that type of photography.
There is no set time for finishing up. I figured we would play it by ear through lunch and to possibly all finish up at a nice pub together. (Taking advantage of the golden hour light at the end of the day hopefully).
In the spirit of saying “Thank you!” and sharing, I have also offered the Furtherfield folks our services for headshots and architectural/environmental shots of the Commons and Gallery spaces. For sure I will be taking these images for them but if anyone else wanted to pitch in and try, help, or assist the effort would be very welcome!
Dot in the Leipzig Market from the 2014 Pre-LGM photowalk.
Speaking of which, if you plan on attending and would like to explore some particular aspect of photography please feel free to let me know. I’ll do my best to match folks up based on interest. I sincerely hope this will be a fun opportunity to learn some neat new things, make some new friends, and to maybe grab some great images at the same time!
If there are any questions, please don’t hesitate to reach out to me! `patdavid@gmail.com` patdavid on irc://irc.gimp.org/#gimp
For some reason I was checking my account on the forums earlier today and noticed that it was created in April, 2015. On further inspection it looks like my, and @darix, accounts were created on April 2nd 2015.
(Not to be confused with the main site because apparently it took me about 8 months to get a forum stood up…)
Which means that the forums have been around for just over a year now?!
We’re just over a year old and just under 500 users on the forum!
For fun, I looked for the oldest (public) post we had and it looks like it’s the “Welcome to PIXLS.US Discussion“ thread. In case anyone wanted to revisit a classic…
THANK YOU so much to everyone who has made this an awesome place to be and nerd out about photography and software and more! Since we started we migrated the official G’MIC forums here as well as our friends at RawTherapee!
We’ve been introduced to some awesome projects like PhotoFlow as well as Filmulator. And everyone has just been amazing, supportive, and fun to be around.
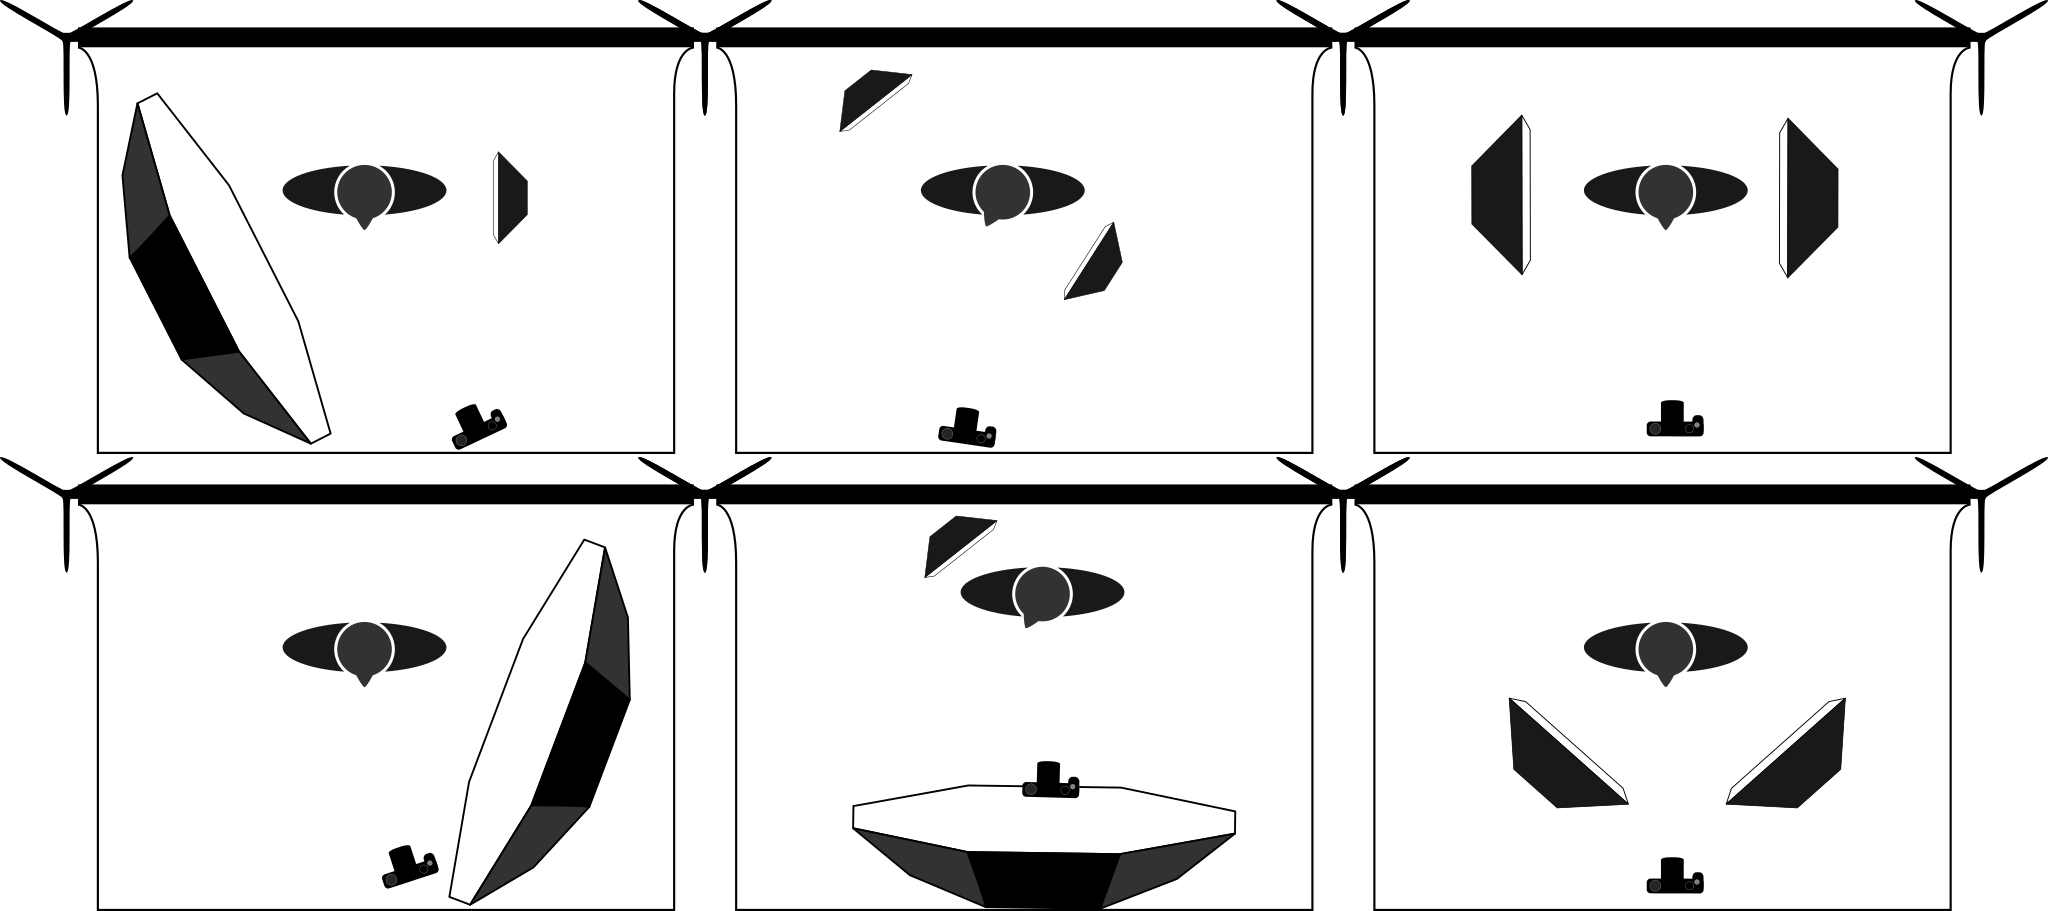
Community member Eric Mesa asked on the forums the other day if there might be some Free resources for photographers that want to build a lighting diagram of their work. These are the diagrams that show how a shot might be set up with the locations of lights, what types of modifiers might be used, and where the camera/photographer might be positioned with respect to the subject. These diagrams usually also include lighting power details and notes to help the production.
It turns out there wasn’t really anything openly available and permissively licensed. So we need to fix that…
These diagrams are particularly handy for planning a shoot conceptually or explaining what the lighting setup was to someone after the fact. For instance, here’s a look at the lighting setup for Sarah (Glance):
Sarah (Glance)
YN560 full power into a 60” Photek Softlighter, about 20” from subject.
She was actually a bit further from the rear wall…
There are a few different commercial or restrictive-licensed options for photographers to create a lighting diagram, but nothing truly Free.
So thanks to the prodding by Eric, I thought it was something we should work on as a community!
I already had a couple of simple, basic shapes created in Inkscape for another tutorial so I figured I could at least get those files published for everyone to use.
I don’t have much to start with but that shouldn’t be a problem! I already had a backdrop, person, camera, octabox (+grid), and a softbox (+grid):
Even better: join the organization and fork the repo to add your own additions and to help us flesh out the available diagram assets for all to use!
From the README.md on that repo, I compiled a list of things I thought might be helpful to create:
Cameras
DSLR
Mirrorless
MF
Strobes
Speedlight
Monoblock
Lighting Modifiers
Softbox (+ grid?)
Umbrella (+ grid?)
Octabox (+ grid?)
Brolly
Reflectors
Flags
Barn Doors / Gobo
Light stands? (C-Stands?)
Environmental
Chairs
Stools
Boxes
Backgrounds (+ stands)
Models
If you don’t want to create something from scratch, perhaps grabbing the files and tweaking the existing assets to make them better in some way?
Hopefully we can fill out the list fairly quickly (as it’s a fairly limited subset of required shapes). Even better would be if someone picked up the momentum to possibly create a nice lighting diagram application of some sort!
On the old RawTherapee forums they used to have a contest sharing a single raw file amongst the members to see how everyone would approach processing from the same starting point. They called it PlayRaw. This seemed to really bring out some great work from the community so I thought it might be fun to start doing something similar again here.
I took a (relatively) recent image of Mairi and decided to see how it would be received (I’d say fairly well given the responses). This was my result from the raw file that I called Mairi Troisième:
The only things I asked for was to see the results and possibly the processing steps through either an XMP or PP3 sidecar file (darktable and RawTherapee respectively).
Here’s a montage of the results from everyone:
I loved being able to see what everyone’s approaches looked like. It’s neat to get a feel for all the different visions out there among the users and there were some truly beautiful results!
If you haven’t given it a try yourself yet, head on over to the [PlayRaw] Mairi Troisieme thread to get the raw file and try it out yourself! Just don’t forget to show us your results in the topic.
I’ll be soliciting options for a new image to kick off another round of processing again soon.
Donations go to help cover to costs of various projects to come together and meet, photograph, discuss, and hack at things. Please consider donating as every little bit helps us immensely! If you can’t donate then please consider helping us to raise awareness of what we’re trying to do! Either link the Pledgie campaign to others or let them know we’re here to help and share!
Even better is if you’re in the vicinity of London this April 15–18! Come out and join us as well as many other awesome Free Software projects all focused on the graphics community! We (PIXLS) will be conducting photowalks and meet-ups the Thursday before LGM kicks off as well!
Oh, and I finally did convince Mairi to join us through the weekend to model for us as needed. She’s super awesome and worth raising a glass to/with! Even more reason to come out and join us!
Some of you may know I exclusively use Contax manual focus lenses on my Canon cameras. I have had one reliable adapter from the start, that just happened to be perfect in every way: perfectly parallel, and lets my lenses focus exactly to infinity, and none of my lenses hit the mirror on my 5D.
However, swapping adapters between cameras gets mighty tedious, so recently I have been trying a variety of different adapters for my cameras, several quality tiers ranging from the cheapest ($15) up to the most expensive ($70).
However, I wasn’t satisfied with any of them. In order to assure that the adapted lenses can focus to infinity even with manufacturing tolerances, they’re made thinner than necessary. This means that they focus past infinity, and with some lenses the mirror of my 5D would hit the back of the lens, needing me to wiggle it to free the mirror after taking a photo.
I measured my fancier Fotodiox Pro adapter, and found that not only was it too thin, but it was unevenly thick! The top was 8 thousandths of an inch thin, the bottom right was 2 thousandth of an inch thin, and the bottom left was exactly the right thickness.
I decided I could do something about it.
I bought some shim stock from McMaster Carr, plastic and 2 thousandths of an inch thick, figuring I might be able to fold it to build up thickness if necessary. (Spoiler: it does fold.) It comes as a giant sheet five by twenty inches, but you’ll only need the tiniest amount of it.
Then I went about removing the screws that hold the two sides together.
The screws are incredibly small.
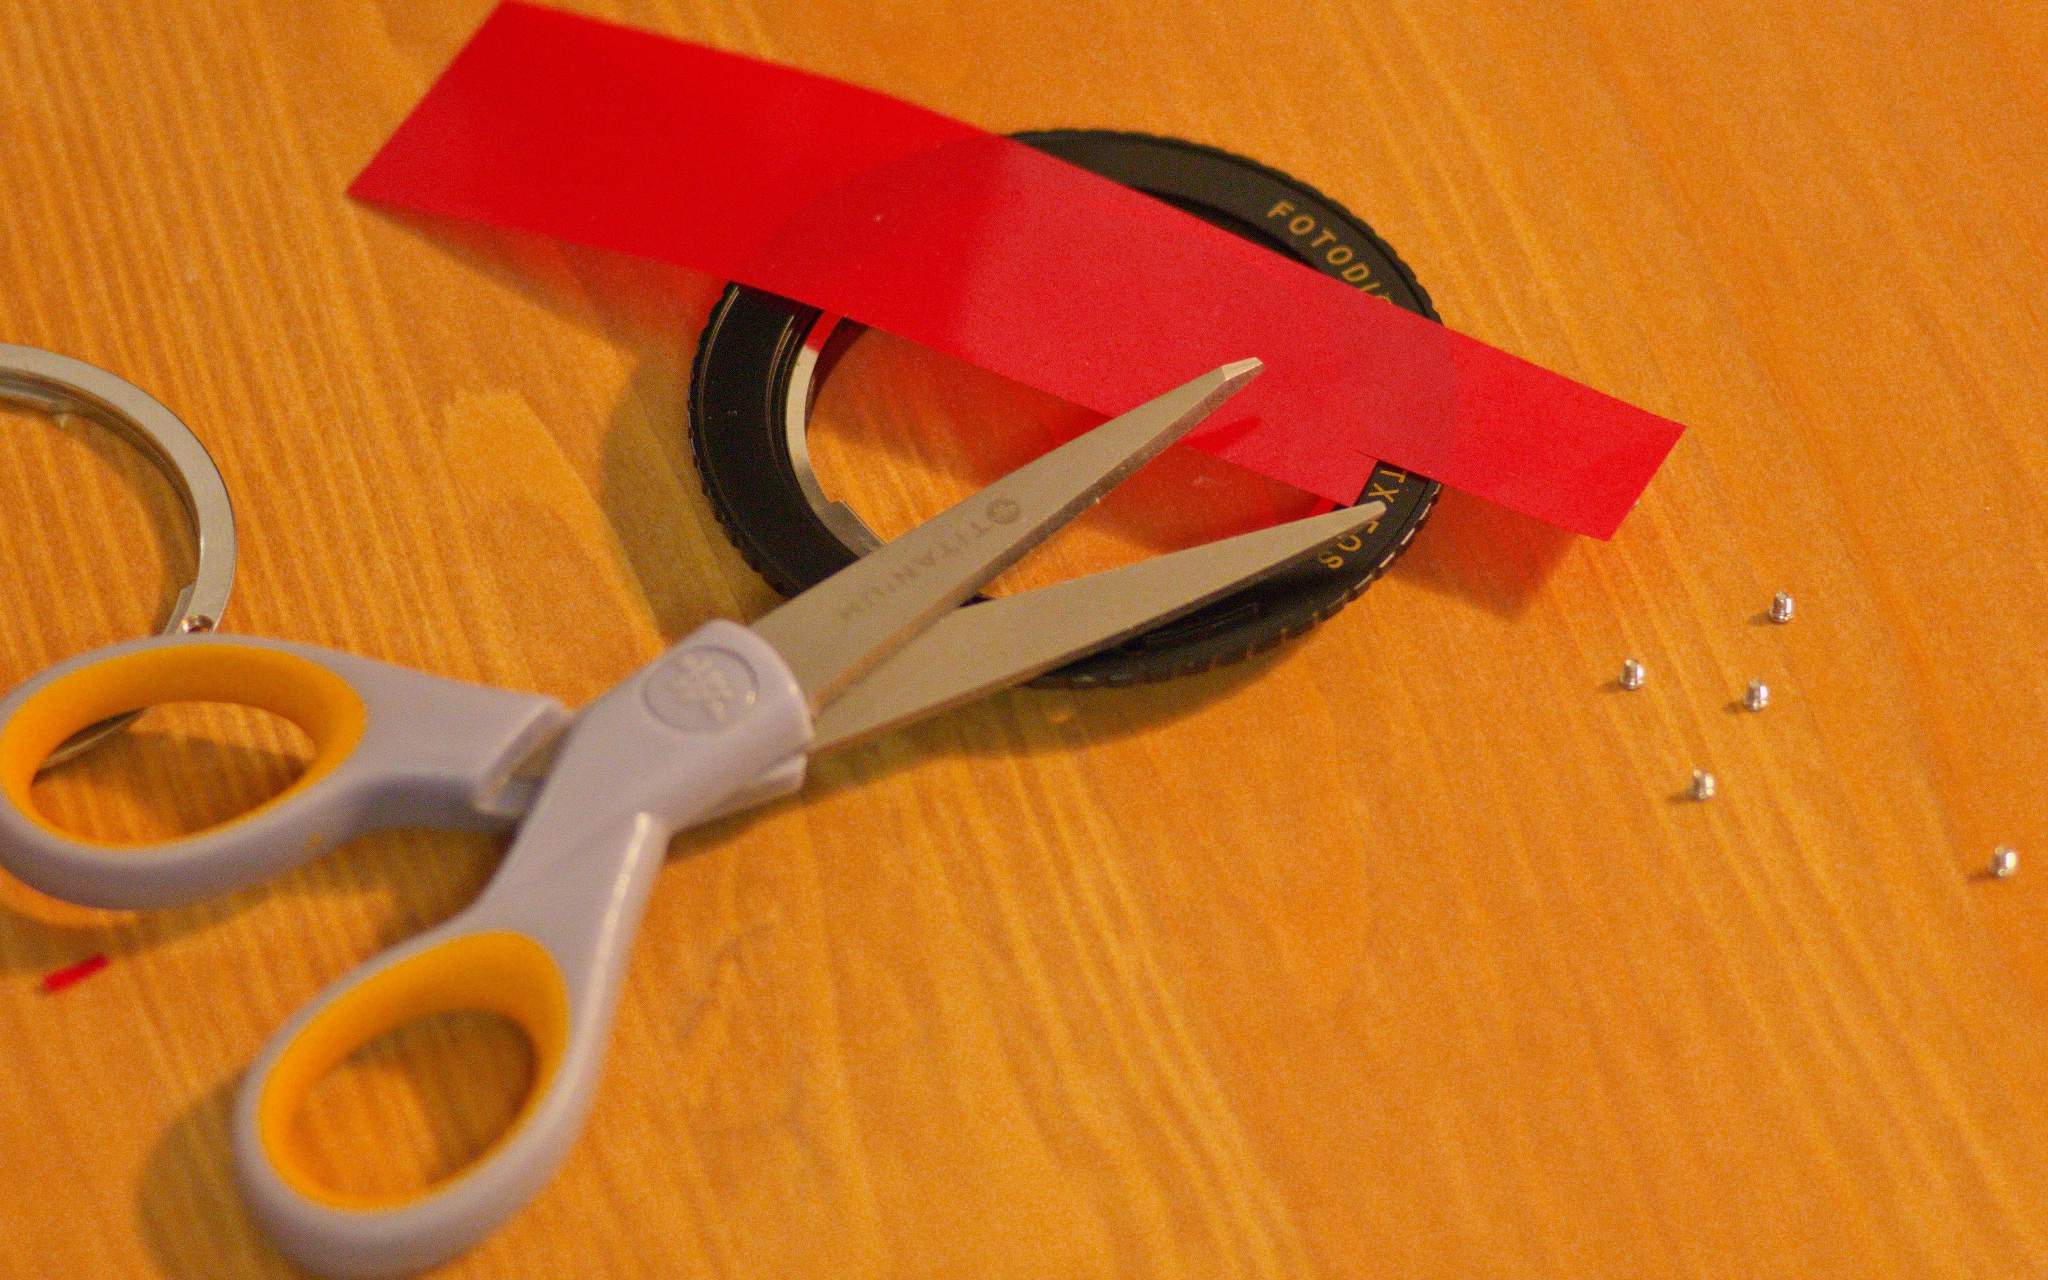
Here you can see that there are only three points on the ring that actually control the thickness; I point to one with the scissors. I had to be careful when measuring the thickness to only measure it between the screws, and that was challenging because the EF mount diameter is larger than the C/Y mount diameter, and there was only the slightest overlap between the outside of the C/Y registration surface and the inside of the EF mount.
Next I just cut a narrow strip out of this piece of shim stock using scissors, and put slits in it so it could fold more easily.
The right hand shim is folded in the shape of a W, and the left hand shim is only one layer.
The thicker shim went on the top, and the thinner shim went on the bottom-right.
Put the ring back on, and then…
Reinstall the screws.
Test your lenses for infinity focus and, if applicable, mirror slap, and rejoice if they’re good!
If you don’t have a perfect adapter as a reference for the proper thickness, you can first adjust the adapter to be perfectly even thickness all the way around, and then you can add thickness uniformly until your lenses just barely focus to infinity. It might be time consuming, but it’s very rewarding being able to trust the infinity stop on your lenses.
This method isn’t only applicable to the two-part SLR->SLR Fotodiox adapters; it should also work for SLR or rangefinder to mirrorless adapters as well.
I’ve seen it written that you can’t be sure whether or not your adapters are even thickness all the way around, but with this technique, you can make sure that your adapters are perfect.
Carlo originally posted this as a thread on the forums but I thought it would be useful as a post. He has graciously allowed us to re-publish it here. –Pat
Mika Ross-Southall and Michael Caines look at the enduring appeal of Thomas Chatterton, an icon of thwarted Romantic genius, and how he became a figure of especial importance for Oscar Wilde.
To mark the centenary of Henry James's death, Catharine Morris and Michael Caines trace the course of his work as it was discussed in his lifetime – and as some of it appeared in the TLS itself.

 Login
Login