With Stig Abell and Lucy Dallas. Lionel Shriver castigates the arrogant British for snootiness over American English; David Coward tells the story of Simon Leys, "the man who did for Mao" and who called Sartre a "windbag"; and Kate Bingham reads her poem "This hair".
Noise in digital images is similar to film grain in analogue photography. In
digital cameras, noise is either created by the amplification of digital
signals or heat produced by the sensor. It appears as random, colored speckles
on an otherwise smooth surface and can significantly degrade image quality.
Noise is always present, and if it gets too pronounced, it detracts from the
image and needs to be mitigated. Removing noise can decrease image quality or
sharpness. There are different algorithms to reduce noise, but the best option
is if having profiles for a camera to understand the noise patterns a camera
model produces.
Noise reduction is an image restoration process. You want to remove the digital
artifacts from the image in such a way that the original image is discernible.
These artifacts can be just some kind of grain (luminance noise) or colorful,
disturbing dots (chroma noise). It can either add to a picture or detract from
it. If the noise is disturbing, we want to remove it. The following pictures
show a picture with noise and a denoised version:
To get the best noise reduction, we need to generate noise profiles for each
ISO value for a camera.
Creating the pictures for noise profiling
For every ISO value your camera has, you have to take a picture. The pictures
need to be exposed a particular way to gather the information correctly. The
photos need to be out of focus with a widespread histogram like in the
following image:
We need overexposed and underexposed areas, but mostly particularly the grey
areas in between. These areas contain the information we are looking for.
Let’s go through the noise profile generation step by step. For easier creation
of the required pictures, we will create a stencil which will make it easier to
capture the photos.
Building a profiling testbed
Requiements
A dark room (wait till night time)
Monitor
Printer
Sheets of black thick paper (DIN A3, >= 200g/m²)
White paper
Scissors
Sellotape (Tesafilm)
First you need to get some thicker black paper or cardboard. No light should shine
through it! Then you need to print out a gradient on white paper. Light
should shine through the white paper!
I got black thick paper (DIN A3, >= 200g/m²) and used two sheets. You need to
be able to cover your monitor with the black paper. Put the printed gradient in
the middle and draw around it. From three sides (bottom, left, top) make the
window smaller by 1 cm, see Figure 1. On the right we need to have a gap.
Figure 1: Drawn window reduced by 1 cm on the bottom, left and top.
Next is to cut out the window and type the gradient onto the black paper like
in Figure 2. It is important that there is a gap between the white and the
black paper on the white side of the gradient. We need light for an overexposed
area.
Figure 2: The gradient taped into the window of the black paper.
Once you have done that go to your monitor and make it all white. You can an
all white image for that. Then tape the sheets to your monitor
like in Figure 3.
Figure 3: The sheets of black paper taped to the monitor.
Taking the pictures
It is time to get your camera. You need to shoot in RAW. It is best to turn off
any noise reduction especially long exposure noise reduction. Mount the camera
on a tripod and use a lens between 35 mm to 85 mm (full frame). I used a 85 mm
f/1.4 lens.
Make sure the gradient fills most of the frame. Set your camera to manual focus
and focus on infinity. Select the manual mode of your camera and choose the
fastest aperture and ISO100. Depending on the lens you’re using you might want
to close the aperture. For me f/1.4 was too blurry and I closed it till f/4.0.
You don’t want to see any edges or any structure on the paper but be too
blurry. You want to still see the gradient but we want nice transitions between
different lightning zone black -> grey -> white like in Figure 4.
Now you need to set the shutter speed. Make the picture really dark and then
make the shutter speed longer till the gap which gives us the white from the
monitor is overexposed, pure white see Figure 4. The black around the white
paper should be underexposed (pure black).
Figure 3: Example shot for noise.
Now you need to take a picture for each ISO value of your camera. When you
increase the ISO value you need to decrease the shutter speed!
If this gives you the help of the tool, continue with STEP 2 otherwise go to
STEP 1a. Packages for openSUSE, Fedora, Ubuntu and Debian packaging the noise
tools can be found
here.
STEP 1a
Your darktable installation doesn’t offer the noise tools so you need to
compile it yourself. Before you start make sure that you have the following
dependencies installed on your system:
This will automatically do everything for you. Note that this can take quite
some time to finish. I think it took 15 to 20 minutes on my machine. If a
picture is not exposed correctly, the tool will tell you the image name and you
have to recapture the picture with that ISO. Remove the non-working picture.
The tool will tell you, once completed, how to test and verify the
noise profiles you created.
Once the tool finished, you end up with a tarball you can send to darktable for
inclusion. You can open a bug here
The interesting files are the presets.json file (darktable input) and, for the
developers, the noise_result.pdf file. You can find an example PDF
here. It is a
collection of diagrams showing the histogram for each picture and the results
of the calculations.
Are we hard-wired to feel other people’s pain? And if so, is it necessarily a good thing? Andrew Scull has reviewed three new books on empathy and joins us to tell us more; Charles Dickens's love of all things theatrical – in life as in art – is no secret. Robert Douglas-Fairhurst considers fifty years' worth of Dickens adaptations for the stage (and film)
Books
The Empathy Instinct by Peter Bazalgette
Against Empathy: The case for rational compassion by Paul Bloom
The Invention of Humanity: Equality and cultural difference in world history by Siep Stuurman
Dickensian Dramas: Plays from Charles Dickens (Volume One, edited by Jacky Bratton; Volume Two, edited by Jim Davis
Who are the most exciting novelists from the British Isles currently working? In a spirit of mischief, the TLS asked 200 notable names in the publishing industry (editors, agents, publishers and writers) to nominate those at the top of their literary game. The critic Alex Clark and TLS fiction editor Toby Lichtig join us in the studio to pick through the results
The political philosopher John Gray discusses the failures of liberalism; as the TLS publishes its 6,000th issue, Ruth Scurr delves into the back issues to explore how the paper has changed, and how it reflects literary culture more broadly; the TLS's poetry editor Alan Jenkins reads two of his favourite poems from the past century: D. J. Enright 's "The Laughing Hyena, by Hokusai" and "In Your Mind" by Carol Ann Duffy
Literary prizes come in more shapes and sizes than ever before: we have prizes that echo the Man Booker, and prizes that set out not to be the Man Booker; we have prizes for first novels, second novels, crime novels that don’t feature violence against women, and, more satirically, a prize for “bad sex in fiction”. Why do we need so many? Do we need them at all? And how do prizes work not only for writers but for those people who do all the reading (and sometimes arguing): the judges? The TLS's Michael Caines chairs a lively discussion between Toby Lichtig, the fiction editor of the TLS, and Alex Clark, a critic and regular prize judge/chair. This live event was a collaboration with BookMachine.
Science reporter Jennie Erin Smith joins us to discuss our desire, or evolutionary compulsion, to delve into the minds of other animals, from cows and penguins to the dismally misunderstood hyena; the TLS's George Berridge shares new insights into the work of Cormac McCarthy and the various (failed) attempts at adapting his novels; much has been said about how literary blogs killed off 'proper', print criticism. Jennifer Howard explains why the picture is far more complicated, and positive, than that
O artista Hélio Ziskind fala um pouco mais sobre a música Amigos do Peito e seu processo de criação.
Conheça o novo canal do Hélio Ziskind, o ZiS: http://goo.gl/j9YhRn
Venha conferir a nova versão de Amigos do Peito: https://goo.gl/Ro41eR
Miranda Seymour reveals the peculiar circumstances surrounding the marriage of Lord Byron's daughter and his super-fan, William King; just how seriously should we be taking the Virtual Reality revolution? Tom Rachman cautiously probes the frontier of what is possible; Death Row attorney Clive Stafford Smith shares the story of Billy Neal Moore, a tale of murder, hope and Mother Theresa; and finally, before the winner of the Republic of Consciousness Prize for small presses is revealed, the TLS's Fiction editor Toby Lichtig meets Neil Griffiths, the prize's founder, to find out more
Dale Salwak, the editor of a new collection of essays, tells us why he wanted to probe this most complicated of relationships, while Judy Carver, the daughter of William Golding – he of Lord of the Flies – sheds light on her father’s difficult relationship with his mother; Charlotte Shane introduces us to Marjorie Hillis, who, in the 1930s, taught American women how to "live alone and like it"; finally, TLS editor Catharine Morris considers the difficult genesis of Latvian literature
David Baddiel – comedian and, as per his Twitter profile, Jew – joins us to discuss whether Jewishness is inherently funny; as Italians prepare to elect their next prime minister (an unenviable choice between undesirables and impossibles), Tim Parks – author, translator, and resident of Italy – talks us through the excessively complicated mess that is Italy
Just how odd was Isaac Newton? Quite, it turns out, because as well as being one of history’s greatest mathematicians, he was also an alchemist and a millenarian, happily wallowing in conspiracy theories – Oliver Moody joins us to tell us more; did the Cold War ever end? Not as straightforward a question as you might think – the historian David Motadel considers a controversial new book; and finally, Thea Lenarduzzi discusses Greta Gerwig and her Oscar-nominated film Lady Bird
This special episode – a live recording of an event at Hay Festival, in Cartagena, Colombia, earlier this year – features a discussion with two novelists: Fiona Mozley, whose Booker-shortlisted novel Elmet caused a stir last year, and Lisa McInerney, an Irish writer described by the TLS as “busily combining the traditions of hardcore Irish crime writing with fast-talking foul-mouthed wit and gentle good humour”.
The IMAGE team of the GREYC laboratory (UMR CNRS 6072, Caen, France) is pleased to announce the release of a new 2.2 version of G’MIC, its open-source, generic, and extensible framework for image processing. As we already did in the past, we take this opportunity to look at the latest notable features added since the previous major release (2.0, last June).
Note 1: click on a picture to view a larger version.Note 2: This is a translation of an original article, in French, published on Linuxfr.
1. Context and recent evolutions
G’MIC is a free and open-source software developed since August 2008 (distributed under the CeCILL license), by folks in the IMAGE team at the GREYC, a French public research laboratory located in Caen and supervised by three institutions: the CNRS, the University of Caen, and the ENSICAEN engineering school. This team is made up of researchers and lecturers specialized in the fields of algorithms and mathematics for image processing.
As one of the main developer of G’MIC, I wanted to sum up the work we’ve made on this software during these last months.
Fig. 1.1: The G’MIC project logo, and its cute little mascot “Gmicky” (designed by David Revoy).
G’MIC is multi-platform (GNU/Linux, MacOS, Windows …) and provides many ways of manipulating generic image data, i.e. still images or image sequences acquired as hyperspectral 2D or 3D floating-point arrays (including usual color images). More than 950 different image processing functions are already available in the G’MIC framework, this number being expandable through the use of the G’MIC scripting capabilities.
Fig.1.2: The G’MIC-Qt plugin for GIMP, currently the most popular G’MIC interface.
Since the last major version release there have been two important events in the project life:
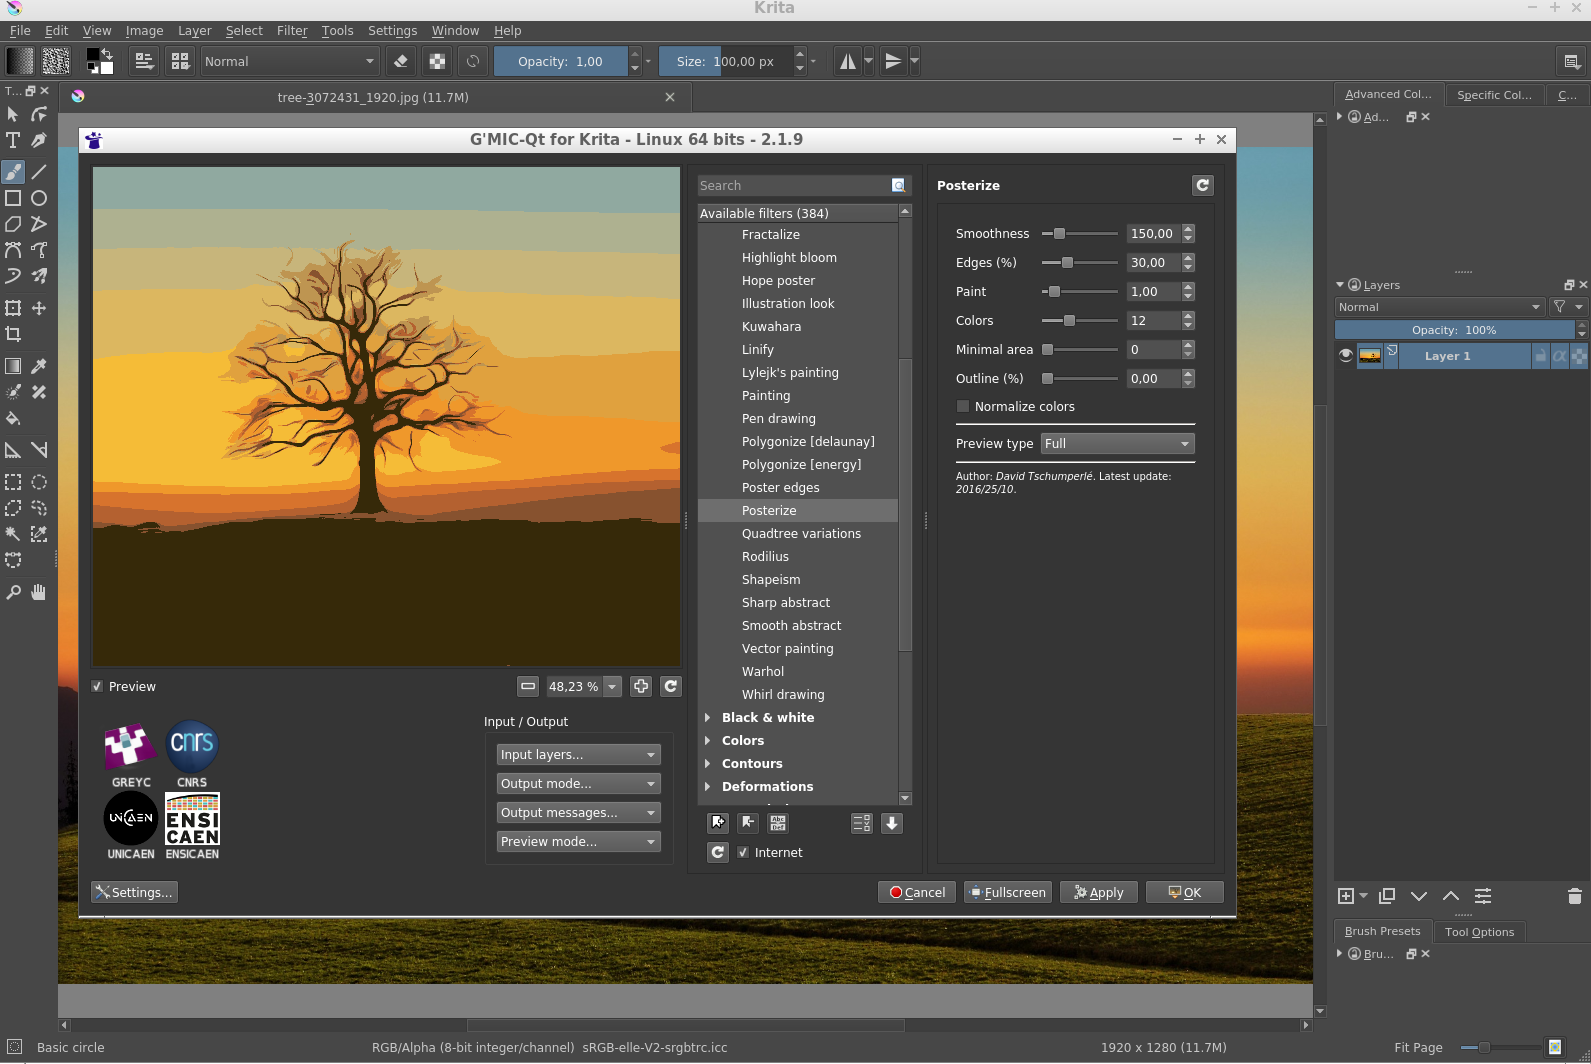
When we released version 2.0 of G’MIC a few months ago, we were happy to announce a complete rewrite (in Qt) of the plugin code for GIMP. An extra step has been taken, since this plugin has been extended to fit into the open-source digital painting software Krita.
This has been made possible thanks to the development work of Boudewijn Rempt (maintainer of Krita) and Sébastien Fourey (developer of the plugin). The G’MIC-Qt plugin is now available for Krita versions 3.3+ and, although it does not yet implement all the I/O functionality of its GIMP counterpart, the feedback we’ve had so far is rather positive.
This new port replaces the old G’MIC plugin for Krita which has not been maintained for some time. The good news for Krita users (and developers) is that they now have an up-to-date plugin whose code is common with the one running in GIMP and for which we will be able to ensure the maintenance and further developments.
Note this port required the writing of a source file host_krita.cpp (in C++) implementing the communication between the host software and the plugin, and it is reasonable to think that a similar effort would allow other programs to get their own version of the G’MIC plugin (and the 500 image filters that come with it!).
Fig. 1.3: Overview of the G’MIC-Qt plugin running on Krita.
Another major event concerns the new license of use : The CeCILL-C license (that is in the spirit of the LGPL) is now available for some components of the G’MIC framework. This license is more permissive than the previously proposed CeCILL license (which is GPL-compatible) and is more suitable for the distribution of software libraries. This license extension (now double licensing) applies precisely to the core files of G’MIC, i.e. its C++ library libgmic. Thus, the integration of the libgmic features (therefore, all G’MIC image filters) is now allowed in software that are not themselves licensed under GPL/CeCILL (including closed source products).
The source code of the G’MIC-Qt plugin, meanwhile, remains distributed under the single CeCILL license (GPL-like).
2. Fruitful collaboration with David Revoy
If you’ve followed us for a while, you may have noticed that we very often refer to the work of illustrator David Revoy for his multiple contributions to G’MIC: mascot design, ideas of filters, articles or video tutorials, tests of all kinds, etc. More generally, David is a major contributor to the world of free digital art, as much with the comic Pepper & Carrot he produces (distributed under free license CC -BY), as with his suggestions and ongoing bug reports for the open-source software he uses.
Therefore, it seems quite natural to devote a special section to him in this article, summarizing the different ideas, contributions and experiments he has brought to G’MIC just recently. A big thank you, David for your availability, the sharing of your ideas, and for all your work in general!
Let’s first mention the progress made on the Black & White / Colorize lineart (smart-coloring) filter that had appeared at the time of the 2.0G’MIC release.
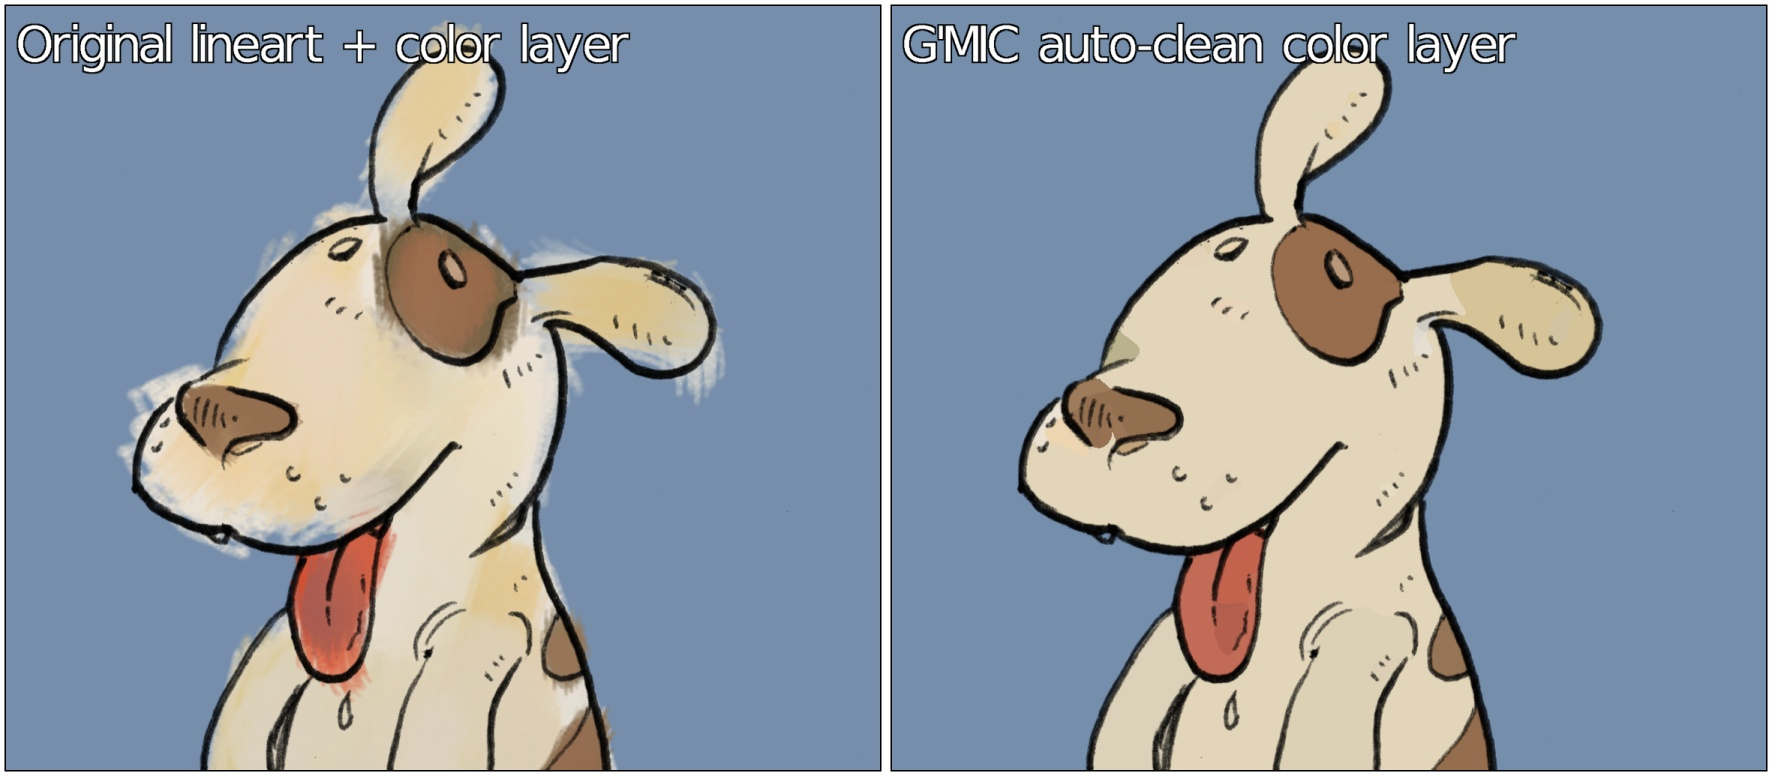
This filter is basically a lineart colorization assistant which was developed in collaboration with David. It tries to automatically generate a colorization layer for a given lineart, from the analysis of the contours and the geometry of that lineart. Following David‘s suggestions, we were able to add a new colorization mode, named “Autoclean“. The idea is to try to automatically “clean” a coloring layer (made roughly by the user) provided in addition to the lineart layer, using the same geometric analysis as for the previous colorization modes.
The use of this new mode is illustrated below, where a given lineart (left) has been colorized approximately by the user. From the two layers line art + color layer, our “Autoclean“ algorithm generates an image (right), where the colors do not overflow the lineart contours (even for “virtual” contours that are not closed). The result is not always perfect, but nevertheless reduces the time spent in the tedious process of colorization.
Fig. 2.1: The new “Autoclean” mode of the lineart colorization filter can automatically “clean” a rough colorization layer.
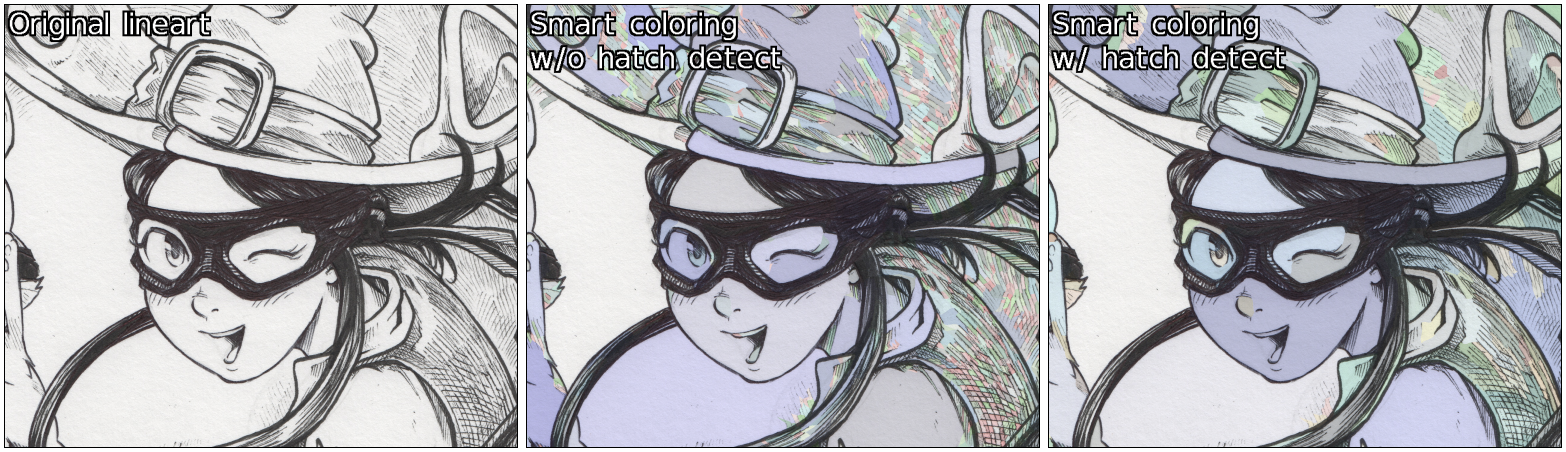
Note that this filter is also equipped with a new hatch detection module, which makes it possible to avoid generating too many small areas when using the previously available random colorization mode, particularly when the input lineart contains a large number of hatches (see figure below).
Fig. 2.2: The new hatching detection module limits the number of small colored areas generated by the automatic random coloring mode.
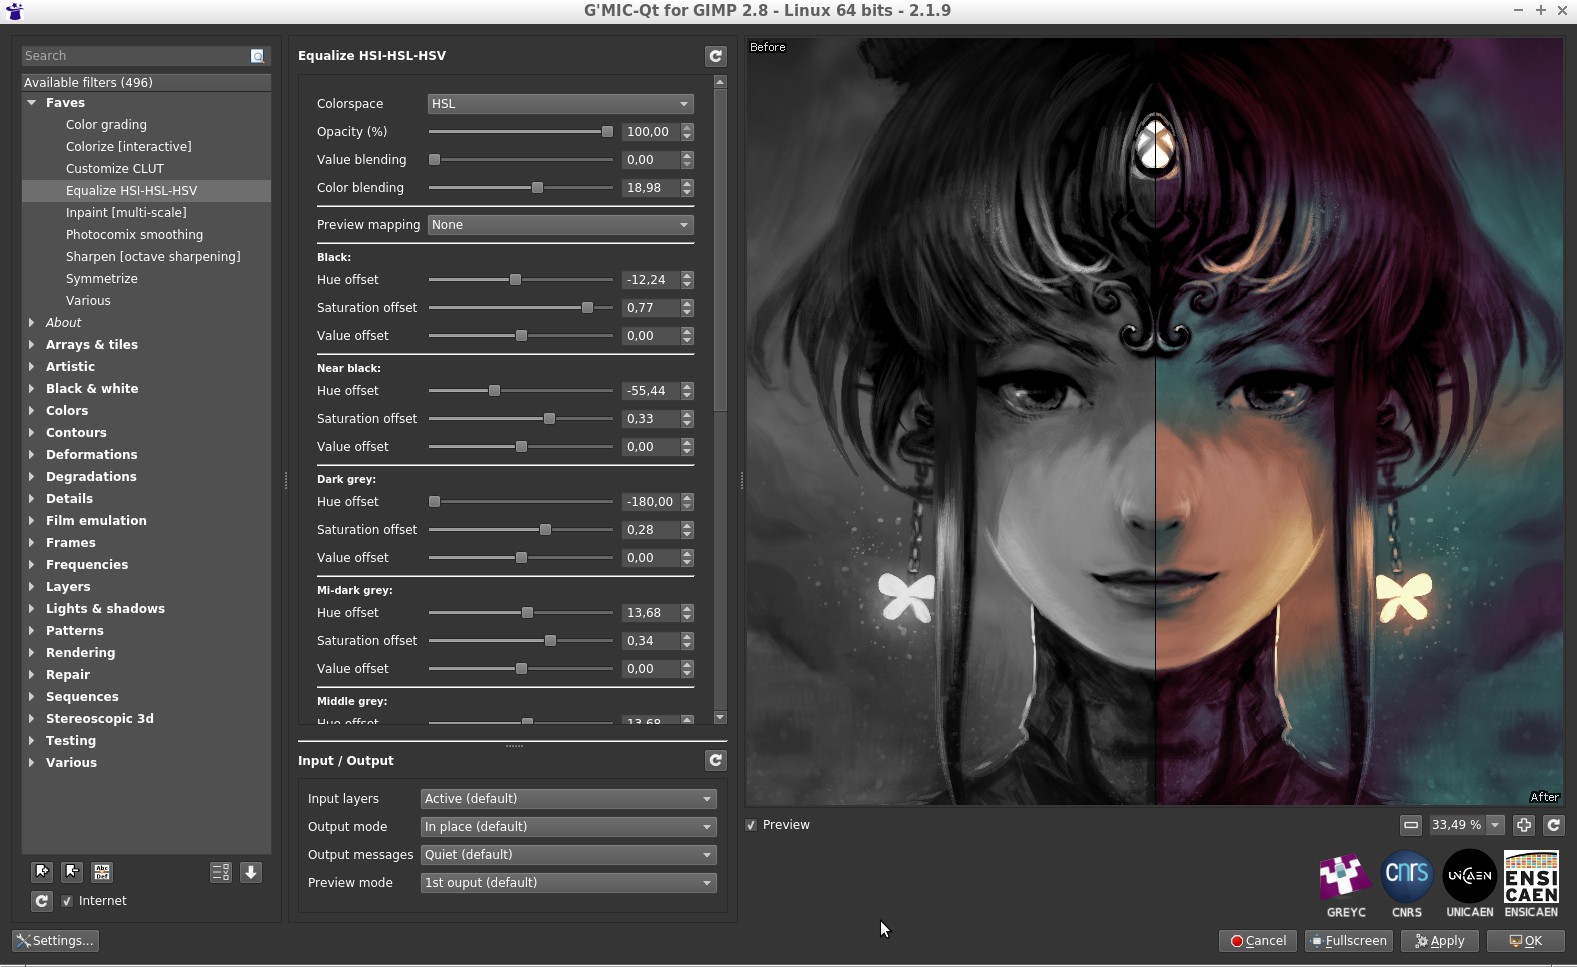
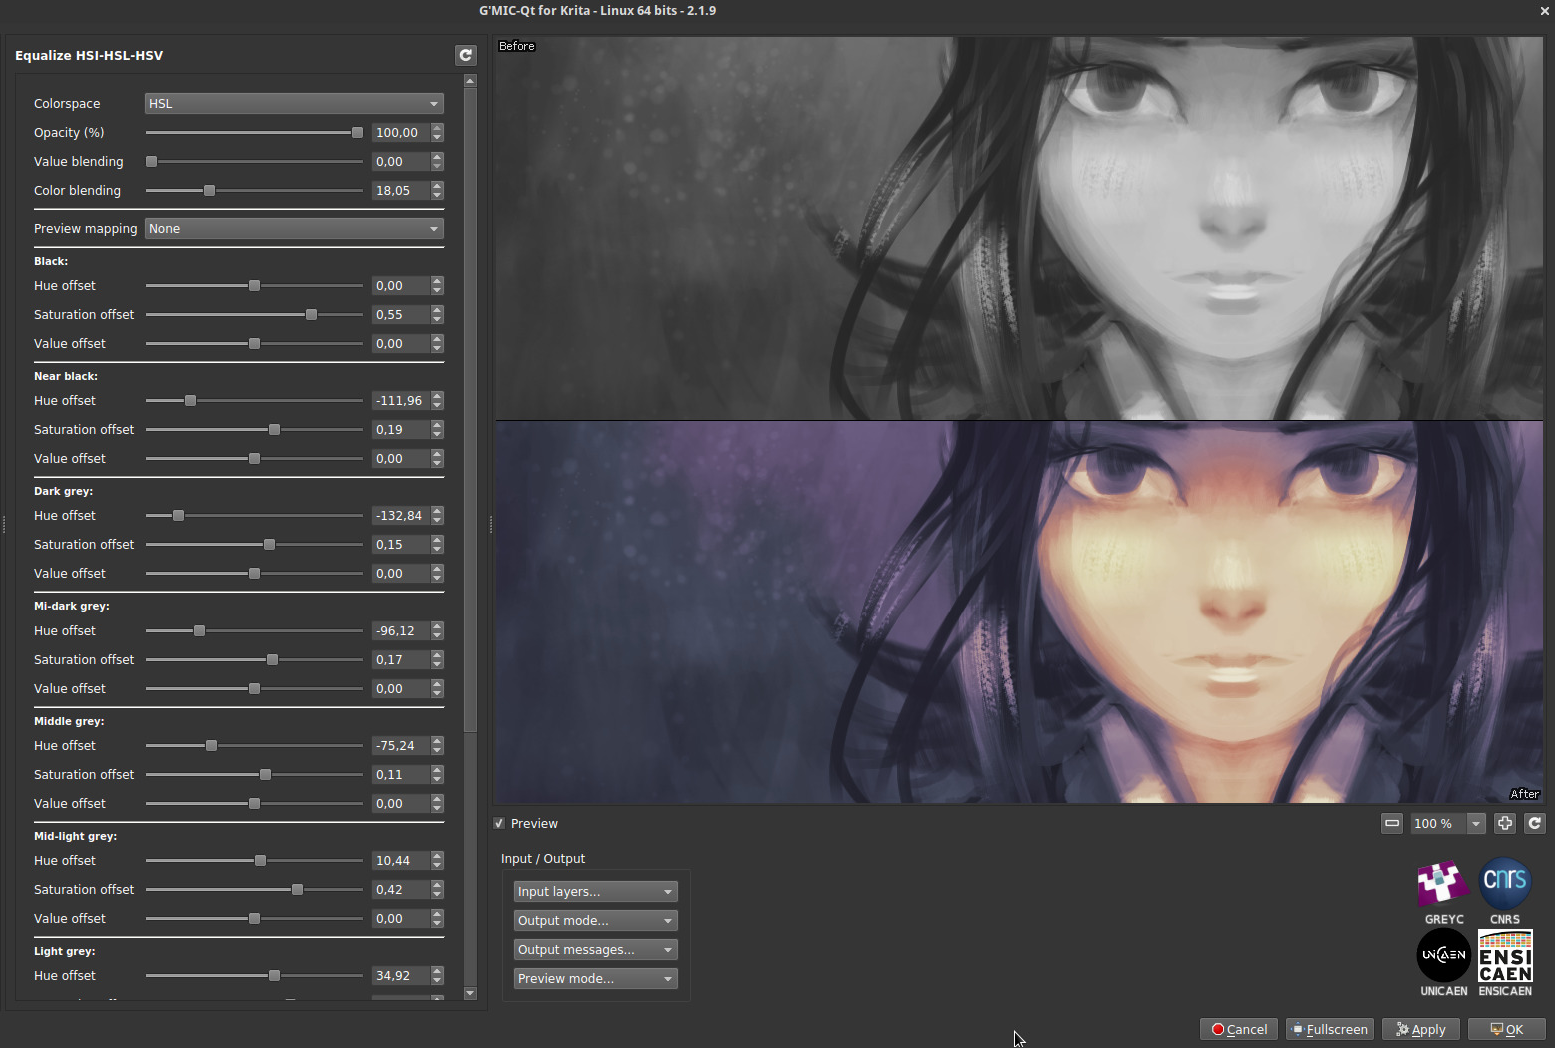
More recently, David suggested the idea of a filter to separately vary the hue and saturation of colors having certain levels of luminosity. The underlying idea is to give the artist the ability to draw or paint digitally using only grayscale, then colorize his masterpiece afterwards by re-assigning specific colors to the different gray values of the image. The obtained result has of course a limited color range, but the overall color mood is already in place. The artist only has to retouch the colors locally rather than having to colorize the entire painting by hand.
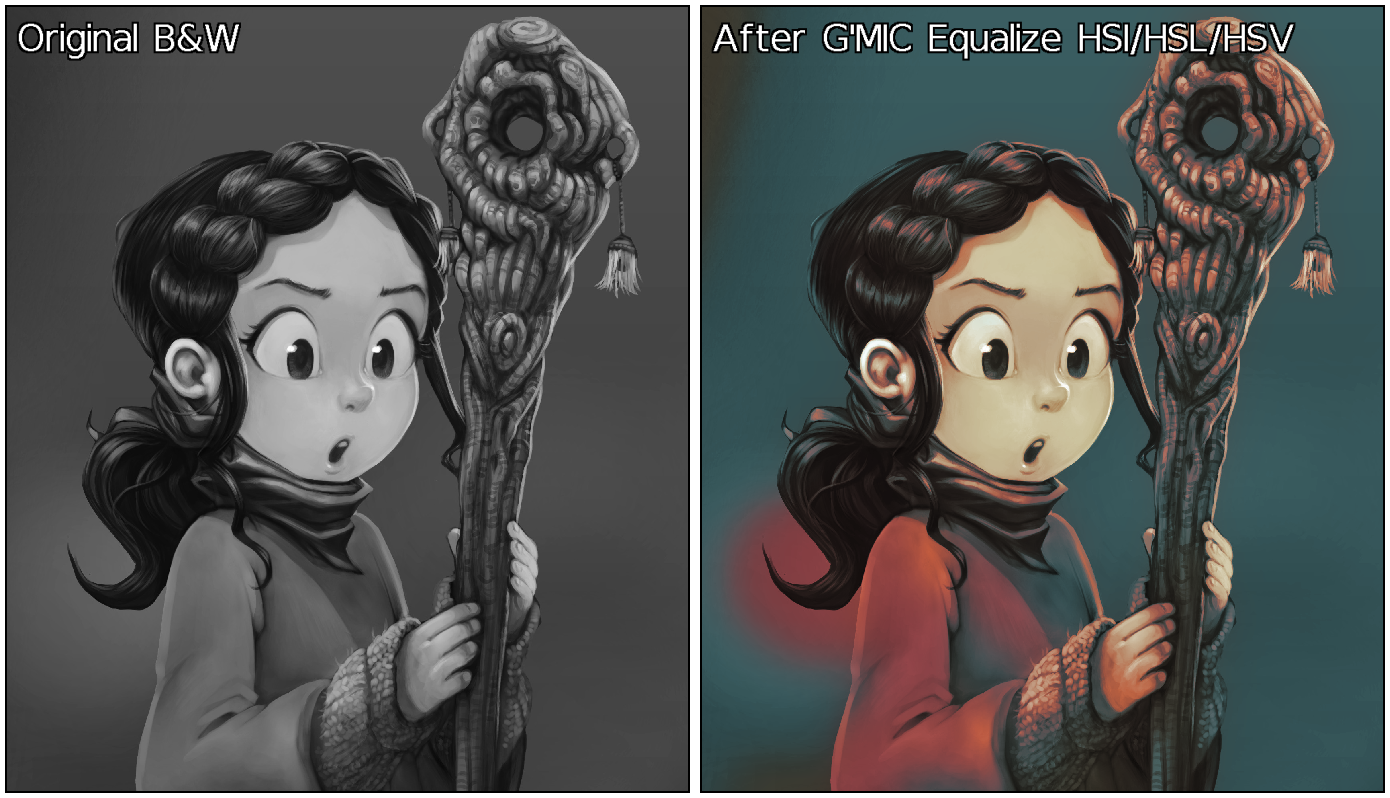
The figure below illustrates the use of this new filter Colors/Equalize HSI/HSL/HSV available in the G’MIC plugin : each category of values can be finely adjusted, resulting in preliminary colorizations of black and white paintings.
Fig. 2.3: Equalization in HSI/HSL/HSV colorspaces allows to easily set the global color mood for B&W paintings.
Note that the effect is equivalent to applying a color gradient to the different gray values of the image. This is something that could already be done quite easily in GIMP. But the main interest here is we can ensure that the pixel brightness remains unchanged during the color transformation, which is not an obvious property to preserve when using a gradient map.
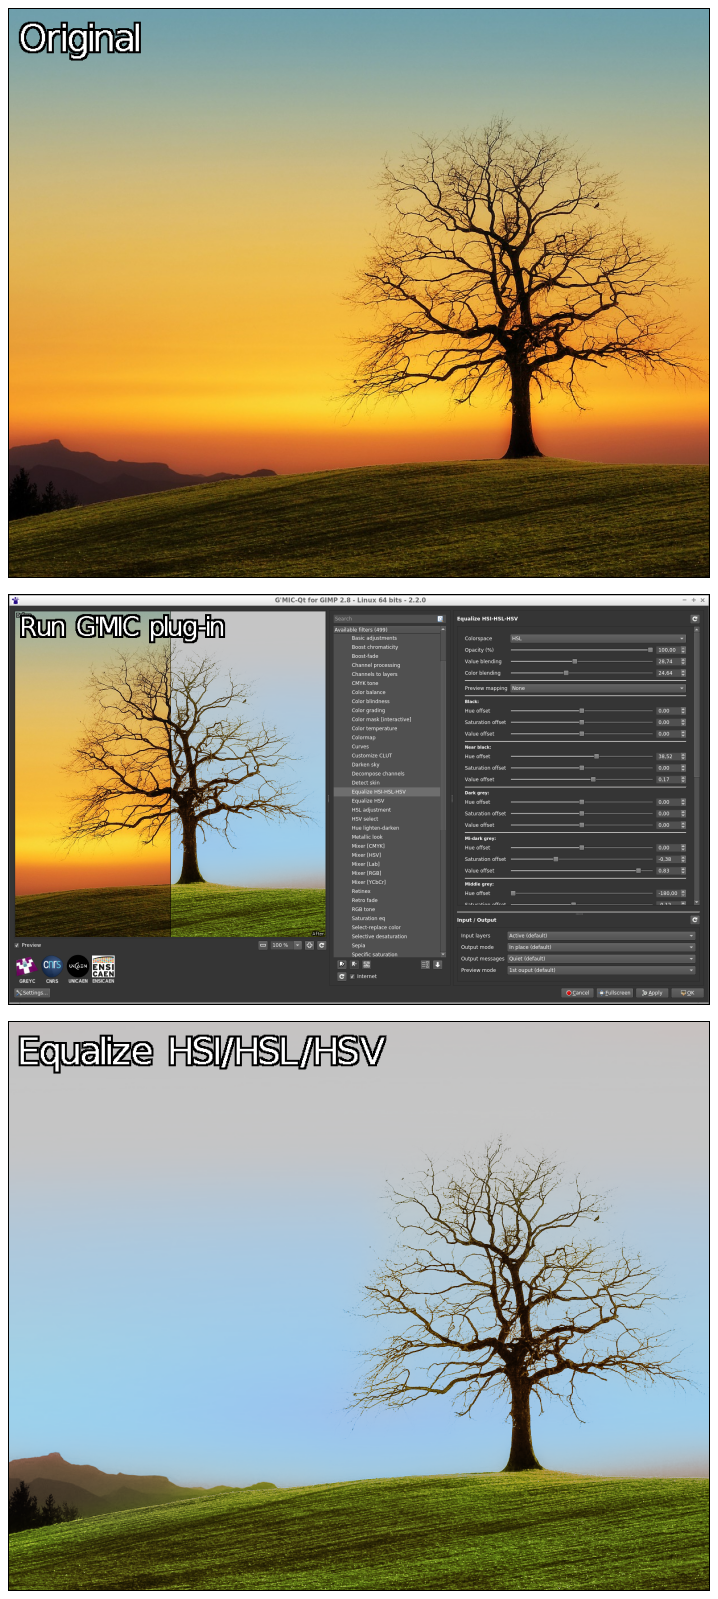
What is nice about this filter is that it can apply to color photographs as well. You can change the hue and saturation of colors with a certain brightness, with an effect that can sometimes be surprising, like with the landscape photography shown below.
Fig. 2.4: The filter “Equalize HSI/HSL/HSV” applied on a color photograph makes it possible to change the colorimetric environment, here in a rather extreme way.
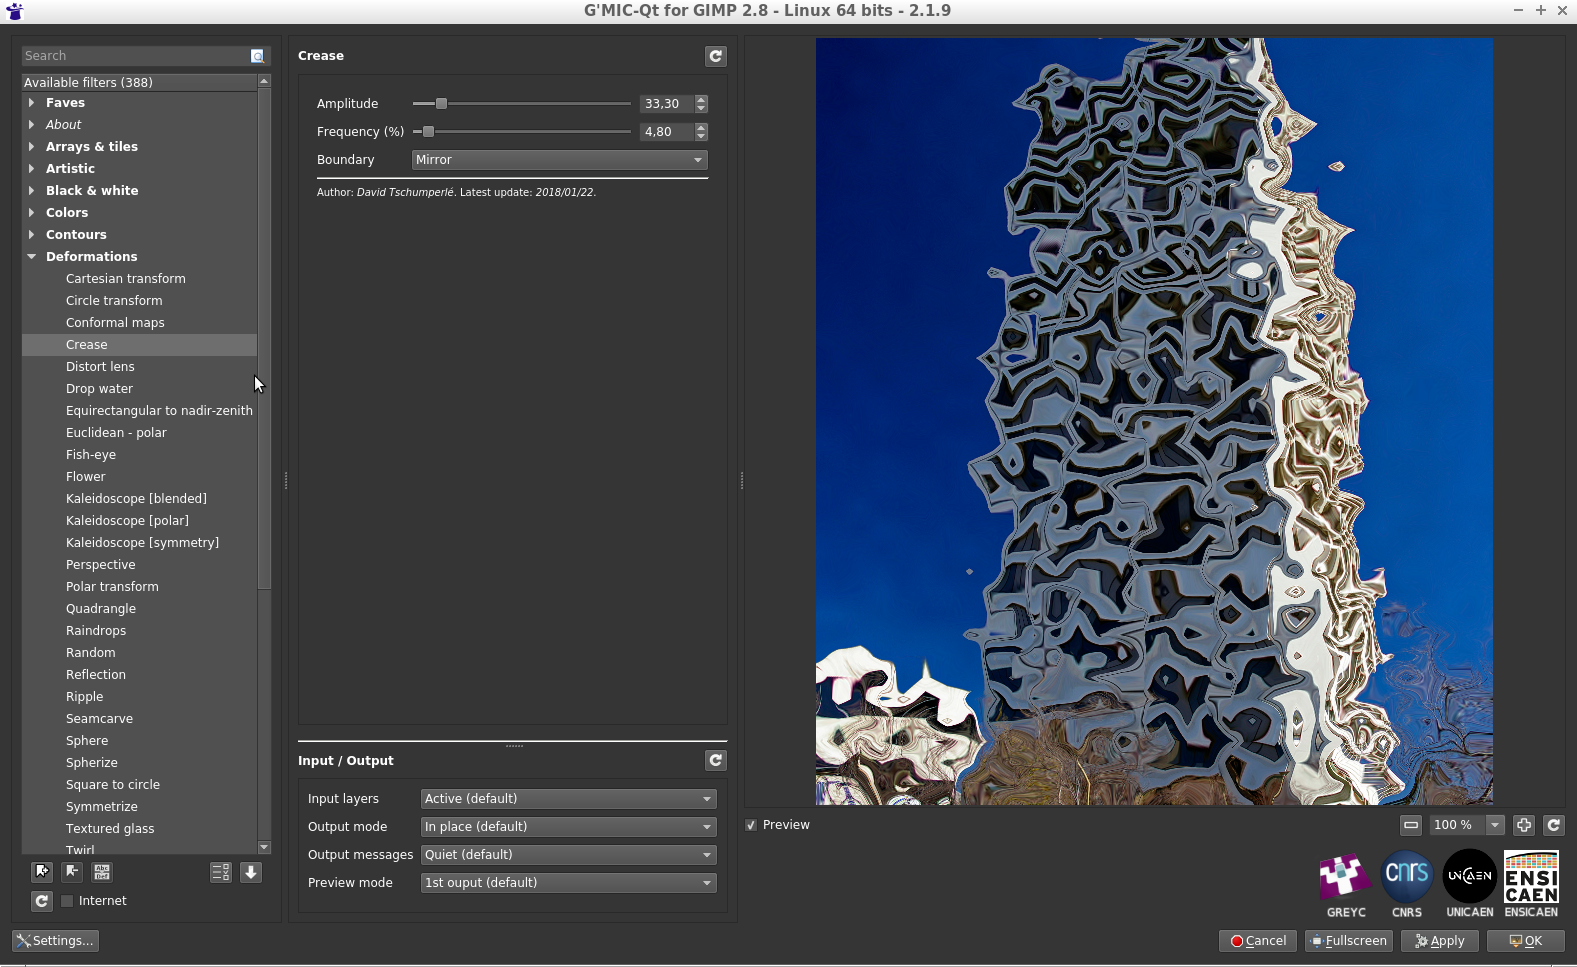
Another one of the David‘s ideas concerned the development of a random local deformation filter, having the ability to generate angular deformations. From an algorithmic point of view, it seemed relatively simple to achieve.
Note that once the implementation has been done (in concise style: 12 lines!) and pushed into the official filter updates, David just had to press the “Update Filters“ button of his G’MIC-Qt plug-in, and the new effect Deformations/Crease was there immediately for testing. This is one of the practical side of developing new filters using the G’MIC script language!
Fig. 2.5: New effect “Crease” for local angular deformations.
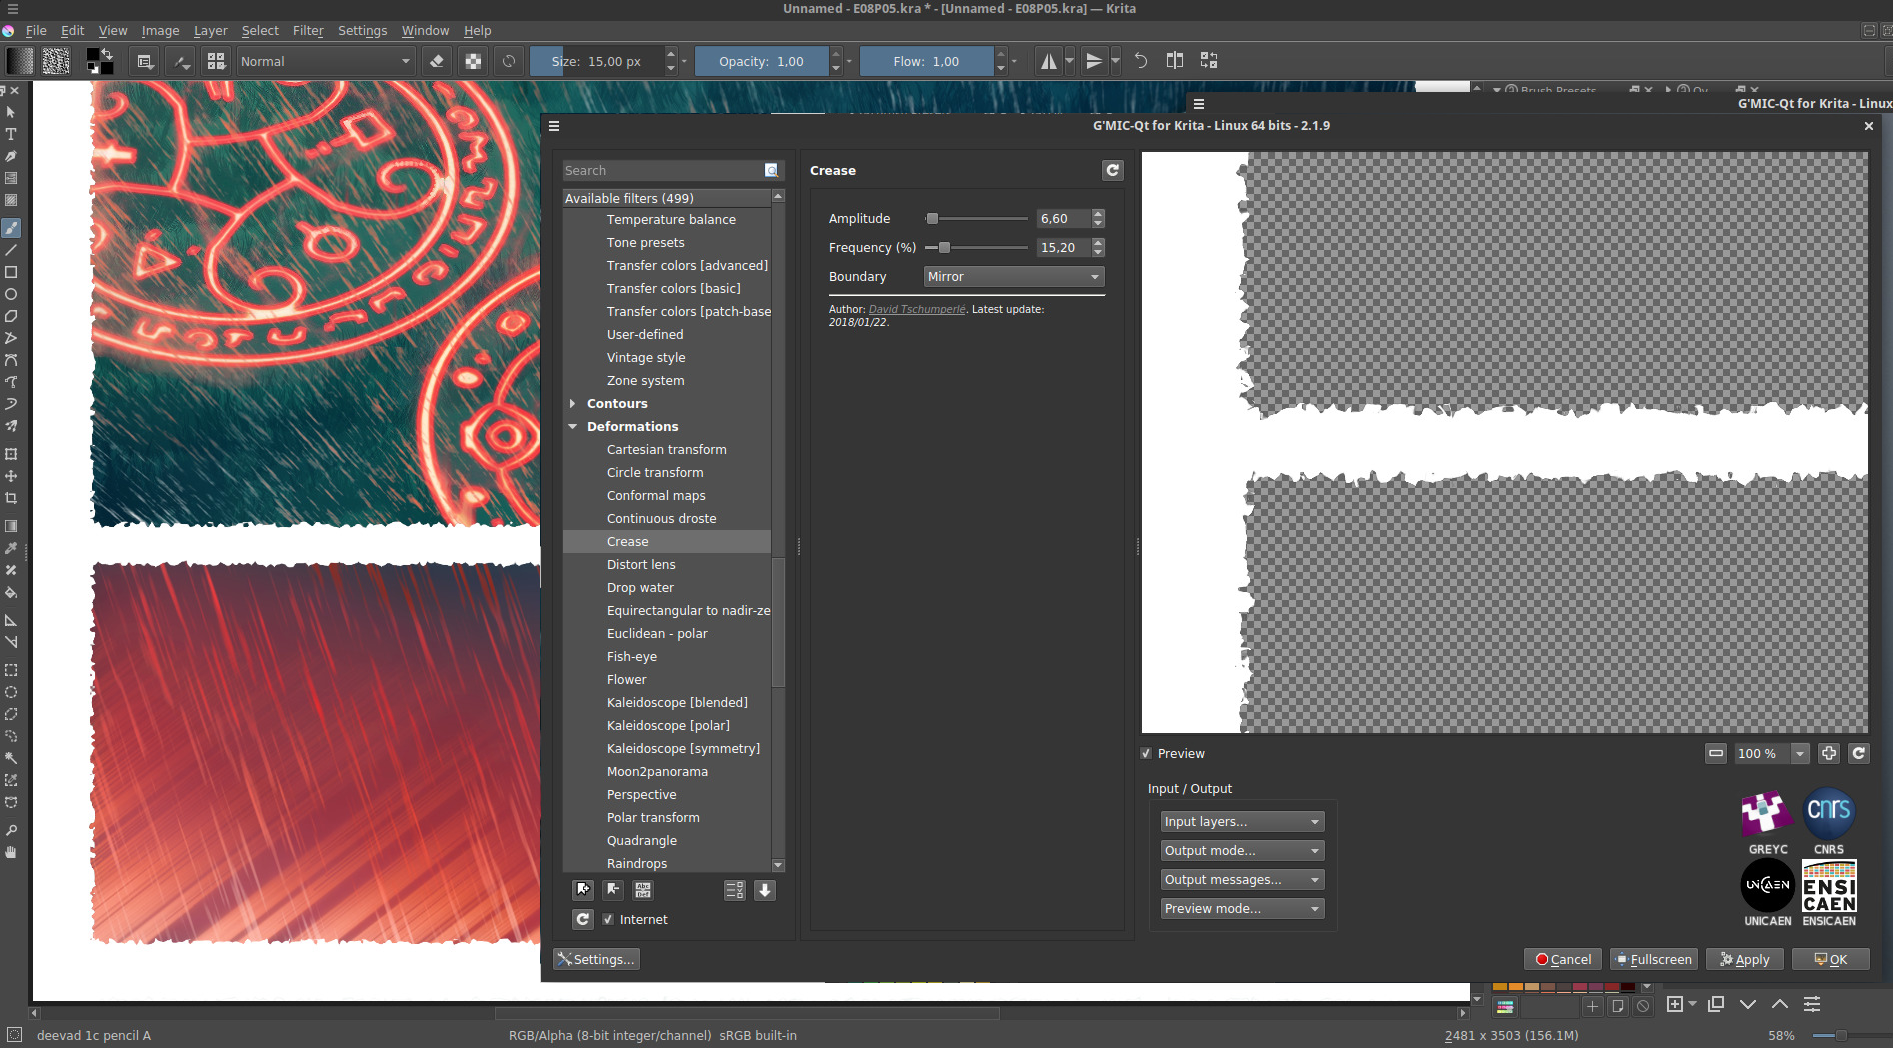
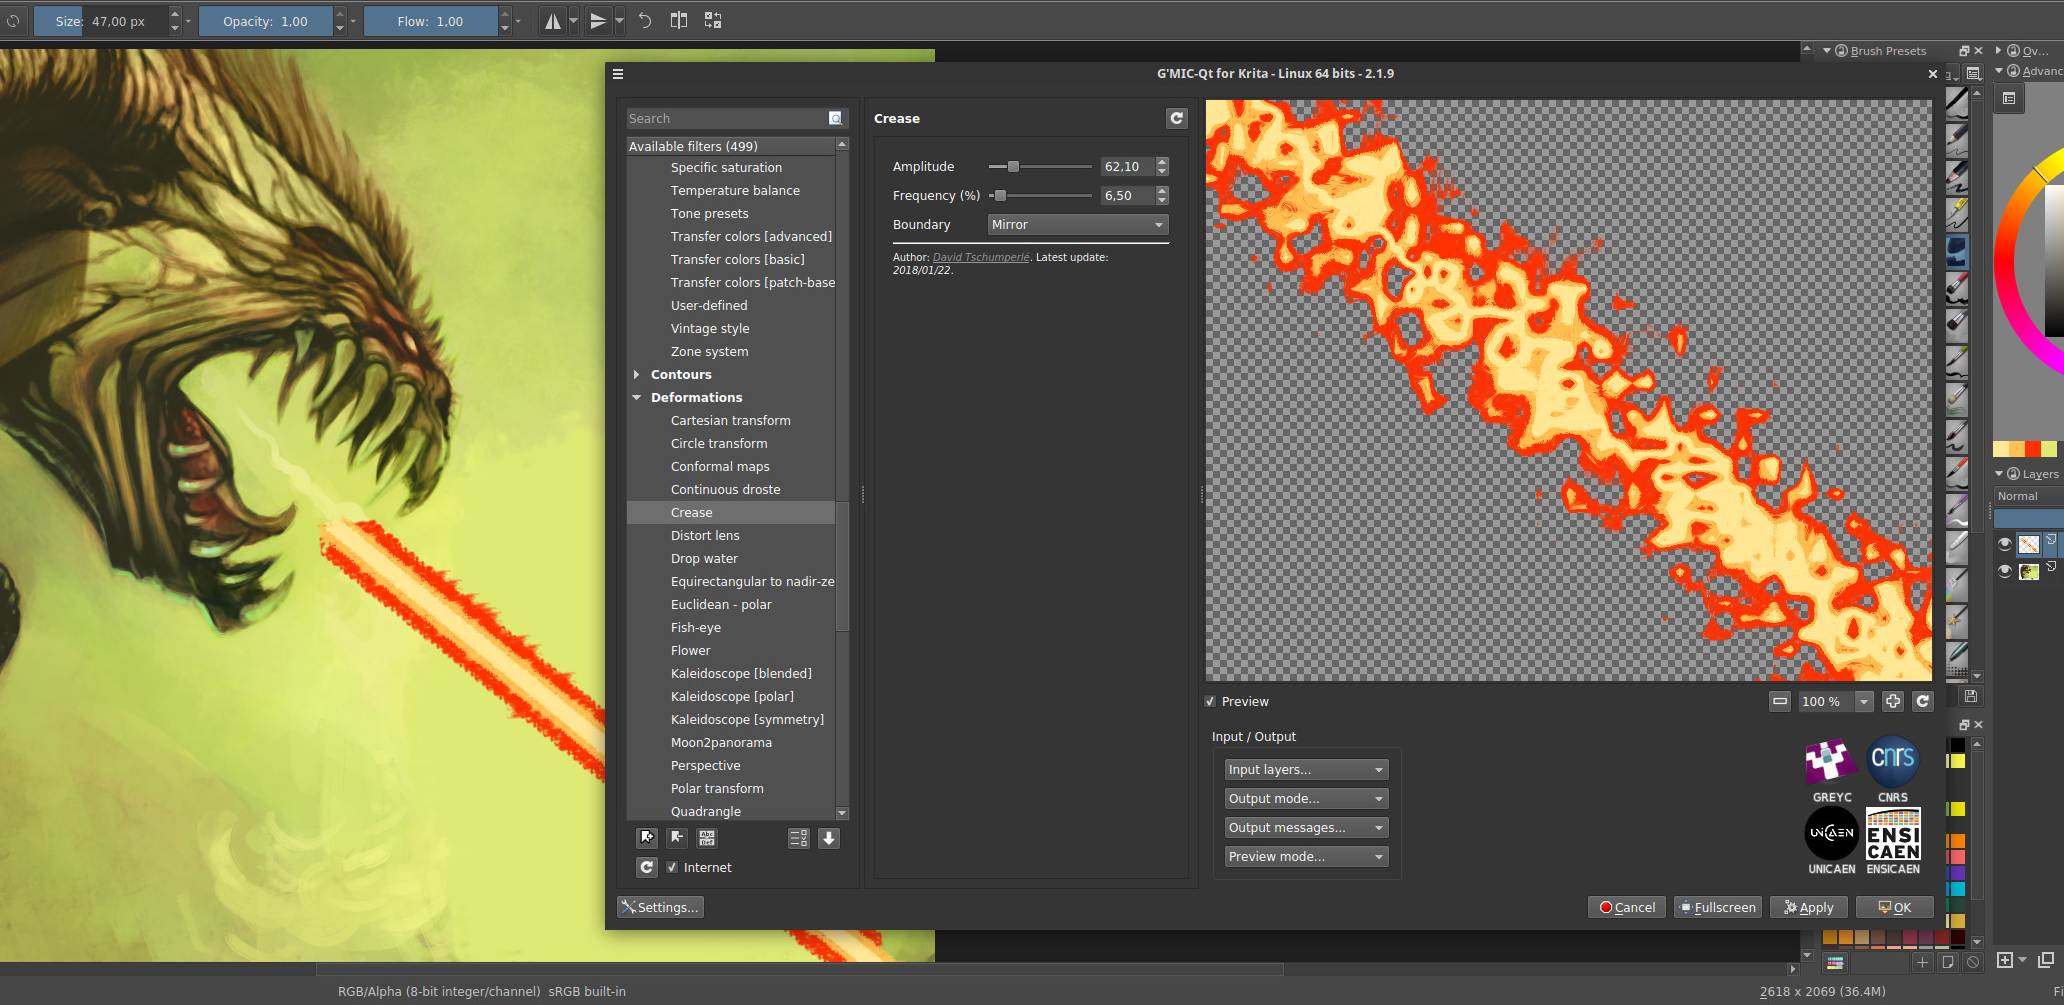
However, I must admit I didn’t really have an idea on what this could be useful for in practice. But the good thing about cooperating with David is that HE knows exactly what he’s going to do with it! For instance, to give a crispy look to the edges of his comics, or for improving the render of his alien death ray.
Fig. 2.6: Using the G’MIC “Crease” filter for two real cases of artistic creation.
3. Filters, filters, filters…
David Revoy is not the only user of G’MIC: we sometimes count up to 900 daily downloads from the main project website. So it happens, of course, that other enthusiastic users inspire us new effects, especially during those lovely discussions that take place on our forum, kindly made available by the PIXLS.US community.
Many photographers will tell you that it is not always easy to enhance the details in digital photographs without creating naughty artifacts that often have to be masked manually afterwards. Conventional contrast enhancement algorithms are most often based on increasing the local variance of pixel lightness, or on the equalization of their local histograms. Unfortunately, these operations are generally done by considering neighborhoods with a fixed size and geometry, where each pixel of a neighborhood is always considered with the same weight in the statistical calculations related to these algorithms.
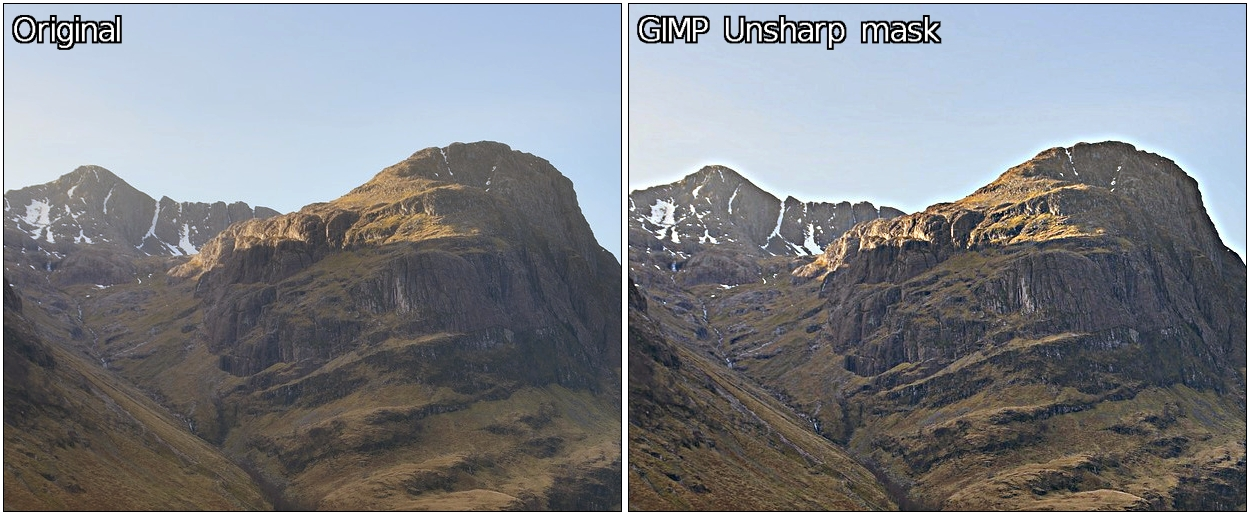
It is simpler and faster, but from a qualitative point of view it is not an excellent idea: we often get “halos” around contours that were already very contrasted in the image. This classic phenomenon is illustrated below with the application of the Unsharp mask filter (the one present by default in GIMP) on a part of a landscape image. This generates an undesirable “halo” effect at the frontier between the mountain and the sky (this is particularly visible in full resolution images).
Fig. 3.1: Unwanted “halo” effects often occur with conventional contrast enhancement filters.
The challenge of the detail enhancement algorithms is to be able to analyze the geometry of the local image structures in a more fine way, to take into account geometry-adaptive local weights for each pixel of a given neighborhood. To make it simple, we want to create anisotropic versions of the usual enhancement methods, orienting them by the edges detected in the images.
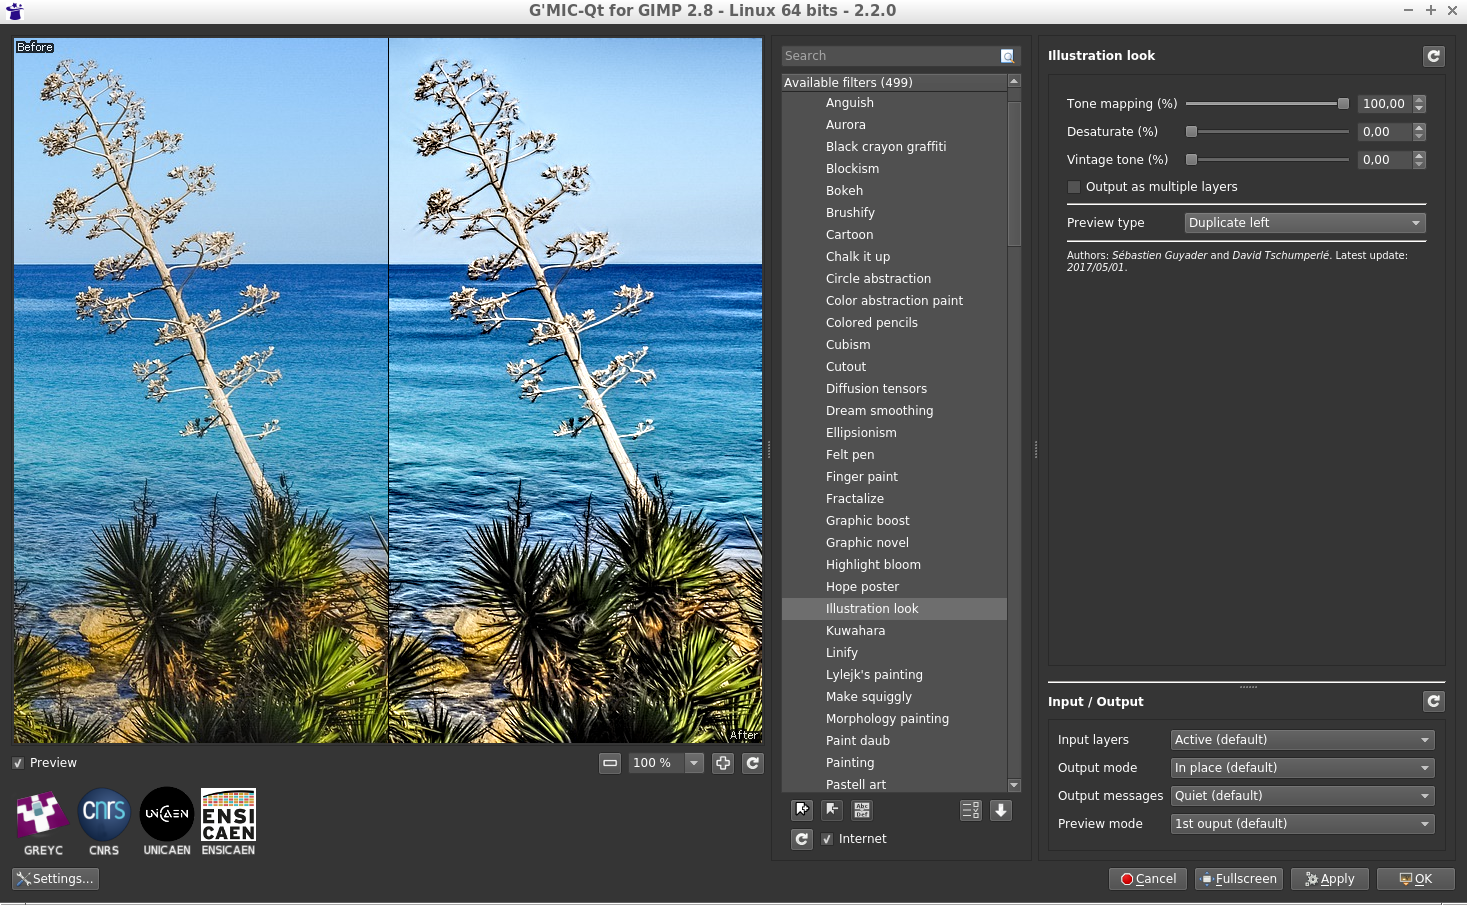
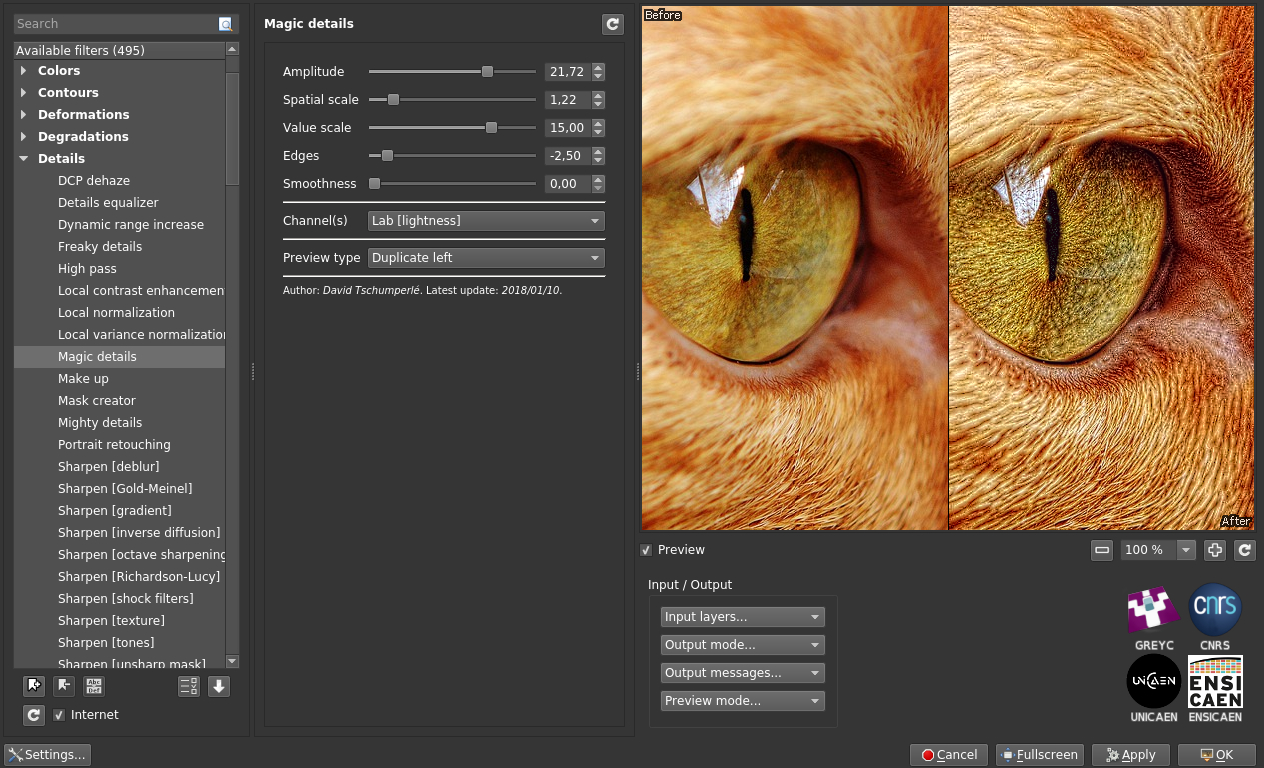
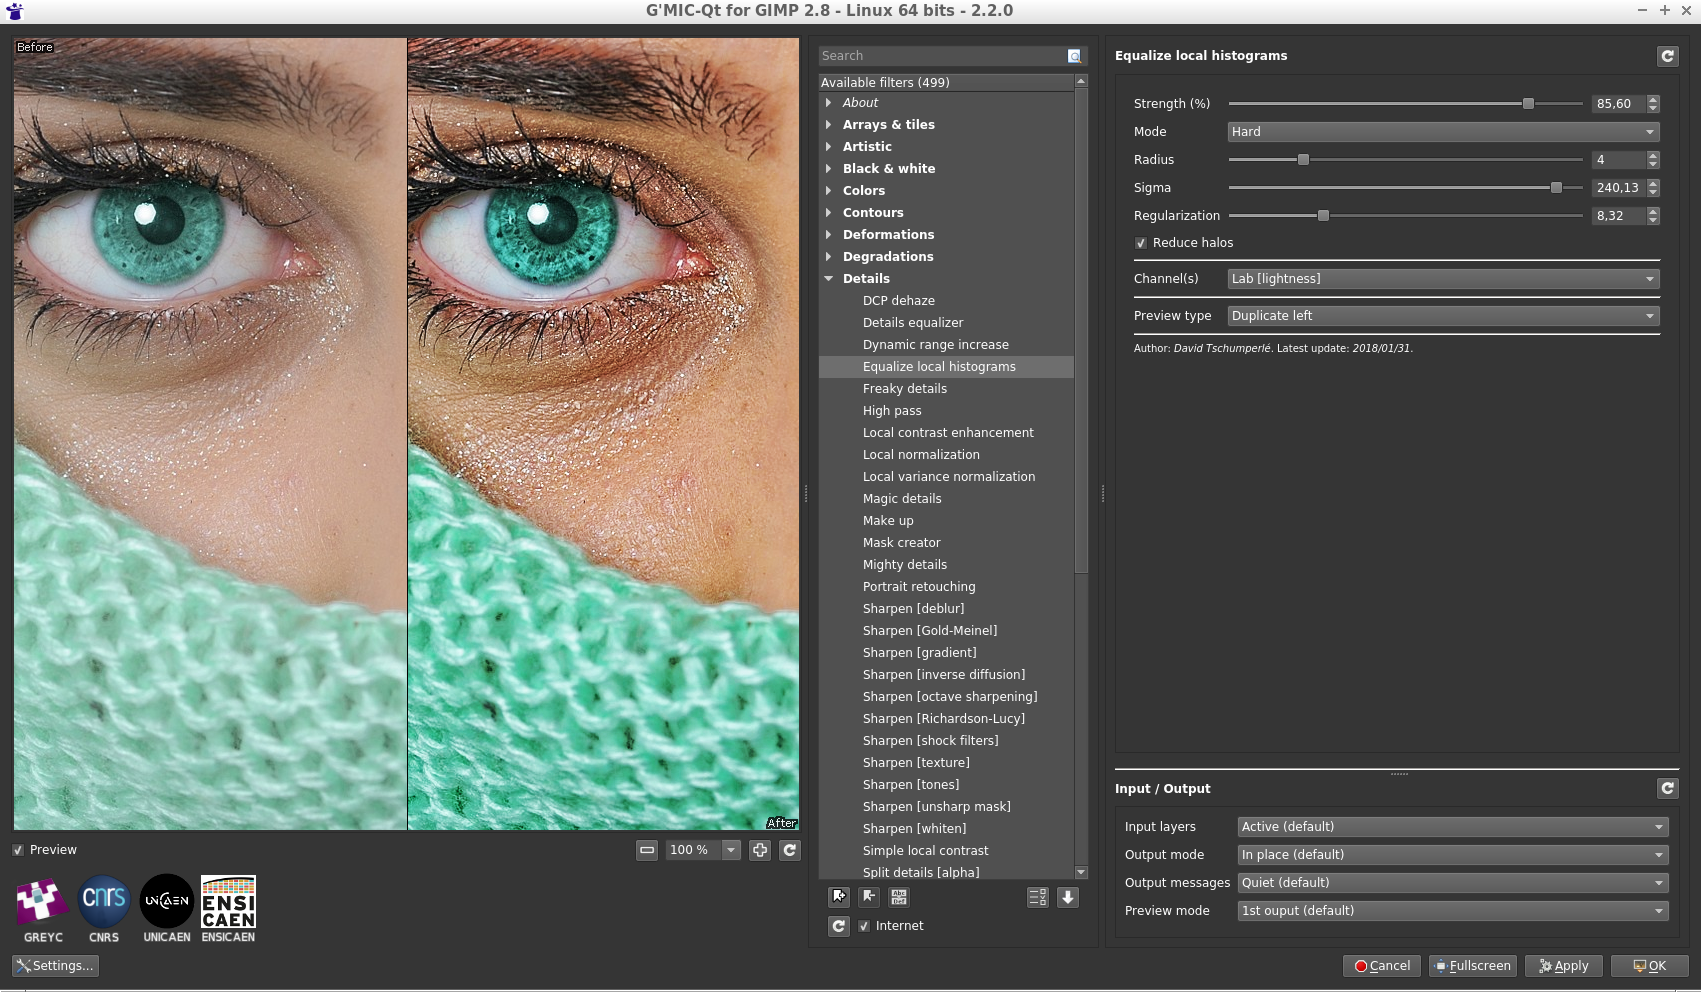
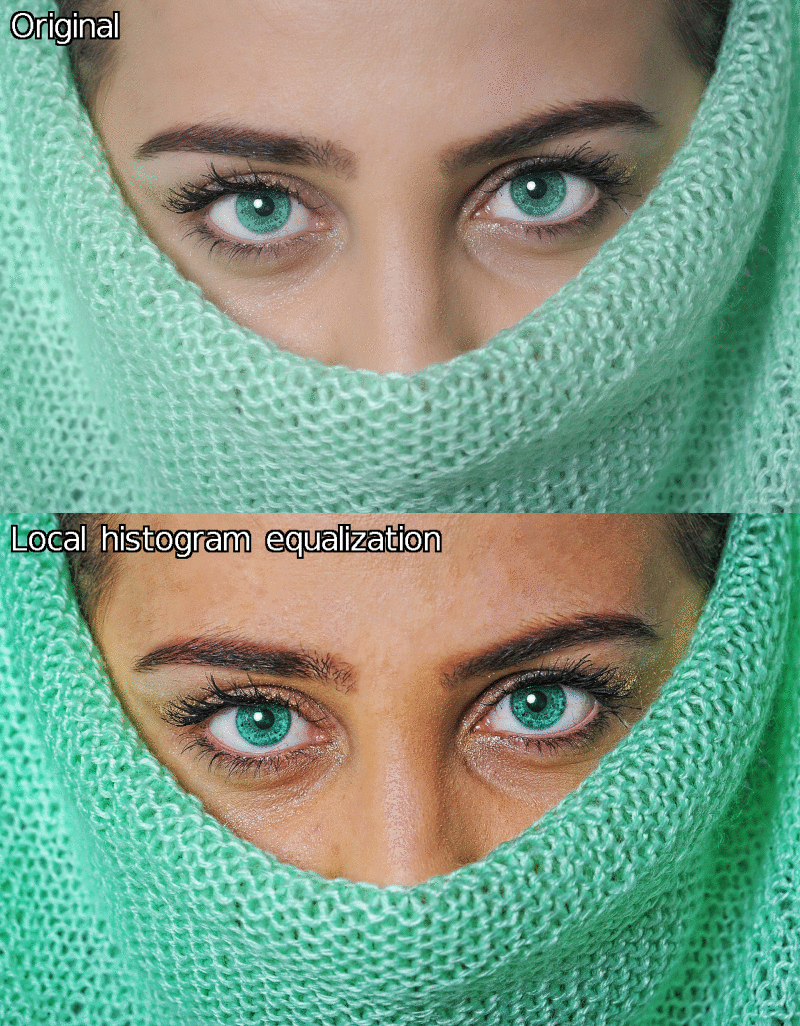
Following this logic, we have added two new G’MIC filters recently, namely Details/Magic details and Details/Equalize local histograms, which try to better take the geometric content of the image into account for local detail enhancement (e.g. using the bilateral filter).
Fig. 3.2: The new G’MIC detail enhancement filters.
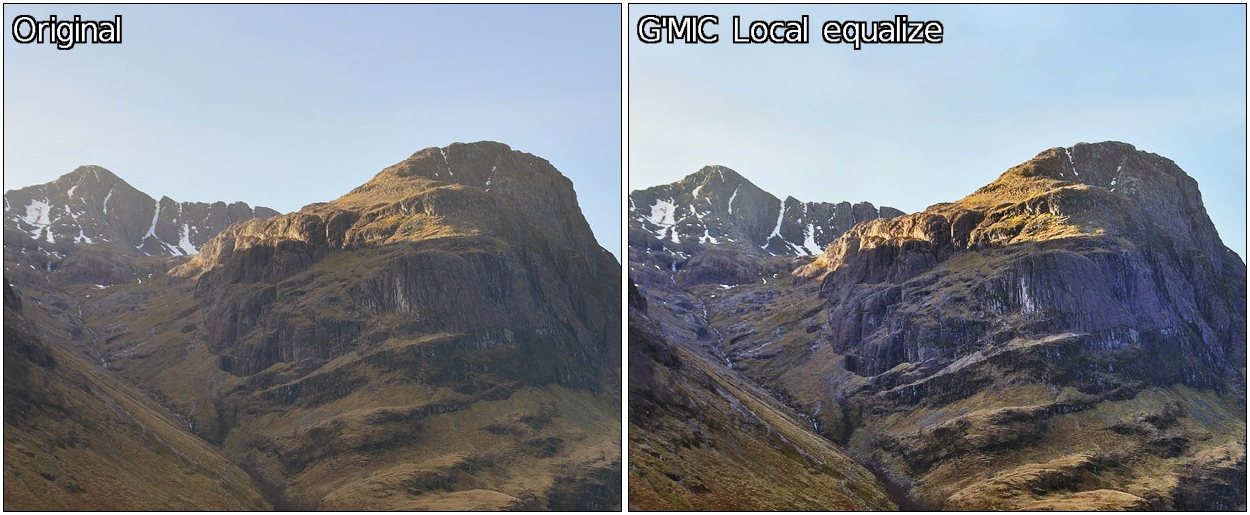
Thus, the application of the new G’MIC local histogram equalization on the landscape image shown before gives something slightly different : a more contrasted result both in geometric details and colors, and reduced halos.
Fig. 3.3: Differences of results between the standard GIMP Unsharp Mask filter and the local histogram equalization of G’MIC, for details enhancement.
New filters to apply geometric deformations on images are added to G’MIC on a regular basis, and this new major version 2.2 offers therefore a bunch of new deformation filters.
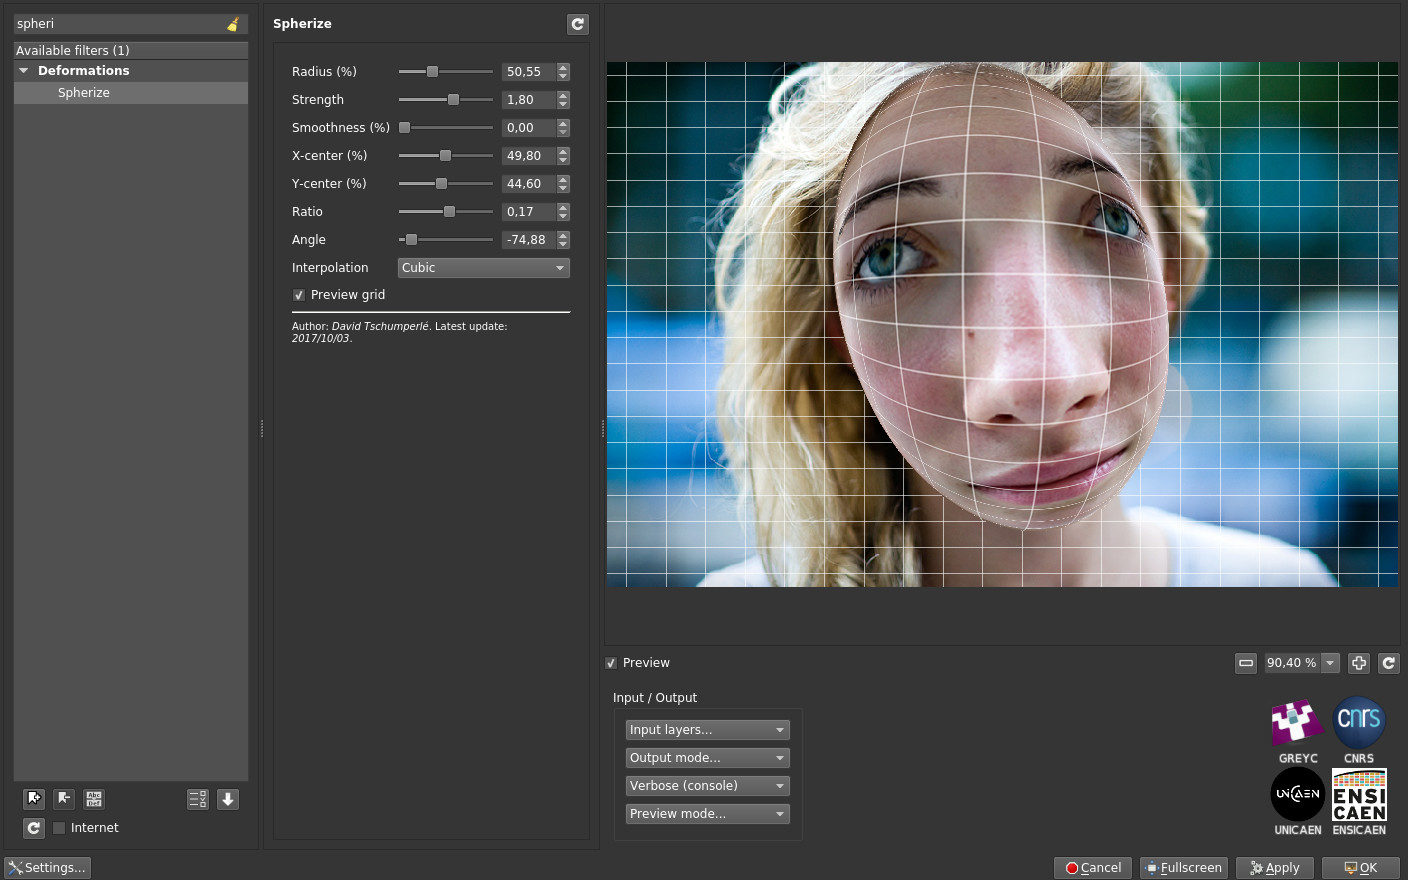
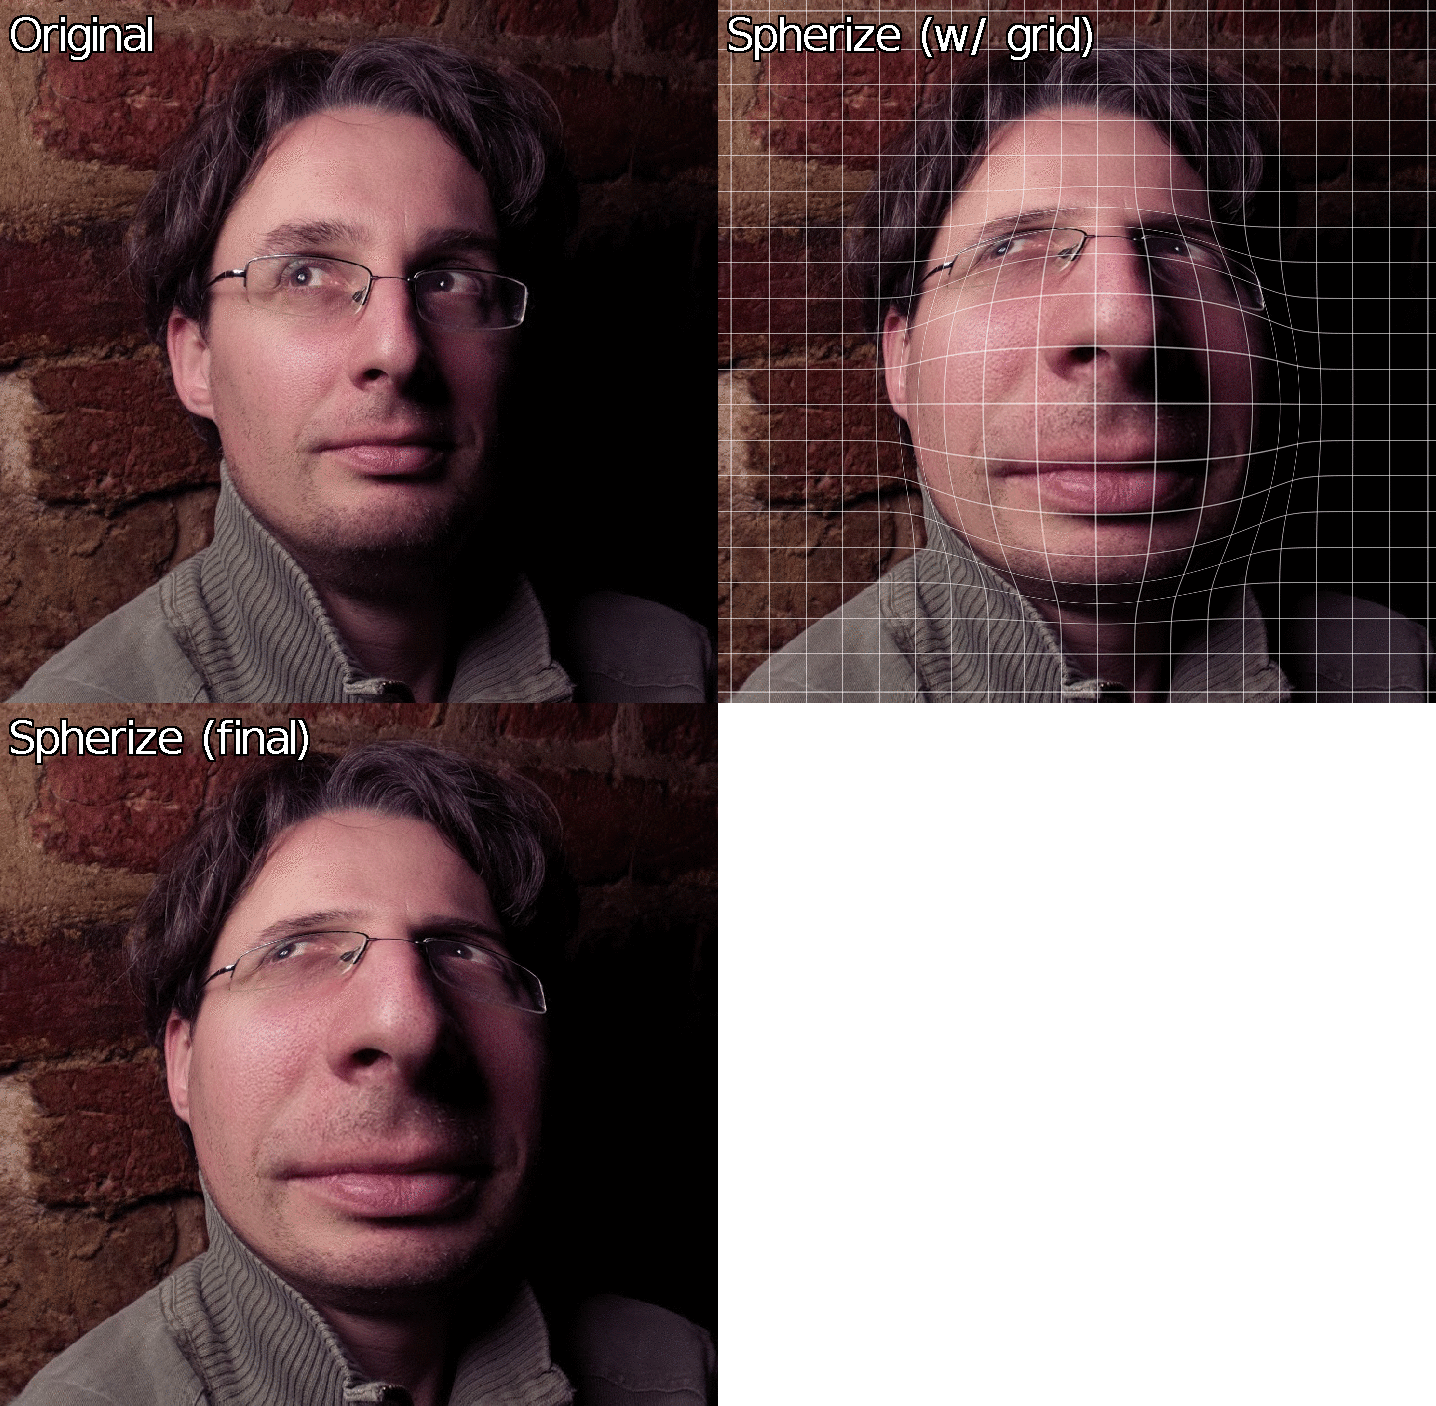
So let’s start with Deformations/Spherize, a filter which allows to locally distort an image to give the impression that it is projected on a 3D sphere or ellipsoid. This is the perfect filter to turn your obnoxious office colleague into a Mr. Potato Head!
Fig .3.4: Two examples of 3D spherical deformations obtained with the G’MIC “Spherize” filter.
On the other hand, the filter Deformations/Square to circle implements the direct and inverse transformations from a square domain (or rectangle) to a disk (as mathematically described on this page), which makes it possible to generate this type of deformations.
Fig. 3.5: Direct and inverse transformations from a square domain to a disk.
The effect Degradations/Streak replaces an image area masked by the user (filled with a constant color) with one or more copies of a neighboring area. It works mainly as the GIMP clone tool but prevents the user to fill the entire mask manually.
Fig. 3.6: The “Streak” filter clones parts of the image into a user-defined color mask.
You might say that image deformations are nice, but sometimes you want to transform an image in a more radical way. Let’s introduce now the new effects that turn an image into a more abstract version (simplification and re-rendering). These filters have in common the analysis of the local image geometry, followed by a step of image synthesis.
For example, G’MIC filter Contours/Super-pixels locally gathers the image pixels with the same color to form a partitioned image, like a puzzle, with geometric shapes that stick to the contours. This partition is obtained using the SLIC method (Simple Linear Iterative Clustering), a classic image partitioning algorithm, which has the advantage of being relatively fast to compute.
Fig. 3.7: Decomposition of an image in super-pixels by the Simple Linear Iterative Clustering algorithm (SLIC).
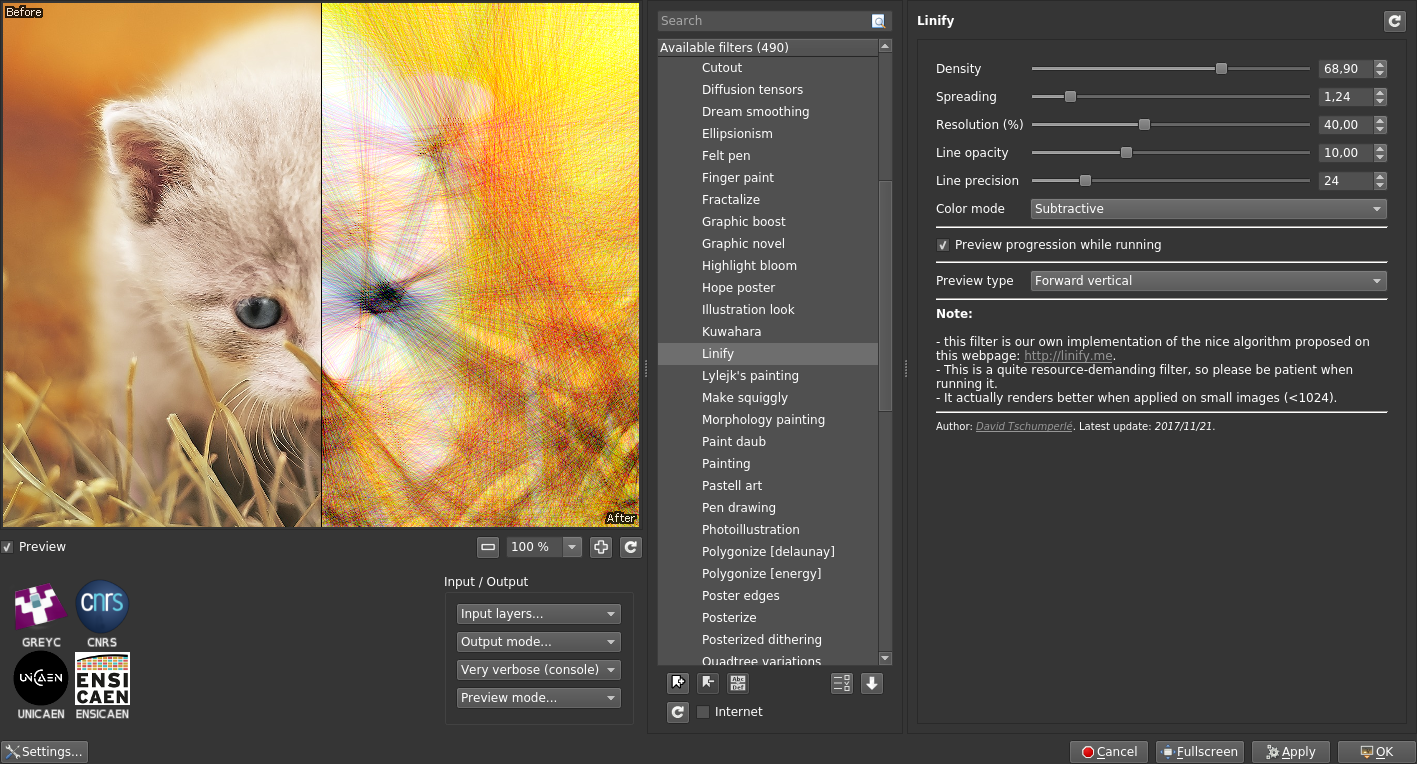
The filter Artistic/Linify tries to redraw an input image by superimposing semi-transparent colored lines on an initially white canvas, as shown in the figure below. This effect is the re-implementation of the smart algorithm initially proposed on the site http://linify.me (initially implemented in JavaScript).
Fig. 3.8: The “Linify” effect tries to redraw an image by superimposing only semi-transparent colored lines on a white canvas.
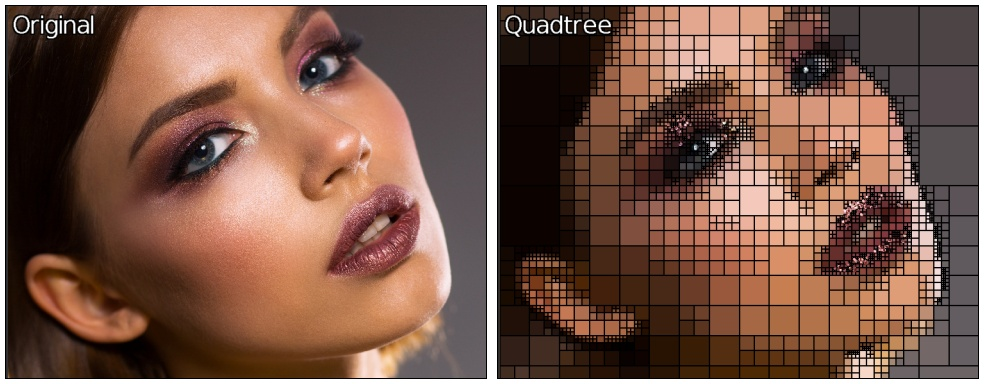
The effect Artistic/Quadtree variations first decomposes an image as a quadtree, then re-synthesize it by drawing oriented and plain ellipses on a canvas, one ellipse for each quadtree leaf. This renders a rather interesting “painting” effect. It is likely that with more complex shapes, even more attractive renderings could be synthesized. Surely an idea to keep in mind for the next filters update :)
Fig. 3.9: Decomposing an image as a quadtree allows to re-synthesize it by superimposing only plain colored ellipses.
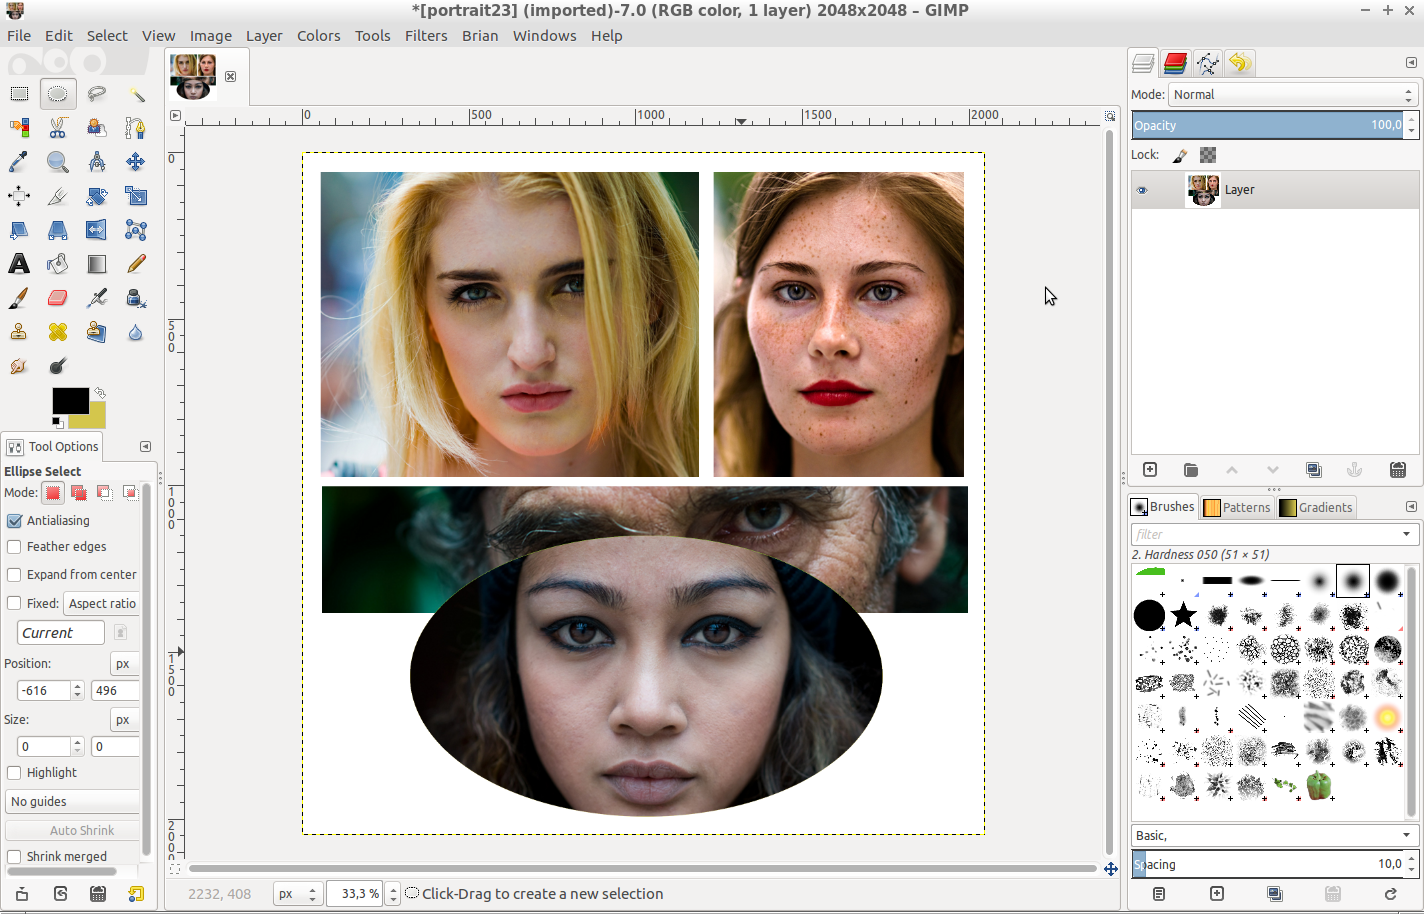
And now that you have processed so many beautiful pictures, why not arrange them in the form of a superb photo montage? This is precisely the role of the filter Arrays & tiles/Drawn montage, which allows to create a juxtaposition of photographs very quickly, for any kind of shapes.
The idea is to provide the filter with a colored template in addition to the serie of photographs (Fig.3.10a), and then to associate each photograph with a different color of the template (Fig.3.10b). Next, the arrangement is done automatically by G’MIC, by resizing the images so that they appear best framed within the shapes defined in the given montage template (Fig.3.10c).
We made a video tutorial illustrating the use of this specific filter.
Fig. 3.10a: Step 1: The user draws the desired organization of the montage with shapes of different colors.
Fig. 3.10b: Step 2: G’MIC’s “Drawn Montage” filter allows you to associate a photograph for each template color.
Fig. 3.10c: Step 3: The photo montage is then automatically synthetized by the filter.
But let’s go back to more essential questions: have you ever needed to draw gears? No?! It’s quite normal, that’s not something we do everyday! But just in case, the new G’MIC filter Rendering/Gear will be glad to help, with different settings to adjust gear size, colors and number of teeth. Perfectly useless, so totally indispensable!
Fig. 3.11: The Gear filter, running at full speed.
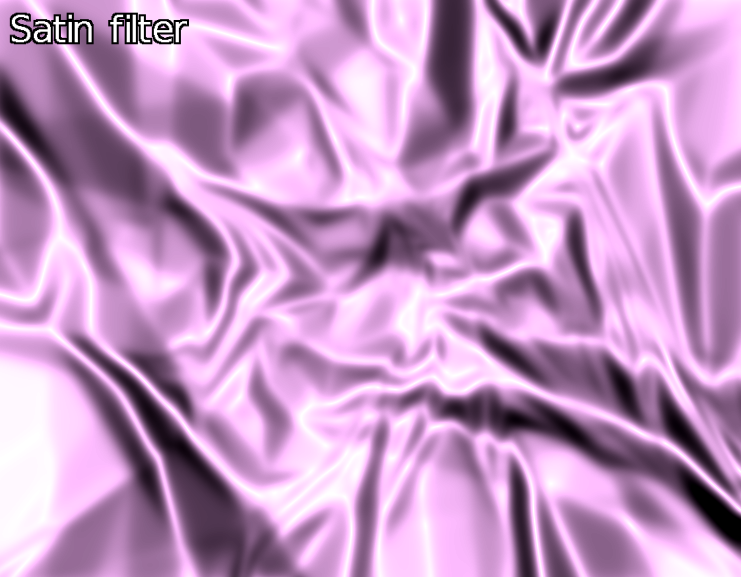
Need a satin texture right now? No?! Too bad, the filter Patterns / Satin could have been of a great help!
Fig. 3.12: G’MIC’s satin filter will make your life more silky.
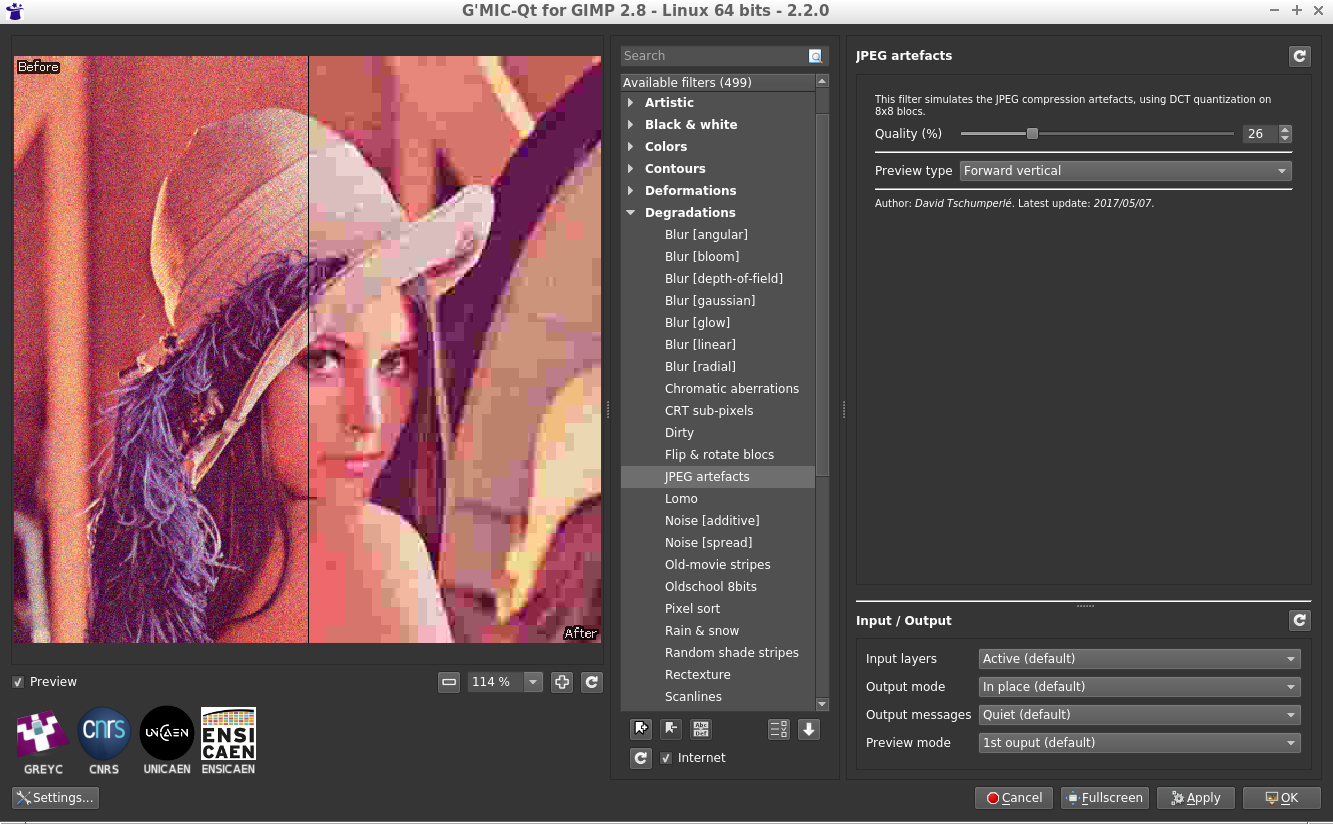
And finally, to end up with the series of these “effects that are useless until we need them”, note the apparition of the new filter Degradations/JPEG artifacts which simulates the appearance of JPEG compression artifacts due to the quantization of the DCT coefficients encoding 8×8 image blocks (yes, you will get almost the same result saving your image as a JPEG file with the desired quality).
Fig. 3.13: The “JPEG artifacts” filter simulates the image degradation due to 8×8 block DCT compression.
4. Other notable improvements
This review of these new available G’MIC filters should not overshadow the various improvements that have been made “under the hood” and that are equally important, even if they are less visible in practice for the user.
A big effort of cleaning and restructuring the G’MIC-Qt plugin code has been realized, with a lot of little inconsistencies fixed in the GUI. Let’s also mention in bulk order some new interesting features that have appeared in the plugin:
The ability to set a timeout) when trying to preview some computationnaly intensive filters.
A better management of the input-output parameters for each filter (with persistence, better menu location, and a reset button).
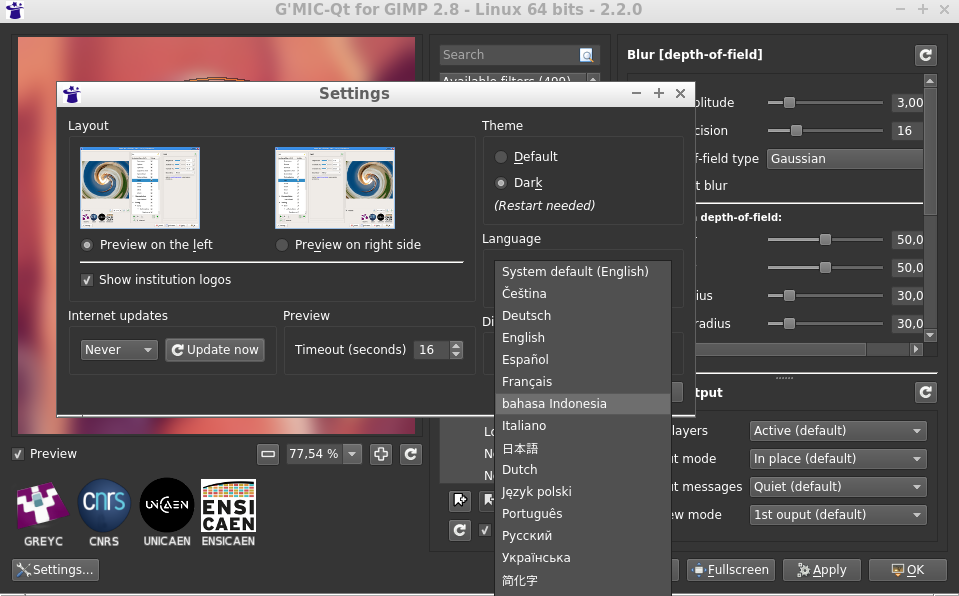
Maximizing the size of the preview area is now easier. Editing its zoom level manually is now possible, as well as chosing the language of the interface (regardless of the language used for the system), etc.
All these little things gathered together globally improves the user experience.
Fig. 4.1: Overview of the G’MIC-Qt plugin interface in its latest version 2.2.
Even less visible, but just as important, many improvements have appeared in the G’MIC computational core and its associated G’MIC script language interpreter. You have to know that all of the available filters are actually written in the form of scripts in the G’MIC language, and each small improvement brought to the interpreter may have a beneficial consequence for all filters at once. Without going too much into the technical details of these internal improvements, we can highlight those points:
The notable improvement in the syntax of the language itself, which goes along with better performances for the analysis of the language syntax (therefore for the script executions), all this with a smaller memory footprint.
The G’MIC built-in mathematical expression evaluator is also experiencing various optimizations and new features, to consider even more possibilities for performing non-trivial operations at the pixel level.
A better support of raw video input/outputs (.yuv format) with support for4:2:2 and 4:4:4 formats, in addition to4:2:0 which was the only mode supported before.
Finally, two new animations have been added to the G’MIC demos menu (which is displayed e.g. when invoking gmic without arguments from the command-line):
First, a 3D starfield animation:
Fig.4.2: New 3D starfield animation added to the G’MIC demo menu.
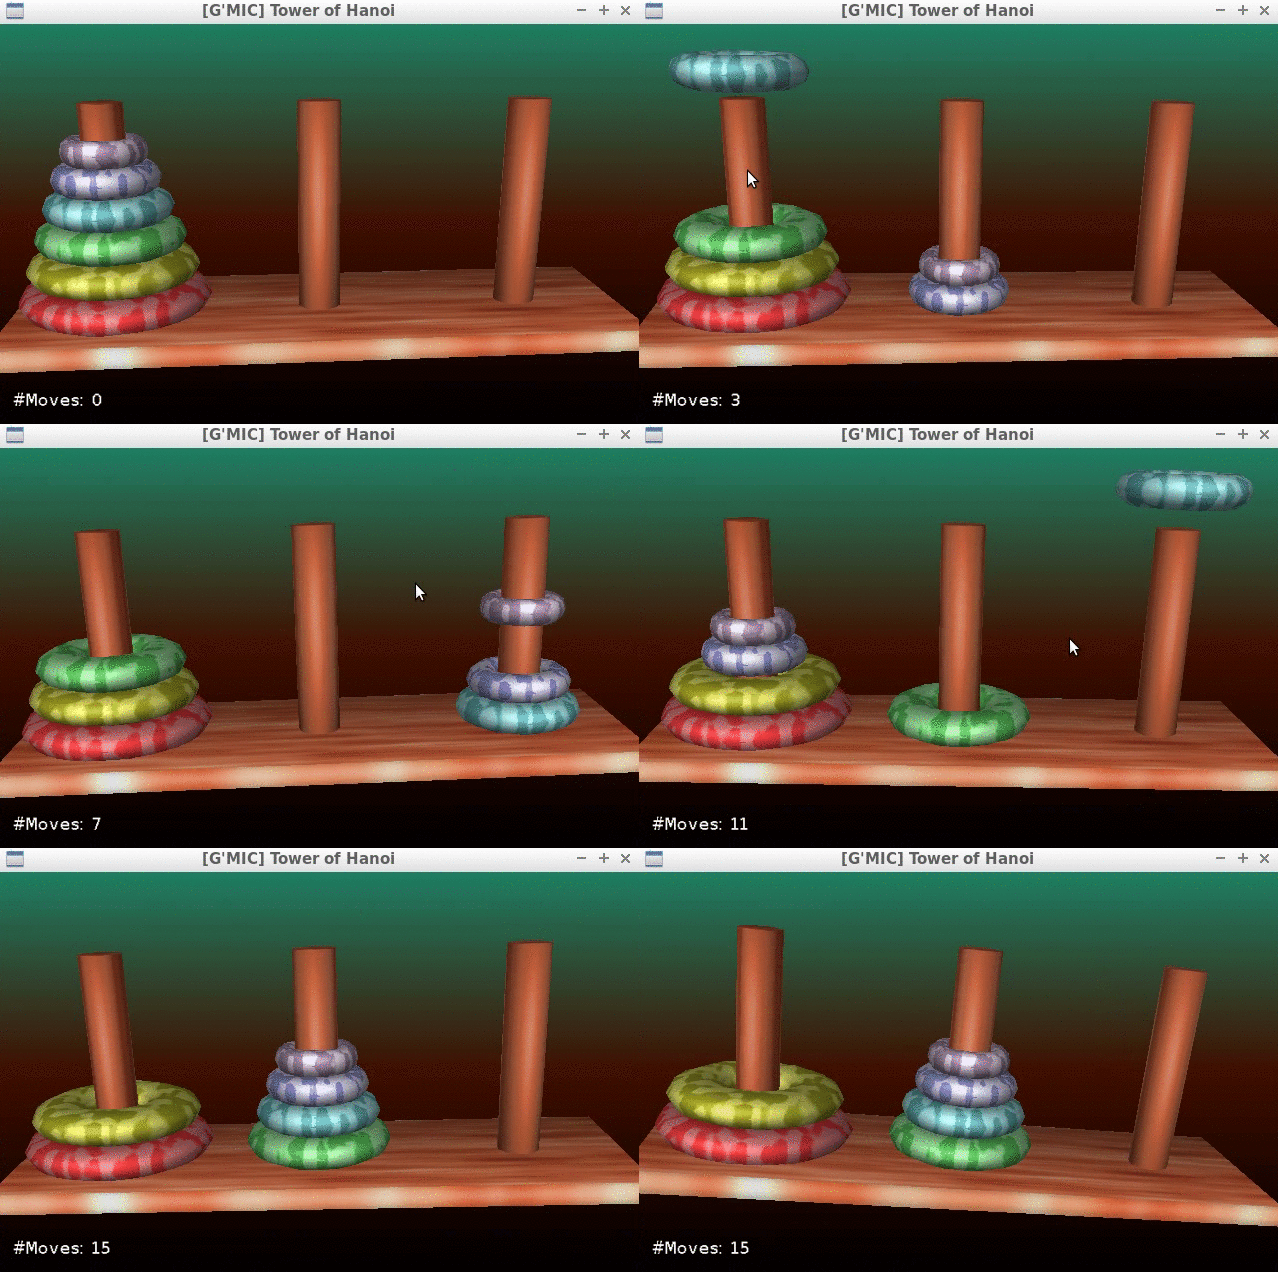
Fig. 4.3: The playable 3D version of the “Tower of Hanoi”, available in G’MIC.
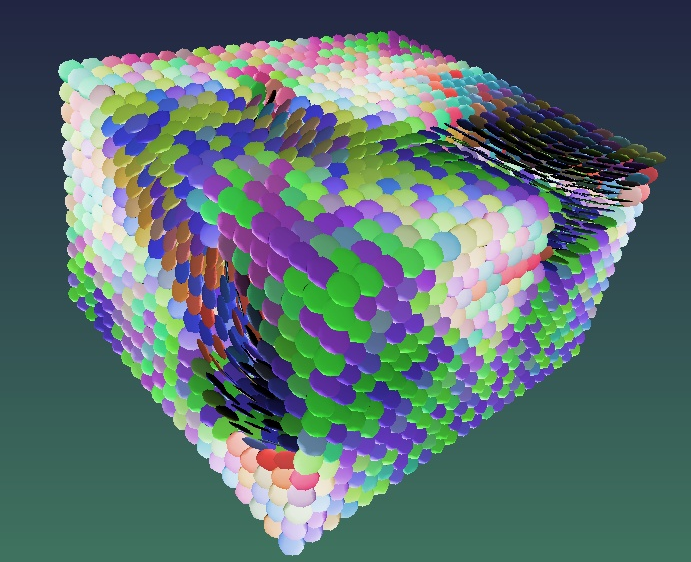
Finally, let us mention the introduction of the command tensors3d dedicated to the 3D representation of second order tensor fields. In practice, it does not only serve to make you want to eat Smarties®! It can be used for example to visualize certain regions of MRI volumes of diffusion tensors:
Fig. 4.4: G’MIC rendering of a 3D tensor field, with command tensors3d.
To finish this tour, let us also mention the complete redesign of G’MIC Online during the year 2017, done by Christophe Couronne and Véronique Robert from the development departement of the GREYC laboratory.
G’MIC Online is a web service allowing you to apply a subset of G’MIC filters on your images, directly inside a web browser. These web pages now have a responsive design, which makes them more enjoyable than before on mobile devices (smartphones and tablets). Shown below is a screenshot of this service running in Chrome/Android, on a 10’’ tablet.
Fig. 4.5: New responsive design of the G’MIC Online web service, running here on a 10” tablet.
5. Conclusion and perspectives
The overview of this new version 2.2 of G’MIC is now over.
One possible conclusion could be: “There are plenty of perspectives!“.
G’MIC is a free project that can be considered as mature: the first lines of code were composed almost ten years ago, and today we have a good idea of the possibilities (and limits) of the beast. We hope to see more and more interest from FOSS users and developers, for example for integrating the G’MIC-Qt generic plugin in various software focused on image or video processing.
The possibility of using the G’MIC core under a more permissive CeCILL-C license can also be a source of interesting collaborations in the future (some companies have already approached us about this). While waiting for potential collaborations, we will do our best to continue developping G’MIC and feed it with new filters and effects, according to the suggestions of our enthusiastic users. A big thanks to them for their help and constant encouragement (the motivation to write code or articles, past 11pm, would not be the same without them!).
“Long live open-source image processing and artistic creation!”
The "ape bumfodder" of one man (Philip Larkin) is another man's treasure – Susan Irvine makes the case for the relevance of Old English literature in the modern world (and leaves us with a beautiful reading of "The Husband's Message", a poem told from the perspective of a wooden staff...); the Whiggish idea of constant societal improvement has, as its most high-profile advocate, Steven Pinker, whose 'The Better Angels of our Nature' caused a stir in 2011. Now he's back with 'Enlightenment Now', another data-heavy work of optimism – David Wootton weighs up the evidence
Stig Abell and Thea Lenarduzzi are joined in the studio by political commentator Zoe Williams to discuss the future of Corbynism, Brexit, Lexit, and British politics more broadly; and, to mark the 100th anniversary of British women’s suffrage, Emelyne Godfrey sheds light on the mosaic of approaches that led, eventually, to something worth celebrating in all its complexity
TLS editor Michael Caines meets Gregory Norminton, the author of a collection of aphorisms, two translations of classic French books for children, two collections of short stories and four novels – including, most recently, The Devil’s Highway – that range across history, from the medieval period up to that far more horrific time known as the early 1990s
Stig Abell and Thea Lenarduzzi are joined by Kathryn Hughes, to discuss whether and where Charlotte Brontë meets Jane Eyre; Katharine Craik looks back on Shakespeare's mysterious, and 'weirdly memorable', sonnets; Kate Brown on the social-media-fuelled Ukrainian uprising of 2013, the David-and-Goliath battle that followed, and the view from 2018

 Login
Login