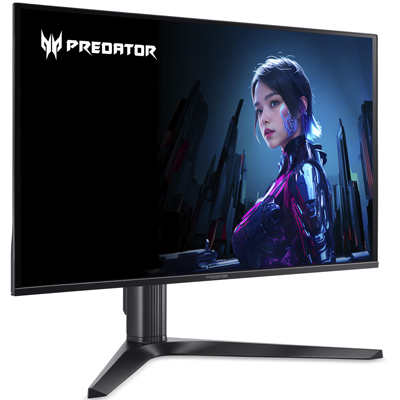
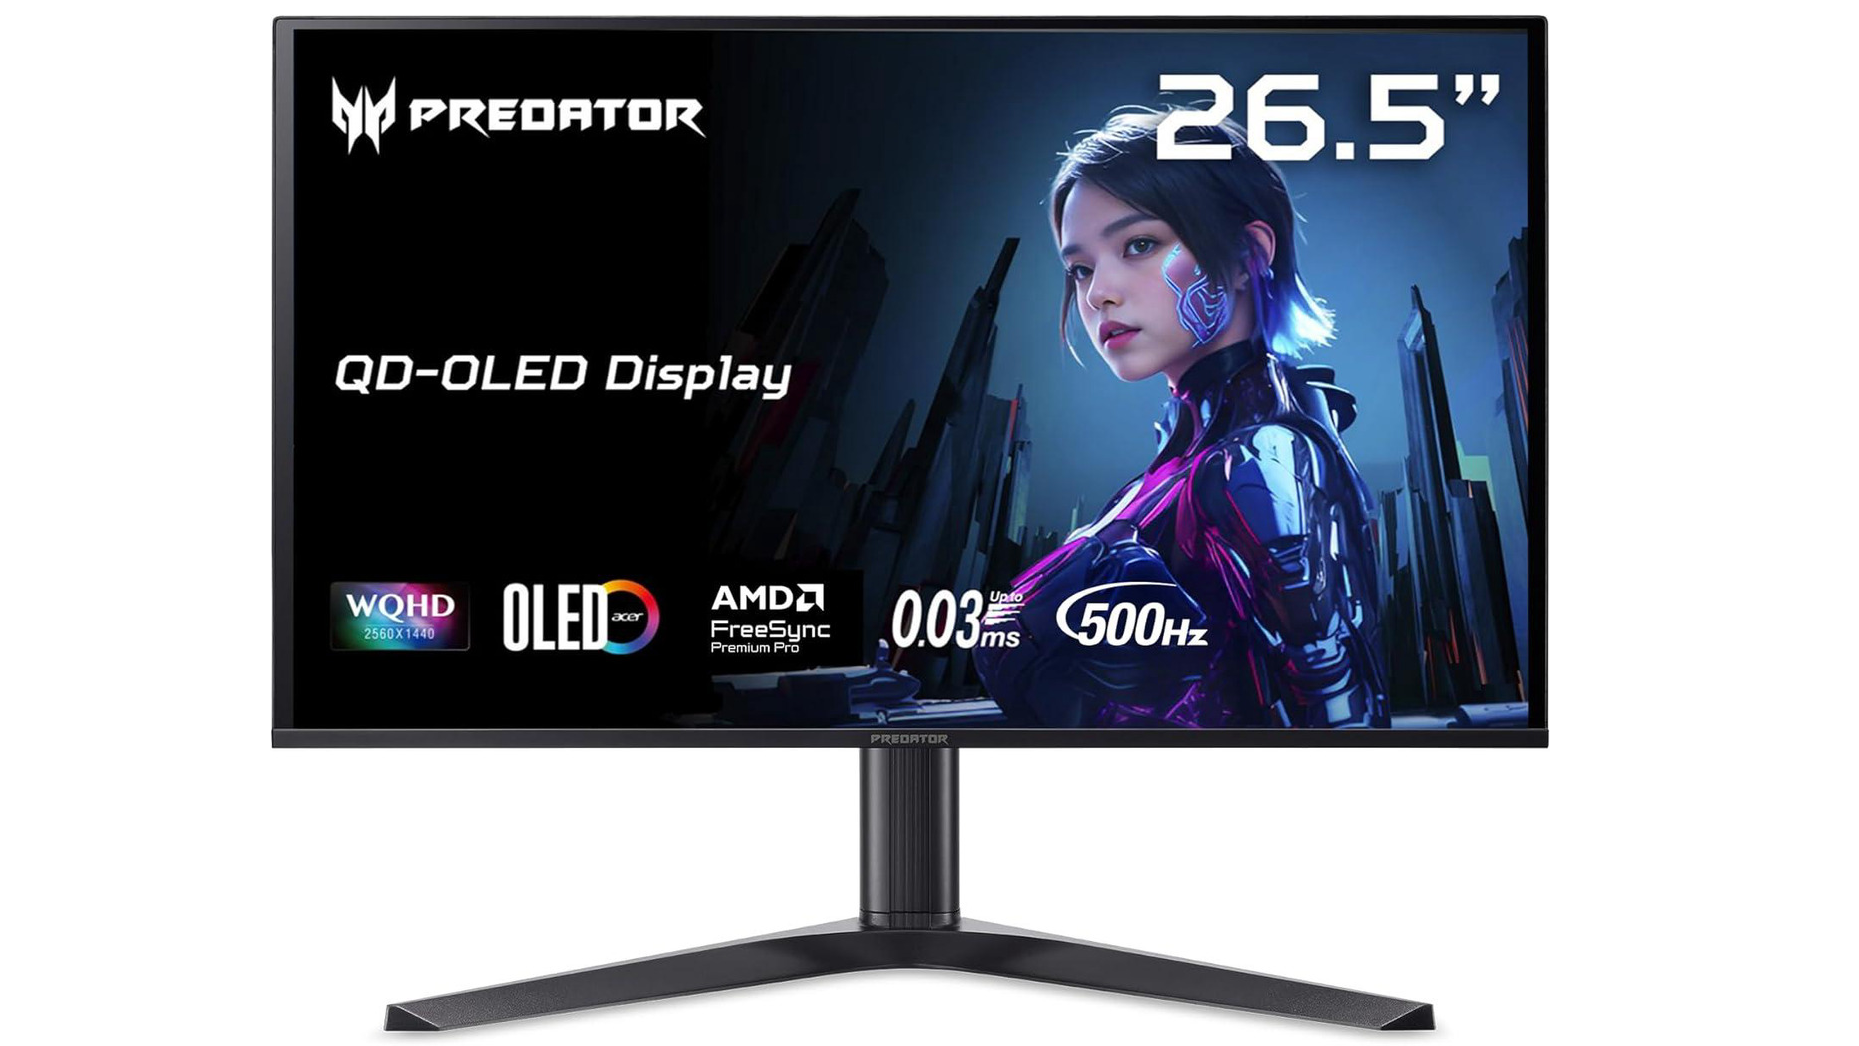
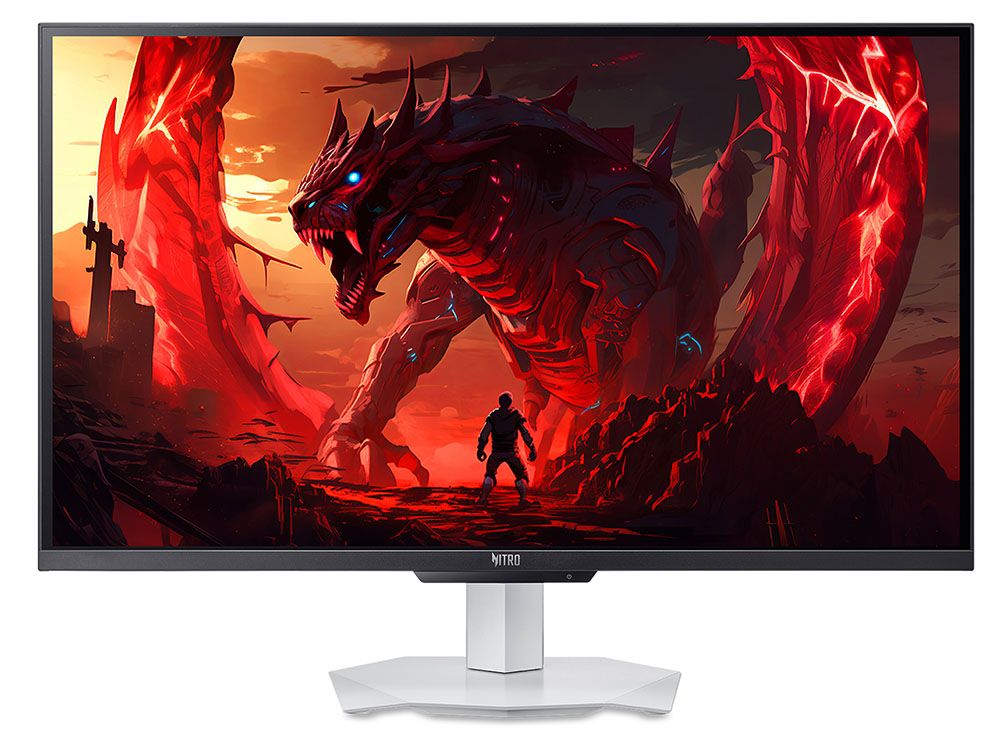
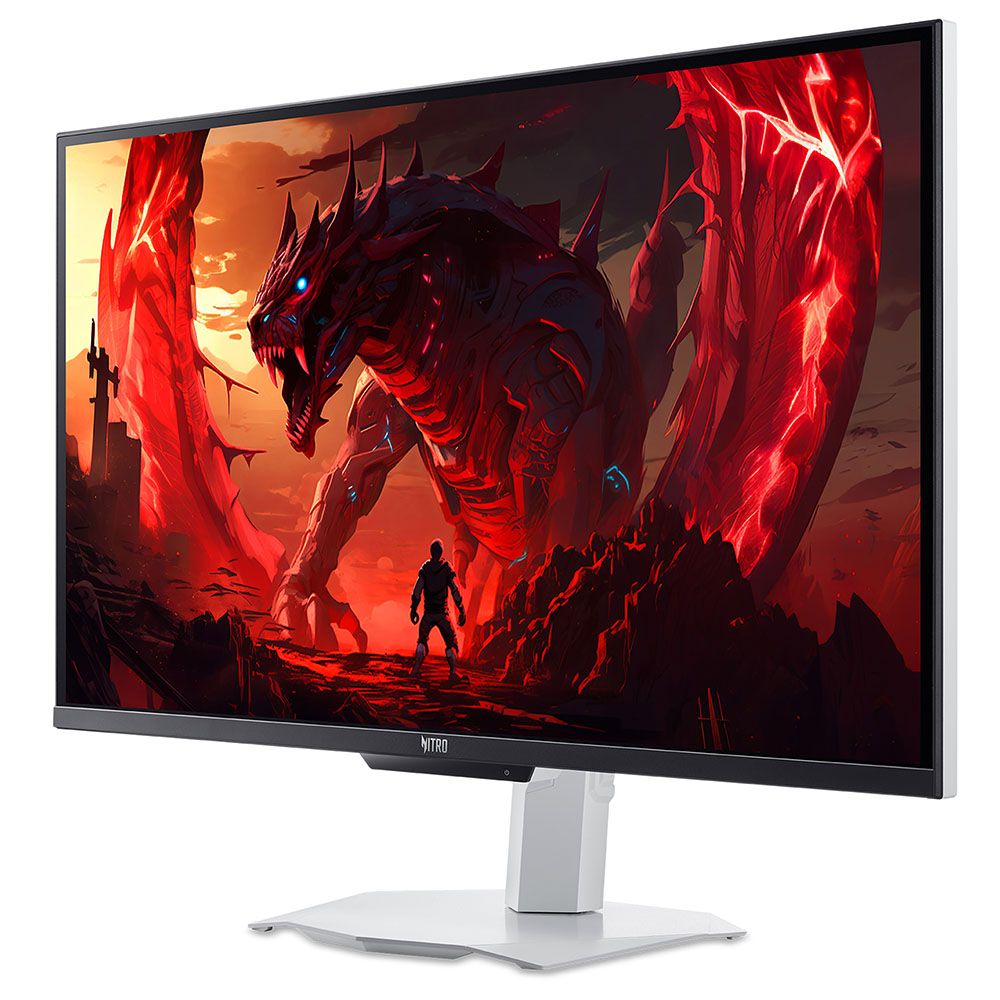
Most every day there's yet another bit of news about how RAM, SSDs, and hard drives are insanely expensive. Today, though, there's a reprieve from high prices, in the form of a sale on an exceedingly nice display. The Acer Predator X27U, or model F5bmiippruzx as it's known to friends, is a 27" 1440p QD-OLED display with a whopping 500 Hz refresh rate and DisplayHDR True Black 500 certification, making for a consistently bright experience. It can be yours for a mere $509.99 at Newegg right now.
The Predator X27U's display is one of the latter-generation QD-OLED 27" 2560x1440 types, granting it that massive 500 Hz refresh rate and increased brightness compared to earlier offerings. It's as good a time as any to note that Acer reused the "Predator X27U" moniker — the F5 model on sale is the nicer revised version, just in case you go searching and find the old specs.
Broadly speaking, OLED displays all have near-zero black levels, an infinite contrast ratio, and "perfect" viewing angles and response time. However, this model's DisplayHDR 500 True Black certification is the star of the show, as it ensures that brightness in HDR mode must be at least 500 nits, but most importantly, that full-screen brightness is at least 300 nits.
Put together, this means that for standard desktop usage, you get a consistently bright image regardless of what's on screen, and that brightness fluctuations ought to be tame — all unlike OLED displays of old. Those 500 nits in HDR mode are also a minimum, too, as Acer says that this display's peak brightness should top out at 1000 nits for 3% panel coverage, for nice highlights during action. As with most any OLED display, the color gamut covers 99% of the DCI-P3 space, and there's true 10-bit input support.
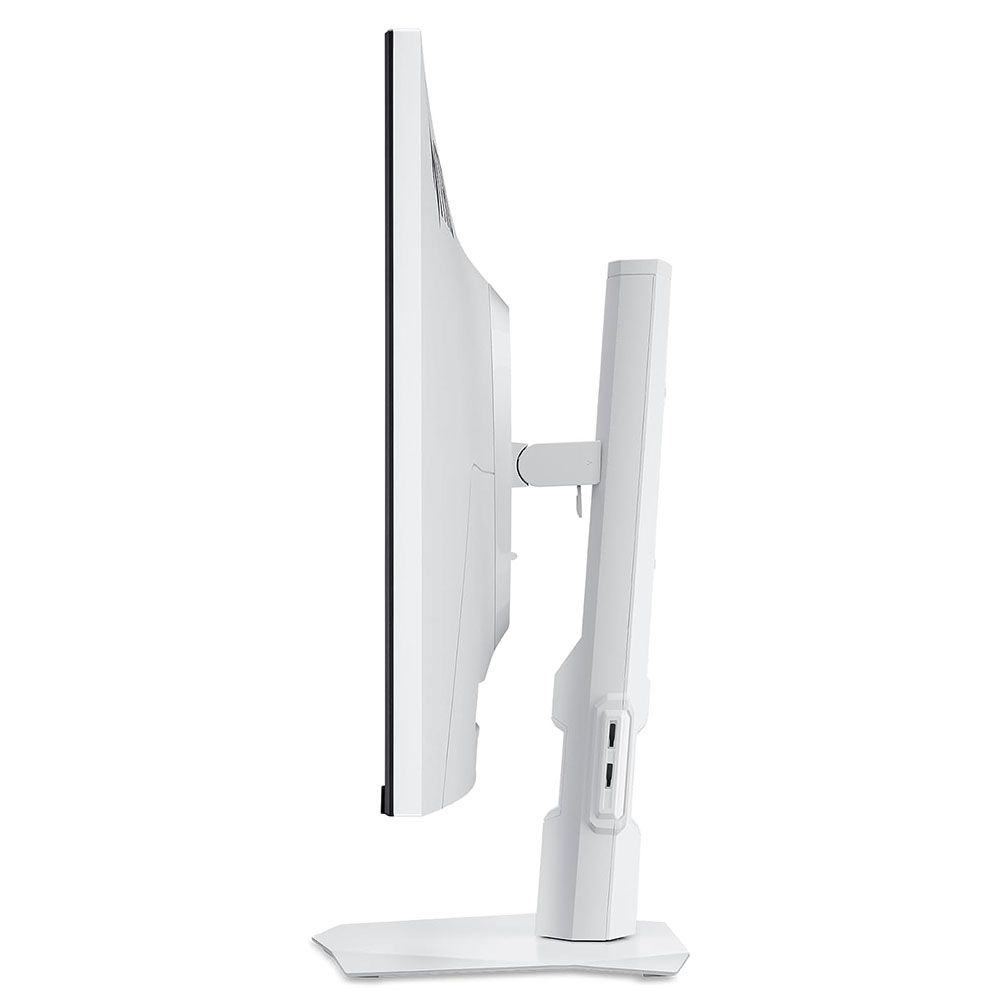
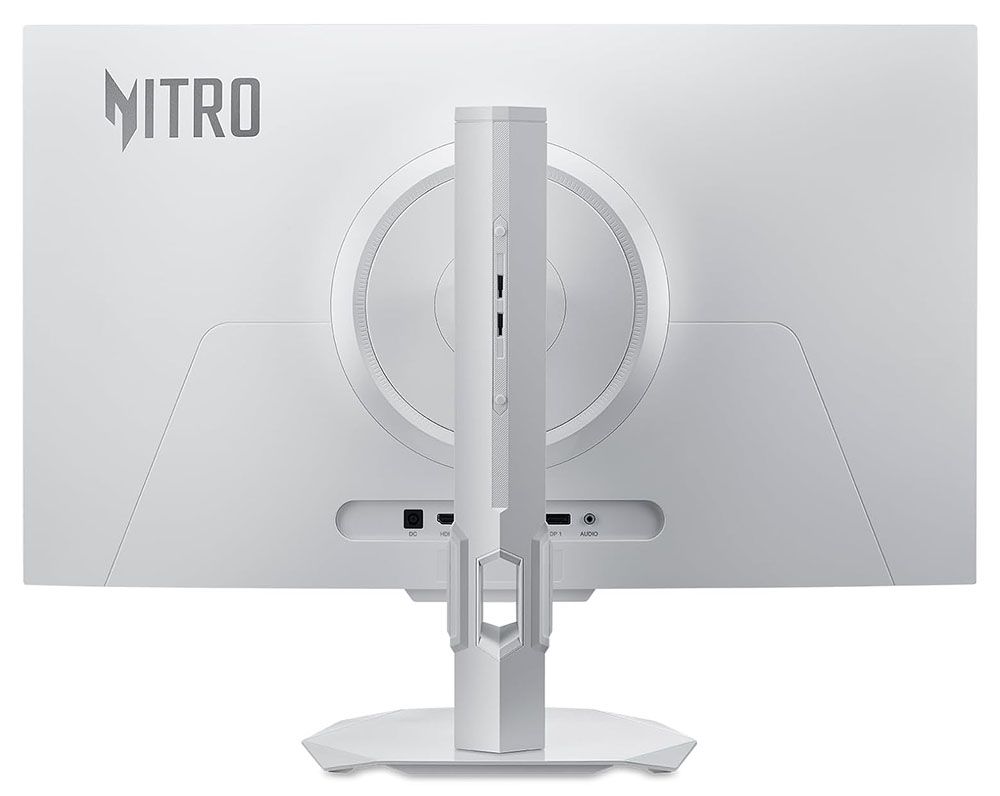
To make the best use of the 500 Hz refresh rate, the Predator X27U has both AMD FreeSync Premium Pro and Nvidia G-Sync Compatible support. The included stand is height-, tilt-, and swivel-adjustable. The newer revision eschews a proximity sensor and other similar accessories for its lower price, but it does include USB-C connectivity alongside two DisplayPort 1.4 inputs and two HDMI 2.1 ports. A pair of 5W speakers round out the main specs. Get yours now from Newegg for $509.99.
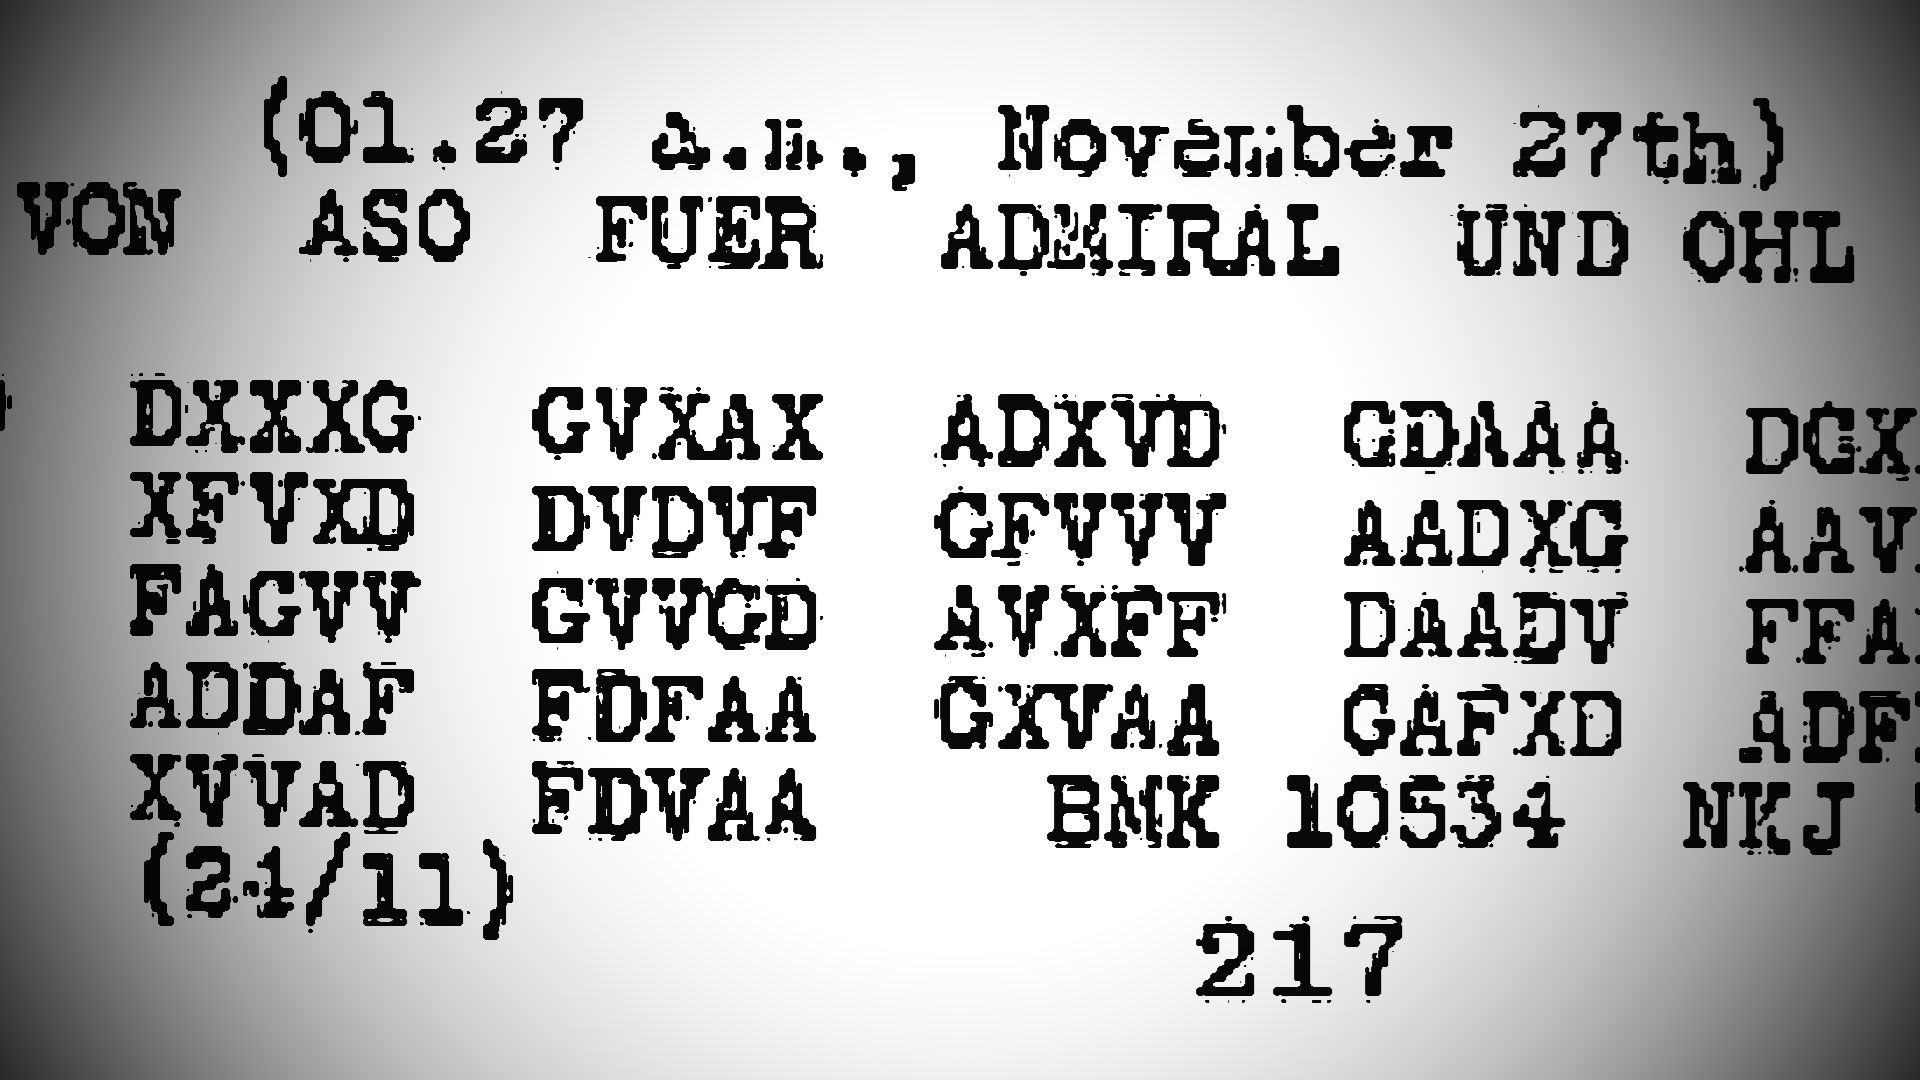
Now 108 years after its transmission, an encrypted World War I German radio message has apparently been deciphered for the first time. The decoded and translated message relays information about the movements of an English cruiser and an Allied squadron near the Crimean Peninsula. Prinz, the developer who reckons they successfully decoded this covert WWI communication, used GPT-Astra to solve the cipher.
Prinz picked the code from a relatively famous list of 50 unsolved ciphers maintained by the German science blogging portal Scienceblogs.de. It was known to be “encoded using the ADFGVX method,” says the developer on their Substack.
Addressed to the German High Command and for the attention of an admiral or perhaps Naval Command, the ciphered message looks like gobbledygook, surely as intended. The German military at the time used a convoluted grid of letters that shuffled depending on the current keyword.
GPT-6 Astra deciphered a 1918 German radio transmission that, to my knowledge, has never been deciphered before.The message below translates to:"EIN ENGLISCHER KREUZER EINLIEG X SEWASTOPOL X S4STEN X EIN GESCHWADER DER X ALLIIERTEN FOLGT 26STEN X"or, in English:"AN… pic.twitter.com/8kjDdI2Q5OSeptember 17, 2026
Astra solved the cipher using the word “TRUPPENVERSCHIEBUNG” as the key. This resulted in the decoded message: “EIN ENGLISCHER KREUZER EINLIEG X SEWASTOPOL X S4STEN X EIN GESCHWADER DER X ALLIIERTEN FOLGT 26STEN X.” Translated into English, we can at last understand that the radio message was the following alert: “AN ENGLISH CRUISER ARRIVED AT SEVASTOPOL ON THE ?4TH AN ALLIED SQUADRON FOLLOWS ON THE 26TH."
Astra also checked its work against military logs. The details about the cruiser’s arrival time aligned with the arrival of the British cruiser HMS Canterbury in Sevastopol, Crimea, on November 24, 1918. So the ‘?’ was perhaps a typo made in transmission. However, the Allied squadron's arrival date was spot on (November 26), according to the historical records Prinz checked.
GPT-Astra hypothesizes that previous attempts to decipher this German message failed because code sleuths made an incorrect assumption. Before this decoding feat, it was thought that the keyword “TRUPPENVERSCHIEBUNG” was used only as a key starting December 9, 1918. Remember, this message was transmitted on November 29 of that year.
This codebreaking feat is a cool result and a good example of Astra’s flexible problem-solving capabilities.
Interestingly, he’s had no issues with losing work, saying that “jobs come and go. I’ve worked my whole life; I’ll find another job… I’ve got two hands, I’m healthy, I’m capable of working. So, if losing my job was the worst that came out of this, I’d honestly probably be okay.” Unfortunately, he’s still on the hook for the massive bill, and it's gotten to the point where he and his wife are talking about selling their home to help pay for it.
Despite the depressing development, Dave and Mike were still about to joke around a bit about it. After Dave thanked his son for bringing him some water, Mike answered, “67.” He then asked, “Mike, do you even know what 67 means?”
To which the kid replied, “To say the least, I do not know what it means, but I think it doesn’t mean anything. It’s just something that makes people laugh and smile.”
The dad then replied, “Yeah, I would have to agree with that, Mike. Actually, I know what 67 means, Mike. That’s how old you’re going to be when you finally have to stop mowing lawns… That’s retirement age for the general public, but not for your old man. After this situation, apparently, I’m going to be working until I’m like 94.”
Interestingly, Dave said that he doesn’t want to accept external help, like setting up a GoFundMe or a crypto coin to help with the bill. “We do not have a Mighty Mike coin. We don’t have a 67 coin. We don’t have any coins. No crypto. We don’t have a GoFundMe. We have no fund raising set up.”
He set up a merch website with 14 different shirt designs that remind people of Mighty Mike’s misadventures, but only three designs are currently available.
(Image credit: Mighty Mike Plays/YouTube)
A few comments said that this was a scam or a made-up story, but Dave shared a screenshot of the credit card bill (which was eventually removed) showing the $118,479.83 bill on the American Express Business Gold Rewards Card.
Several others encouraged him to take the help being offered and let big news channels talk to him, but he seems to want to deal with the problem on his own. “So, I felt like if I sit down with Fox or CNN or whatever, and I tell them my story, what has that changed?” Dave said during the YouTube video. “I’m still living in this reality, and I still have to sort of dig myself out of this hole. I don’t know if I have the mental bandwidth to sit there and talk to some reporter, but I might, anyway.”
The number 1,000 is a benchmark goal in many disciplines. You know a car is special when it has 1,000 horsepower. An amplifier reaches a different level when it can output 1,000 watts. In computer monitor parlance, 1,000 Hz or 1 kHz is also a plateau. Remember that TVs and most displays max out at 60 Hz. But the best gaming monitors, in pursuit of higher frame rates and smoother motion, have been getting faster with each new generation.
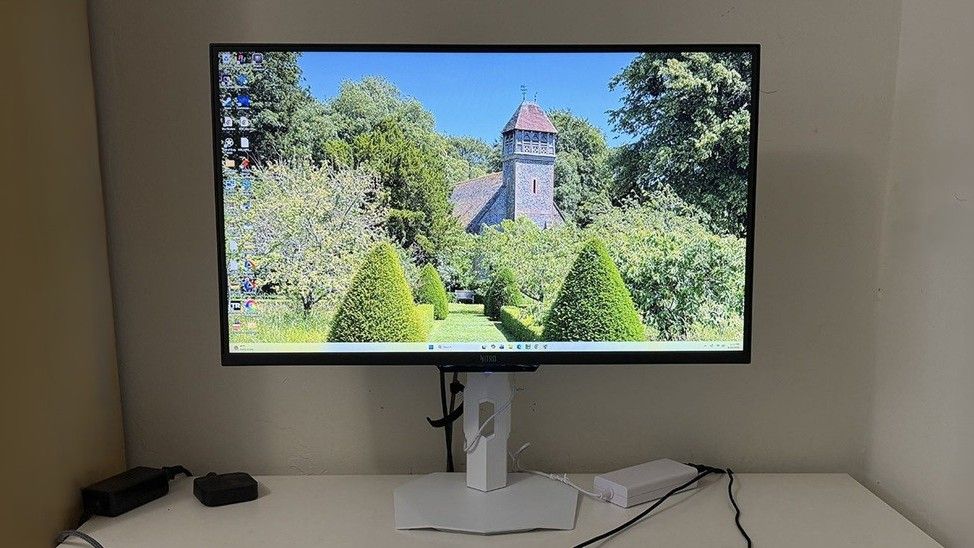
I’ve reviewed several 500 Hz monitors, mostly LCDs, with a few OLEDs sprinkled in. But currently on my desk is Acer’s Nitro XV273U F5, which has a 1,000 Hz mode. And before I get to the caveat, know that it can refresh its screen at 540 Hz in QHD 2560x1440 resolution, so even without trickery, it’s one of the fastest flat panels you can buy. This 27-inch IPS display also features Adaptive-Sync, HDR 600, and wide gamut color. Let’s take a look.
Acer Nitro XV273U F5 Specs
Panel Type / Backlight
IPS / W-LED, edge array
Screen Size / Aspect Ratio
27 inches / 16:9
Max Resolution and Refresh Rate
2560x1440 @ 540 Hz
1280x720 @ 1,000 Hz
FreeSync and G-Sync Compatible
Native Color Depth and Gamut
10-bit (8-bit+FRC) / DCI-P3
Response Time (GTG)
1ms
Brightness (mfr)
400 nits, 600 nits peak HDR
Contrast (mfr)
1,000:1
Speakers
2x 2w
Video Inputs
2x DisplayPort 1.4
2x HDMI 2.1
Audio
3.5mm headphone output
USB
None
Power Consumption
36.5w, brightness @ 200 nits
Panel Dimensions
WxHxD w/base
24.3 x 15.6-21.5 x 8.3 inches
(617 x 396-546 x 211mm)
Panel Thickness
2.36 inches (60mm)
Bezel Width
Top/sides: 0.39 inch (10mm)
Bottom: 0.55 inch (14mm)
Weight
13.57 pounds (6.17kg)
Warranty
3 years
So, let’s get the caveat out of the way first. The XV273U F5’s 1,000 Hz mode happens at 1280x720 resolution. That’s HD, not Full HD, which is 1920x1080. The good part is that this is a multiple of QHD’s 2560x1440. The picture becomes softer but not by as much as you’d expect. Additional video processing features include backlight strobe-based blur reduction and very precise overdrive.
The XV273U F5 also provides excellent image quality from an IPS panel, which has far higher contrast than its claimed 1,000:1 ratio. I measured just over 2,000:1 in testing, which blows away most other IPS panels for dynamic range. The black levels are almost in VA territory, resulting in a very deep, textural image. Acer gets color and gamma right as well, and with a few tweaks that I’ll show you on page four, you can enjoy reference-level accuracy. Gamut coverage is generous, with around 90% coverage of DCI-P3.
The XV273U F5 is fully ready for gaming on PC or console and has all the features to enhance gameplay at any skill level. You get plenty of aiming points and sniper modes, along with a set of timers. The overdrive and backlight strobe are enabled when your system can’t push the frame rates to 540 or 1,000, and they work extremely well, with significant blur reduction and no ghosting or phasing artifacts.
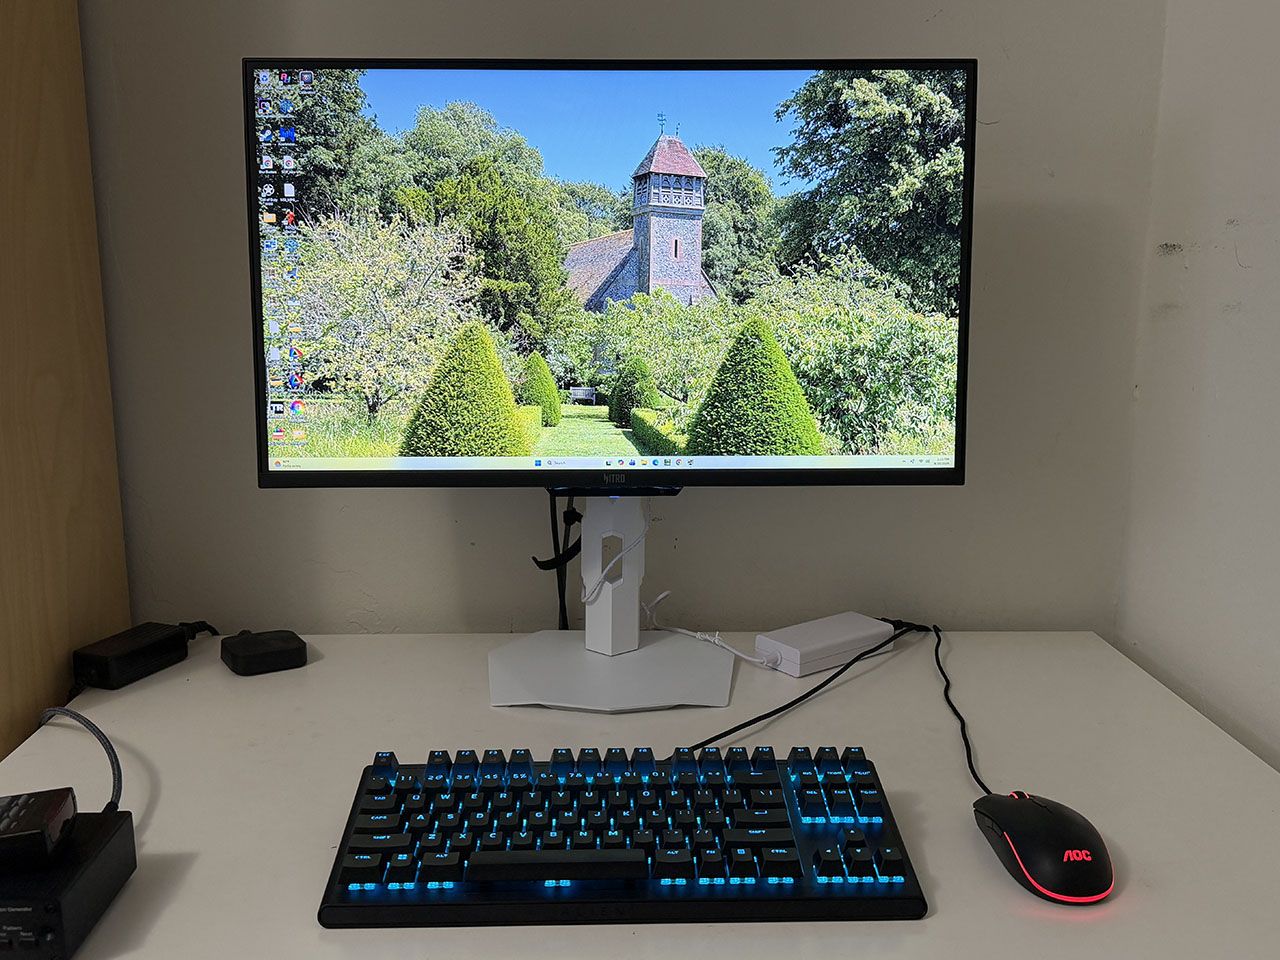
Style is not forgotten here, with a rare white aesthetic. Everything is white, including the base and the included cables. Only the thin screen bezel is black. A handy joystick controls most functions, and there are three control keys, one of which switches the refresh modes.
Connectivity includes two DisplayPorts and two HDMIs. There are no USB ports. You also get internal speakers and a headphone jack. And the ports all face backward for easy access.
The XV273U F5 isn’t a trifling purchase at $700, but if you want a 1,000 Hz monitor, they aren’t exactly common. I’m anxious to pop the hood, then take it for a spin.
Assembly and Accessories
The XV273U F5 comes simply packaged in recyclable pulp forms. A clamshell box opens to reveal four parts: the panel, upright, base, and a snap-on fulcrum. You would omit that if you wanted to use the 100mm VESA mount with an aftermarket arm or wall bracket. The cable bundle includes a white external power brick and an HDMI cable, no DisplayPort though.
Product 360
AcerAcerAcer
There’s something cool about white monitors, mostly because they are few and far between. The XV273U F5 has a nice aesthetic that balances purpose between gaming and productivity. The angular bits are reserved for the stand. The base is a metal plate with downturned corners, finished in a white powder coat. The upright has a cable hole and a few small trim pieces, with a tripod socket at the top. It features full ergonomics with a 5.9-inch height adjustment, 5/25 degree tilt, 20-degree swivel, and a 90-degree portrait mode. Movements are firm, but there’s a little play at the fulcrum point. Getting the panel level takes a bit more effort.
In the back is a large gray Nitro logo and a smooth panel shape with no angles or extra curves. The inputs face backward, making them easy to see and access. You get two DisplayPort 1.4, two HDMI 2.1, and a 3.5mm headphone jack. There are no USB ports, but there is a pair of two-watt internal speakers that play clean and politely in the upper midrange frequencies.
OSD Features
The XV273U F5’s OSD will be familiar to users of Acer monitors. It’s divided into four fields forming a logical tree and has eight sub-sections. To summon it, press the joystick twice.
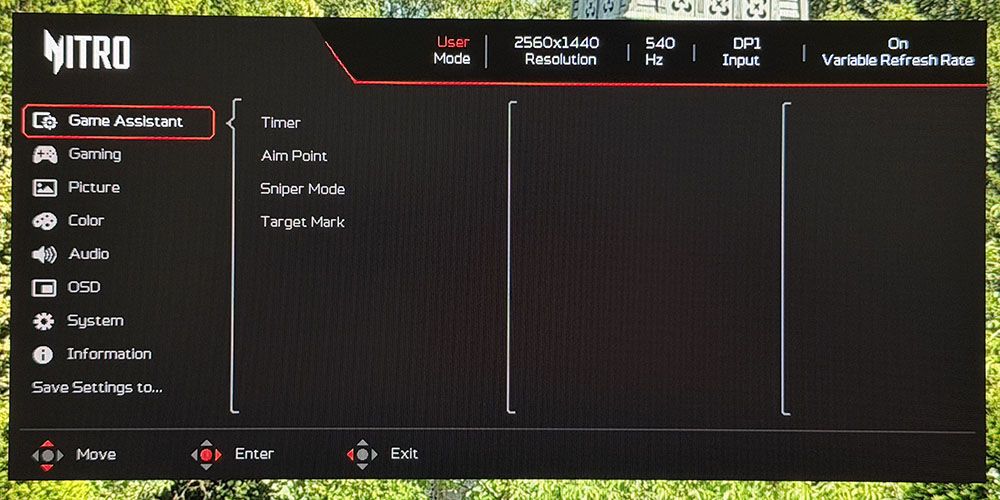
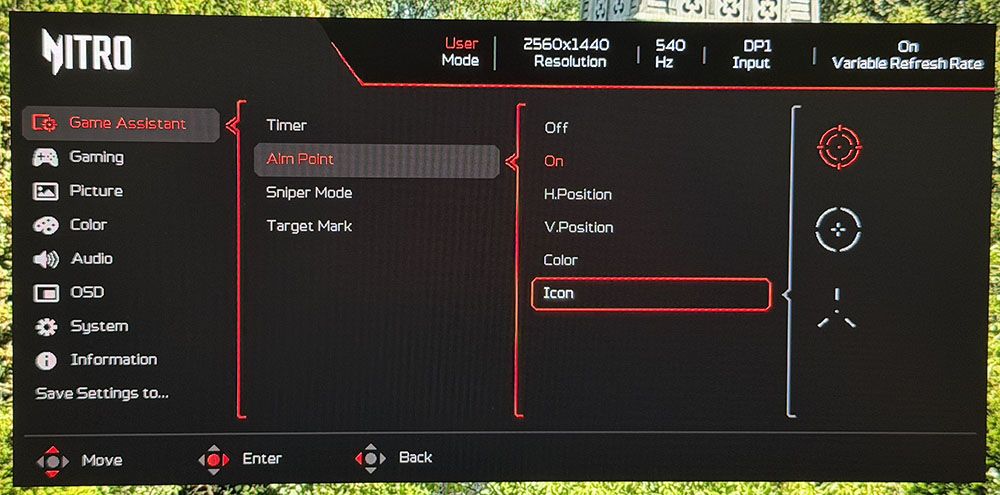
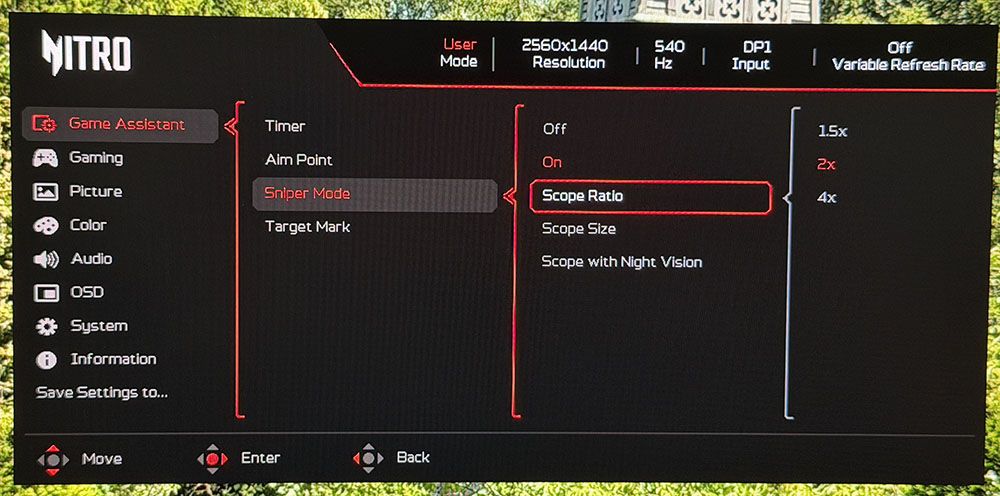
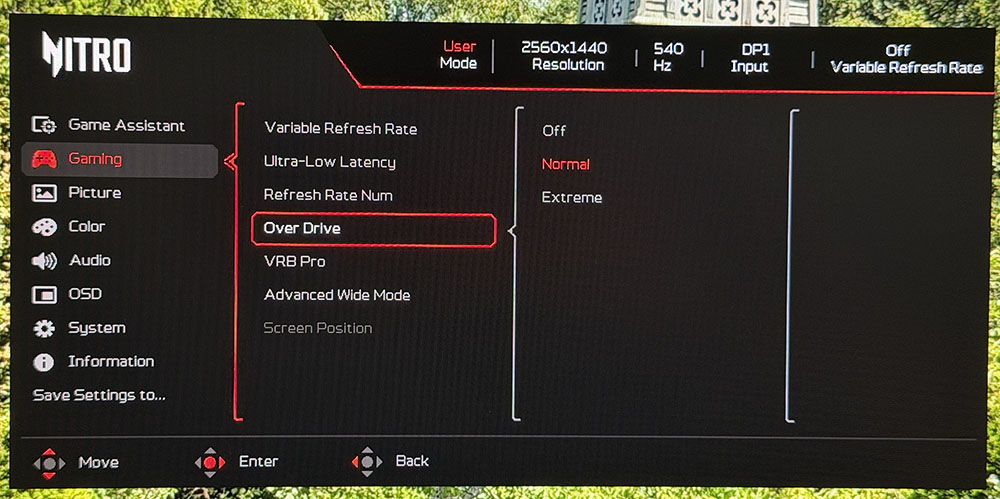
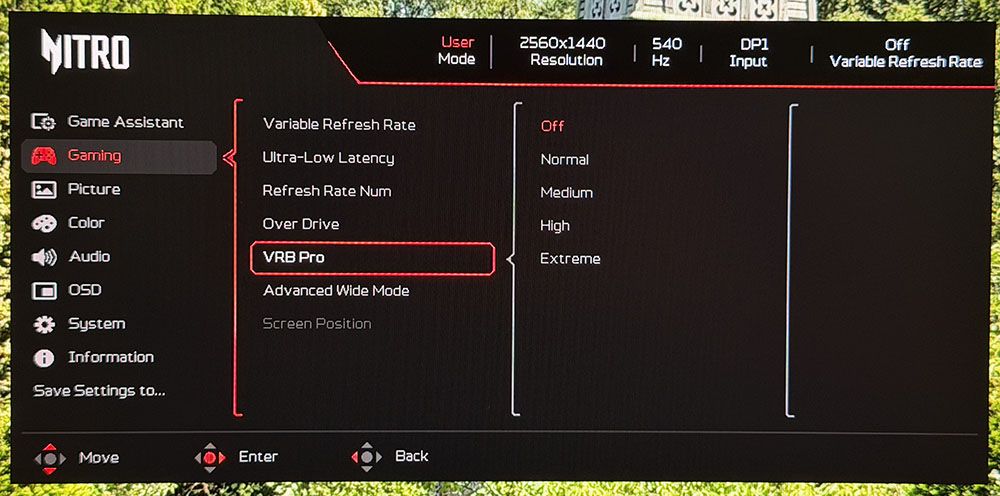
The first two menus are the gaming aids and video processing options. Enhancements include timers, aiming points in multiple shapes and colors, and a sniper mode. The reticle can be moved around the screen if you wish. The sniper scope has three magnifications and night vision. Video processing includes a frame counter, blur reduction with four backlight strobe pulse width levels, and a two-level overdrive. Both are very effective at reducing blur and operate artifact-free. The strobe is one of the very best I’ve seen. At its most extreme setting, it reduces light output by around 40%, but you can increase the brightness slider to compensate.
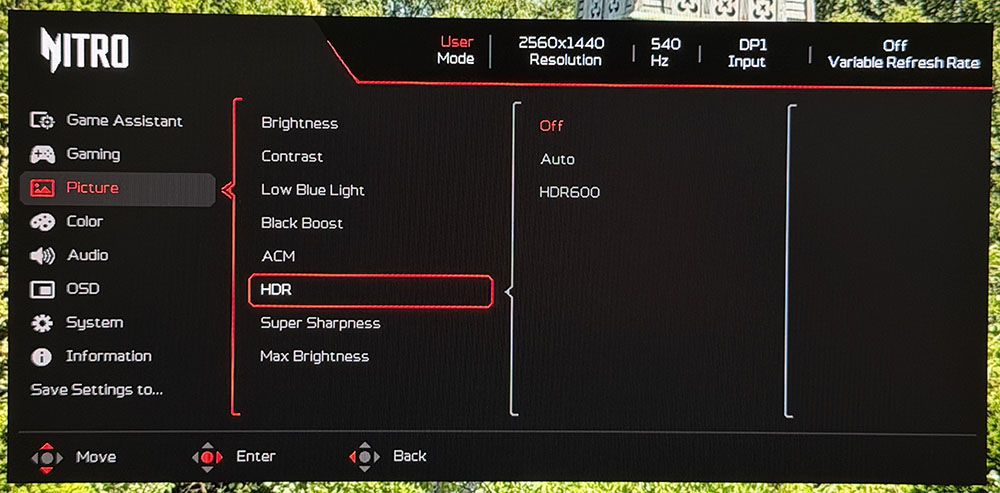
The picture menu includes the HDR modes. You get two: Auto and HDR 600. You would think they are different, but in my tests they measured the same. I noted that the XV273U F5 does not switch to HDR mode automatically; you must select one of these options after applying the signal. Also important in the menu is Max Brightness. Turn it on to get, you know…
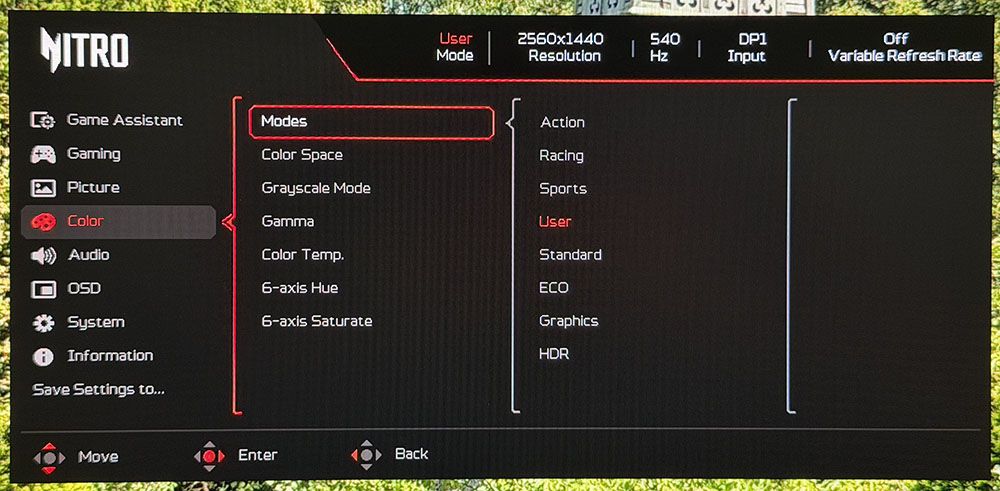
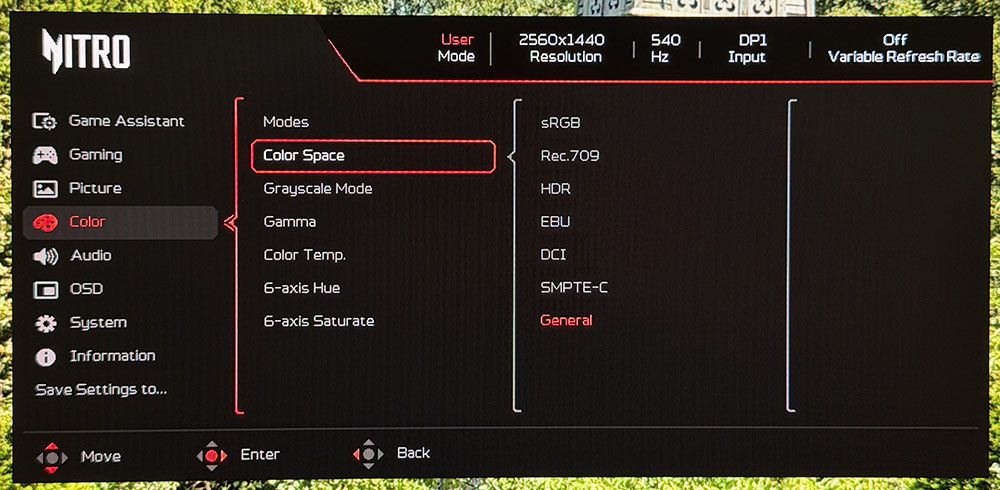
In the Color menu are the eight picture modes arranged by game type or task. Standard is the default, but if you change any setting, the XV273U F5 switches to User. Calibration controls include seven color space options; Native is the most colorful, plus gamma and color temp presets. The RGB sliders include gain and bias adjustments for very precise grayscale tracking.
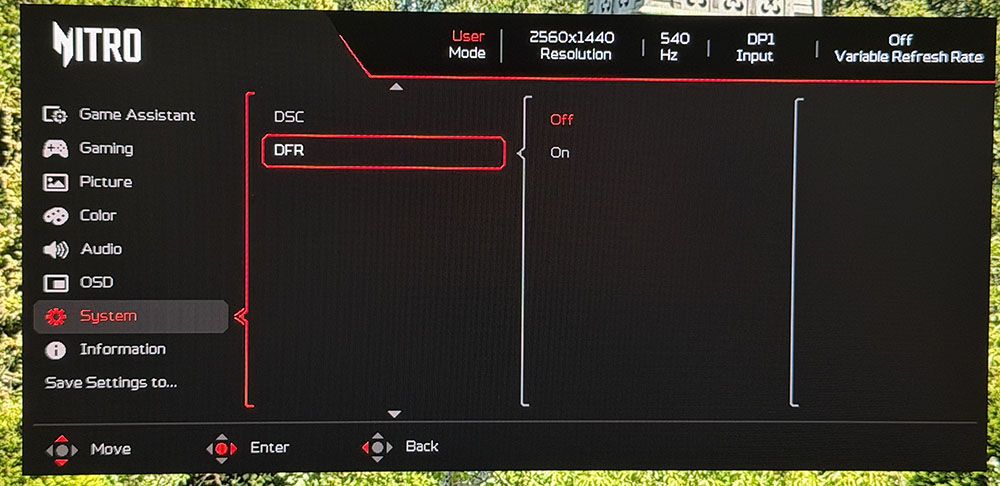
If you’re looking for the frame rate switch, it’s in the System menu, which is counterintuitive. It should be in the Gaming menu. You can also do it with the far-left control key to switch refresh rates without going into the OSD. Like most dual-mode monitors, you must initially set up each resolution in the Nvidia or AMD control panel. Then, you can make the switch on the fly. When you’ve made your settings, you can save them to the two memory locations under Save Settings to…
Acer Nitro XV273U F5 Calibration Settings
The XV273U F5 comes out of the box looking a little cool. It could probably satisfy most users, but a grayscale calibration takes it to reference level. The Native color gamut covers about 90% of DCI-P3, and an sRGB option is available. In all cases, gamma was spot-on, so I left that preset on 2.2. I had to reduce contrast by two clicks to solve a clipping issue. My suggested settings are below. For HDR, apply the signal first, then choose either Auto or HDR 600 from the Picture menu. And don’t forget to turn on Max Brightness for the XV273U F5’s max brightness.
Picture Mode
User
Brightness 200 nits
55
Brightness 120 nits
31
Brightness 100 nits
23
Brightness 80 nits
18
Brightness 50 nits
8 (min. 23 nits)
Contrast
48
Gamma
2.2
Color Temp User
Gain – Red 49, Green 51, Blue 49
Bias – Red 50, Green 50, Blue 50
Gaming and Hands-on
If you are a gamer looking for maximum smoothness and next-to-no input lag, and you don’t want to buy an OLED, the XV273U F5 is easily the next best thing. My perspective comes from the fact that the most prolific OLED category right now is 27-inch QHD 240 Hz. The XV273U F5 has the same size and pixel density, as well as excellent contrast and color. And it’s as smooth as a QHD 240 Hz OLED, albeit running at 540 Hz. I could do this without any problem using a GeForce RTX 4090, though given the fan noise I heard, it was working for it. But this monitor is the first LCD I would compare to an OLED for gaming feel and addictive play.
Motion blur simply did not exist at 540 Hz, and perceptually, neither did input lag. Turn-and-fire and circle strafe maneuvers were super easy and precise. I experienced very little wasted ammo. Competitive gamers will be right at home playing on an XV273U F5.
At 1,000 Hz, the story is different, but not that different. Yes, the picture is soft. It’s a bit like watching old TV shows on YouTube. You don’t enjoy them less, but by modern FHD and UHD standards, 480p is so 10 years ago. However, 1,000 fps is really something. The RTX 4090 worked even harder than before, but it managed to keep the frame rate locked at 1K. Again, there is no input lag, nor is there any blur. And even though the picture was soft, gameplay was just as addictive. It’s just so quick that some scenarios become too easy. For gamers of all skill levels, the XV273U F5 is a weapon.
I’m spoiled by OLEDs, so I won’t pretend that the XV273U F5 looks as good as them. But it’s closer to that standard than many other LCDs. It has one of the highest-contrast IPS panels I’ve seen, with a native contrast ratio around 2,000:1. That’s almost VA territory, but with better viewing angles and more saturated color. You’ll see in my test results on page four that this is a very accurate display, and it shows in practice. I noted that HDR content looked very good but had no more contrast than SDR. But with excellent luminance tracking and rich color, it provided decent impact.
For daily use, you can save a little power and run it at 120 Hz for productivity. That will get you smooth scrolling for webpages and documents. 109ppi pixel density gave me clear fonts, sharp graphics, and solid detail in small objects like icons and toolbars. Color accuracy and a useful sRGB mode provided good functionality in Photoshop.
I enjoyed the styling very much too, especially the white part. I’m a fan of white monitors, and the XV273U F5 is one of the nicer ones I’ve experienced. The rear-facing ports are super handy because they’re easy to see and reach. I’d have liked some USB ports, though. But I was glad to hear decent sound from the internal speakers. They aren’t Wilson Sashas, but they play clean and loud enough for one user.
Takeaway: The XV273U F5 is a superb gaming monitor with a gaming feel and response time on par with any OLED display. It has plenty of contrast and color too, which gives the picture impact and texture. I really enjoyed the styling and the white aesthetic. Though premium-priced, it can refresh at 1,000 Hz, and that is something rare indeed.
To compare the XV273U F5’s performance, I’ve rounded up a group of speedy LCDs that refresh between 210 and 360 Hz. Obviously, the response and lag tests give the Acer an unfair advantage, but I haven’t reviewed a 500 Hz LCD monitor in quite a while. They are Acer’s XB273U F5, KTC’s M27T6S and H27E6, AOC’s CQ27G4ZH, and HP’s Omen 27qs.
Pixel Response and Input Lag
Click here to read up on our pixel response and input lag testing procedures.
Tom's HardwareTom's Hardware
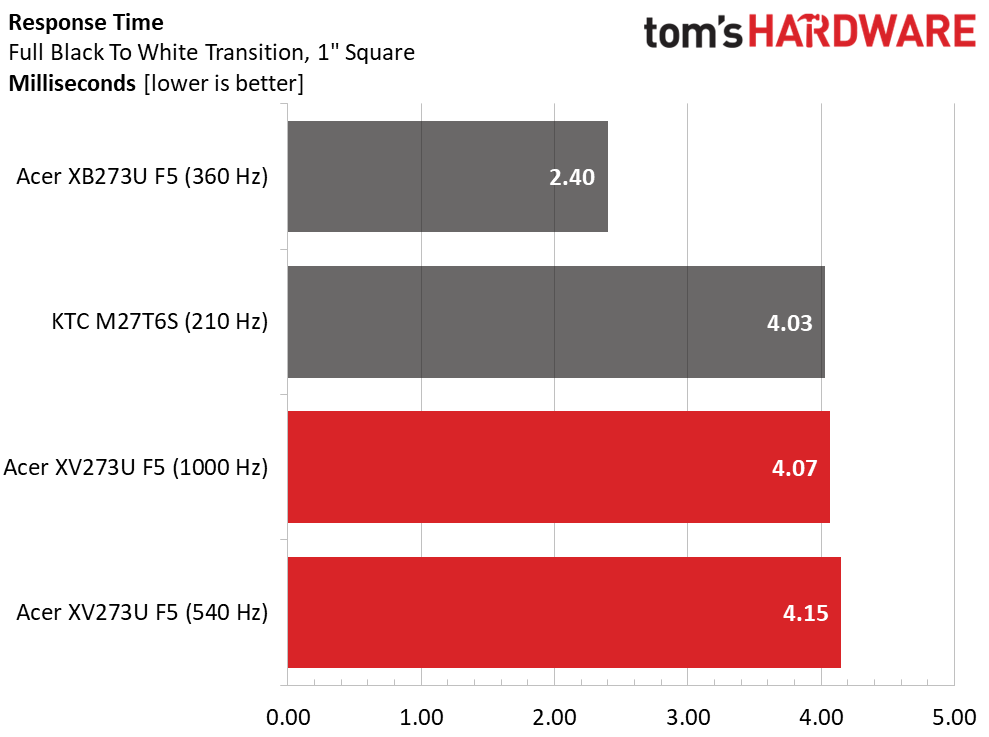
For the response test, only the XB273U F5 and M27T6S have been measured by my new LDAT sensor from Nvidia. Interestingly, the 360 Hz screen is the quickest at 2.4ms. The XV273U F5 seems a tad slow by comparison, and there’s only a slight difference at 1,000 Hz. But this doesn’t account for the quality of the overdrive. The XV273U F5 has one of the best I’ve seen, and it removes almost all motion blur at 540 and 1,000 Hz. It’s effective at lower frame rates too. You can run down to about 300fps before blur becomes noticeable.
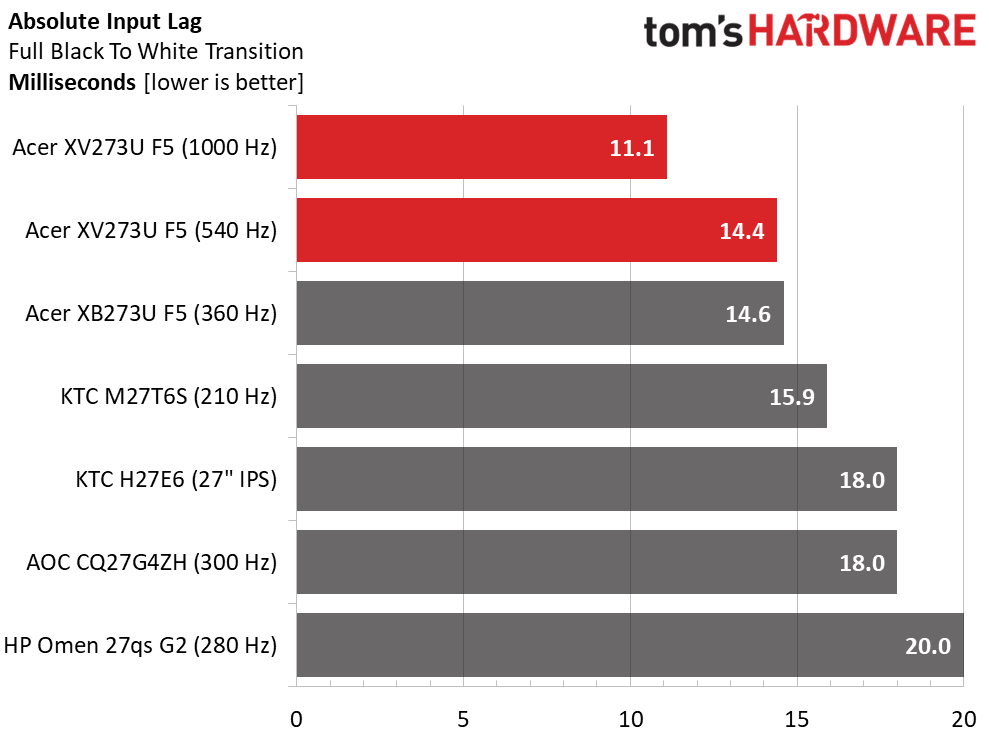
The lag test is where the XV273U F5 really shines. It’s one of the quickest LCDs I’ve tested at just 14.4ms for 540 Hz and 11.1ms for 1,000 Hz. In practice, any of these monitors will satisfy twitchy gameplay, but the XV273U F5 is firmly on top. Only the XB273U F5 and M27T6S come close.
Test Takeaway: The XV273U F5 is one of the fastest LCDs you can buy. At 540 Hz, it equals many OLEDs in smoothness. The overdrive and backlight strobe are among the best available, with effective blur reduction and no ghosting or phasing artifacts. At 1,000 Hz, motion is uncannily smooth, and though resolution is reduced, it isn’t as soft as you might expect. And it has very low input lag in that mode.
Viewing Angles
(Image credit: Tom's Hardware)
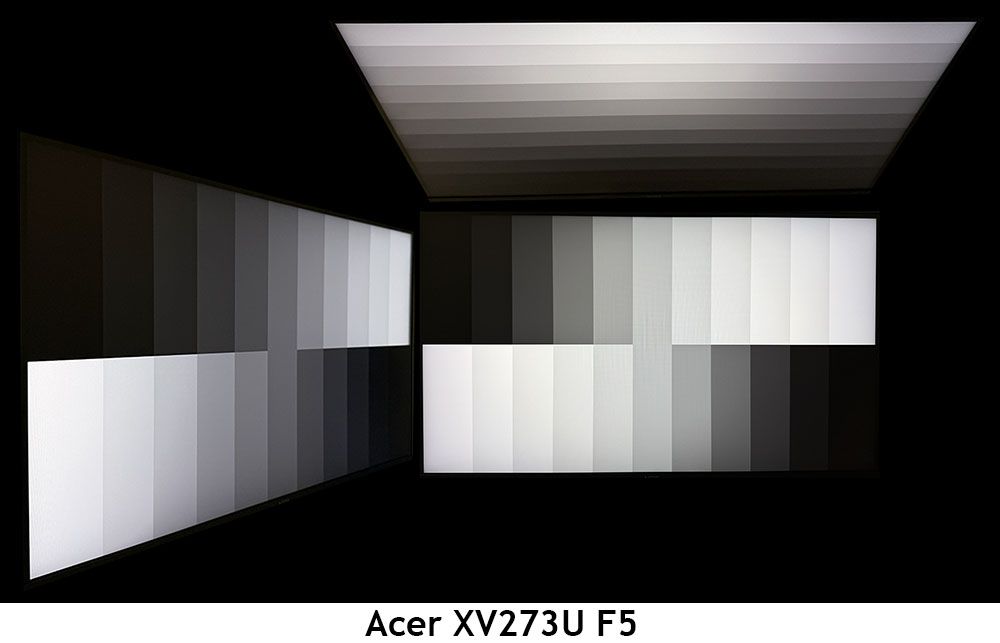
The XV273U F5 is one of the better IPS screens I’ve photographed. In the side view, there is a slight blue tint but no change to gamma or brightness. The top view darkens by around 50% and has a red tint, but its gamma is better than most. This is one of the most shareable LCDs I’ve seen.
Screen Uniformity
To learn how we measure screen uniformity,click here.
(Image credit: Tom's Hardware)
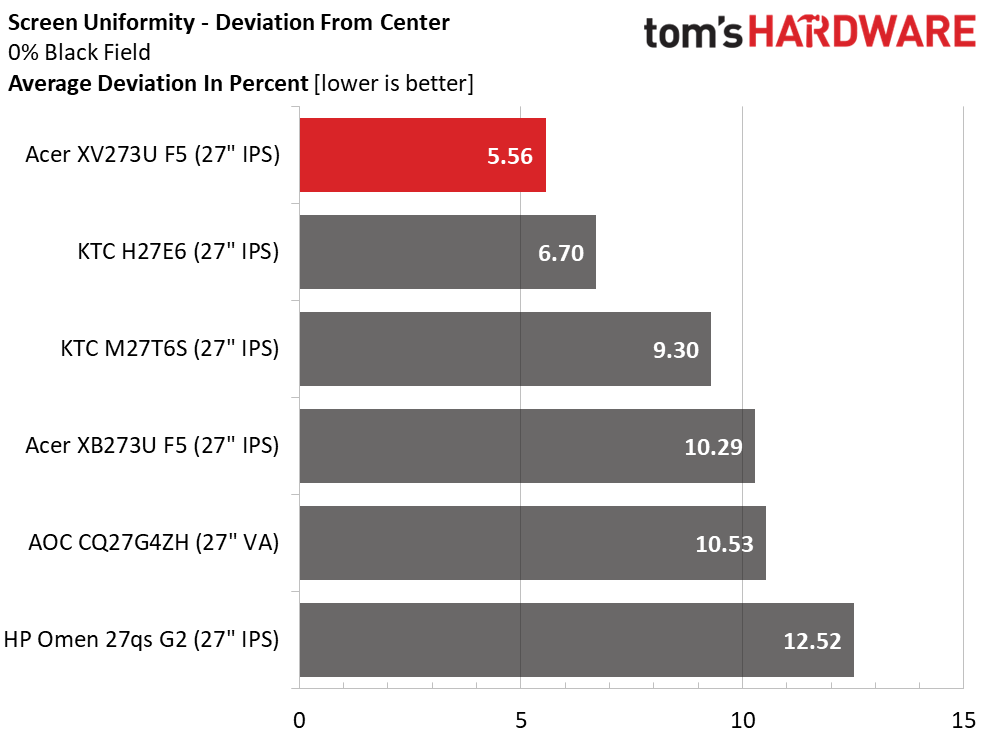
The XV273U F5’s screen uniformity is also on par with many OLEDs. 5.56% is well below the point where you would see any glow or bleed. Color fields were perfectly uniform in my tests as well. This is excellent performance.
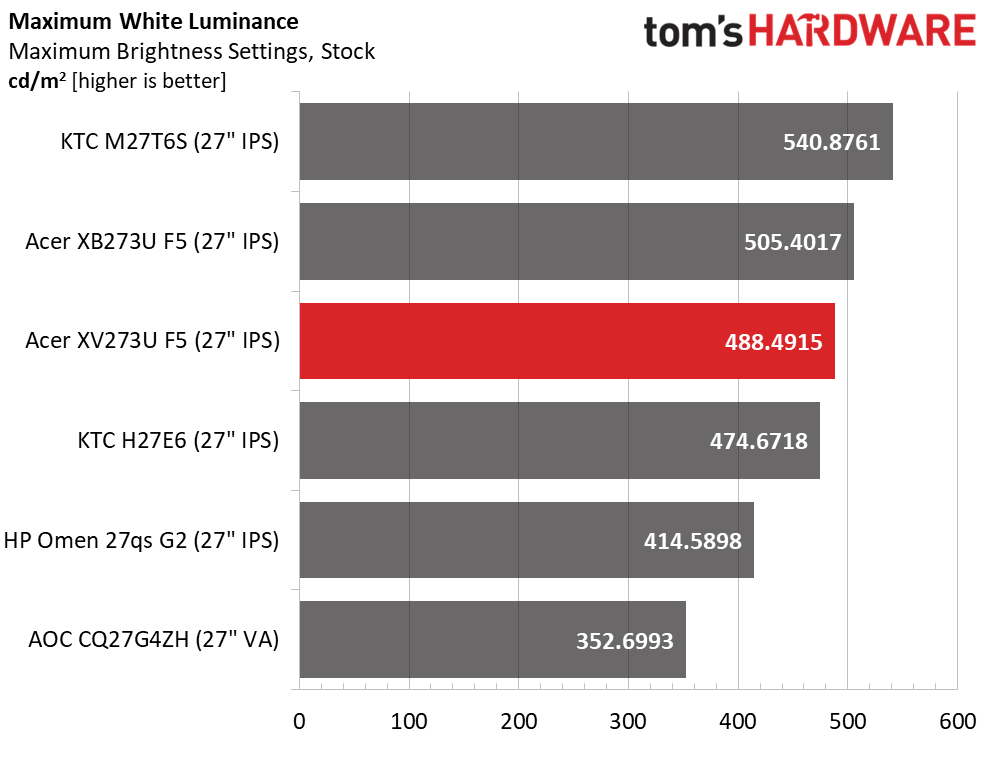
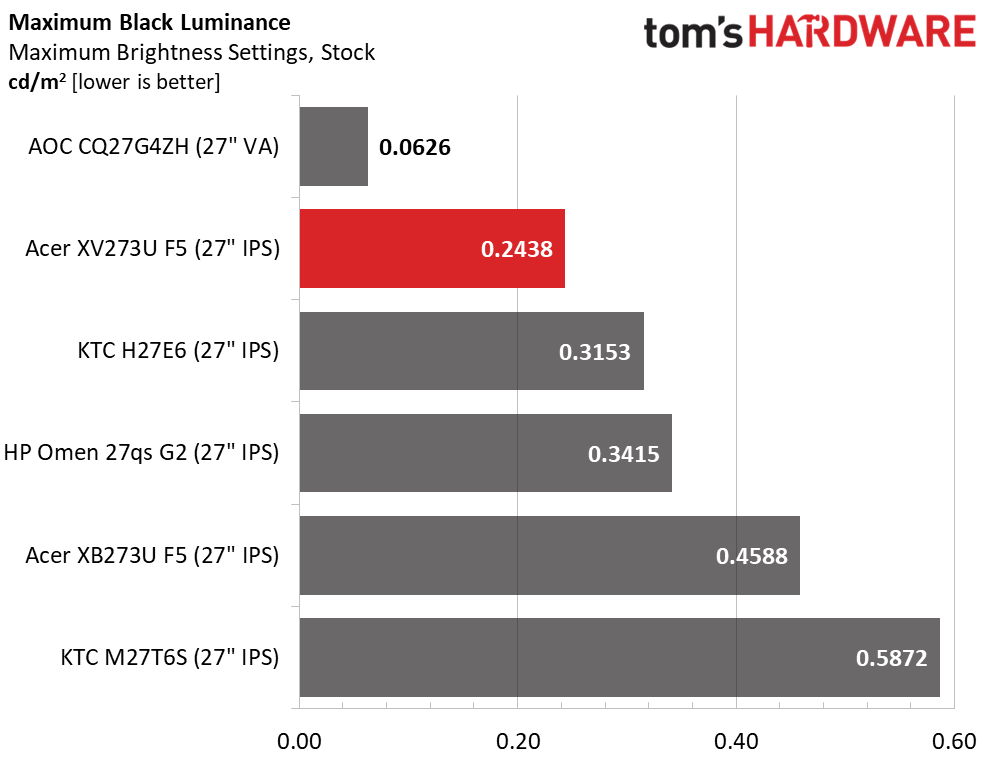
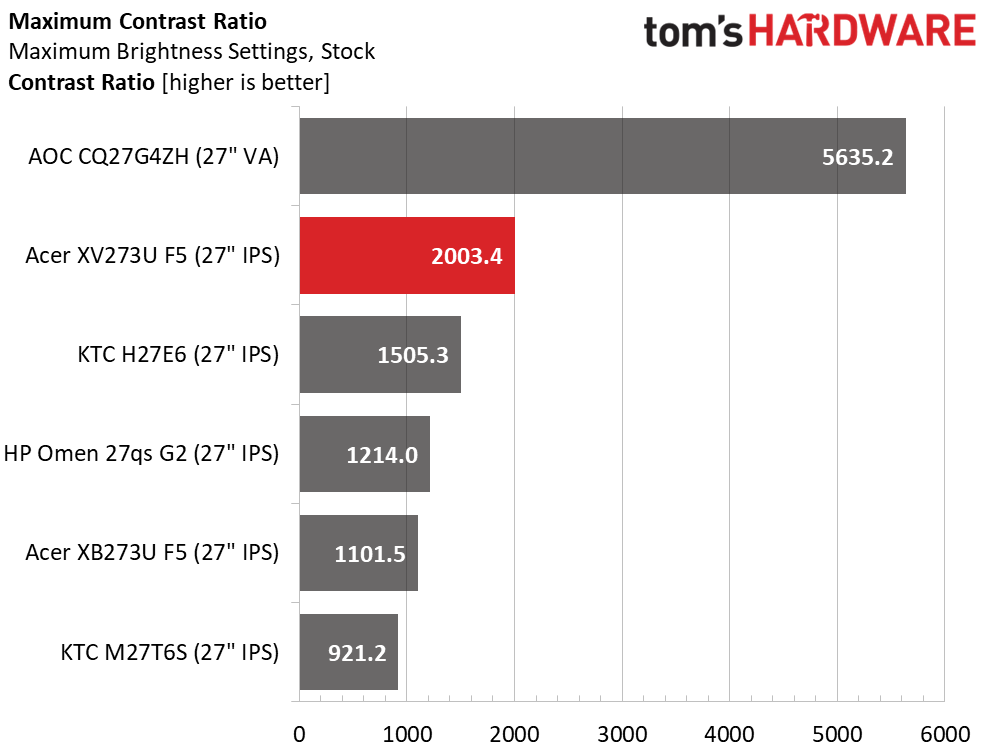
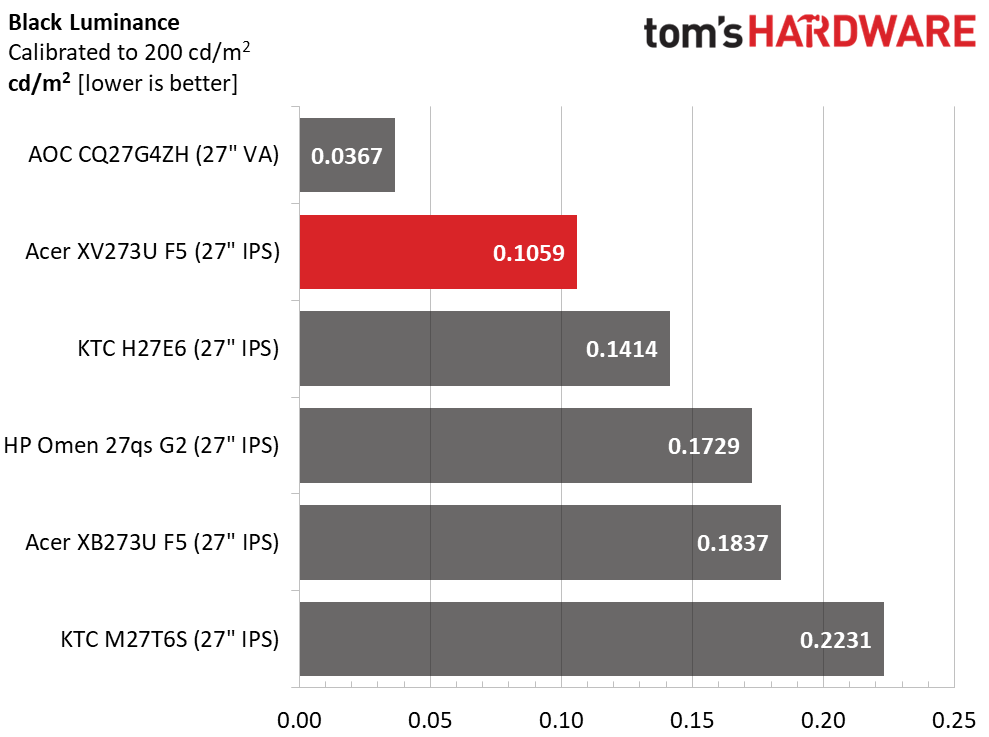
The XV273U F5 has more than enough light output for any indoor space. You could use it in an outdoor location, too, with almost 500 nits available. What’s truly amazing though, is the black level. I was almost fooled into thinking it was a VA panel with a contrast ratio of 2,003:1. This is twice the IPS average of 1,000:1. Only the AOC, which actually is VA, can do better.
After Calibration to 200 nits
Tom's HardwareTom's HardwareTom's Hardware
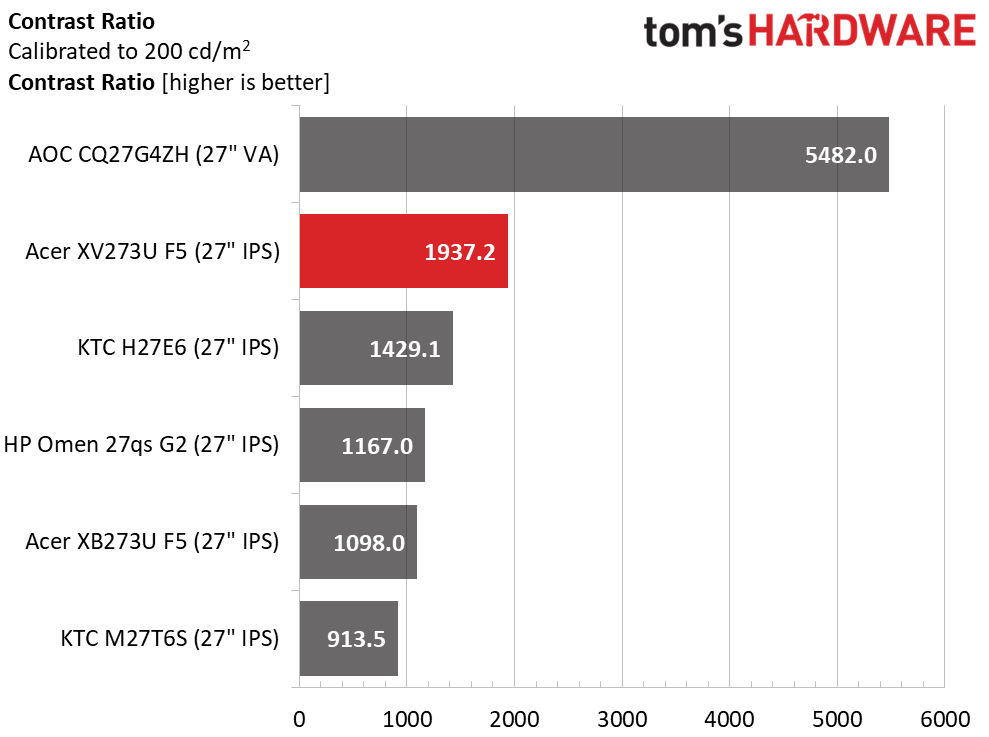
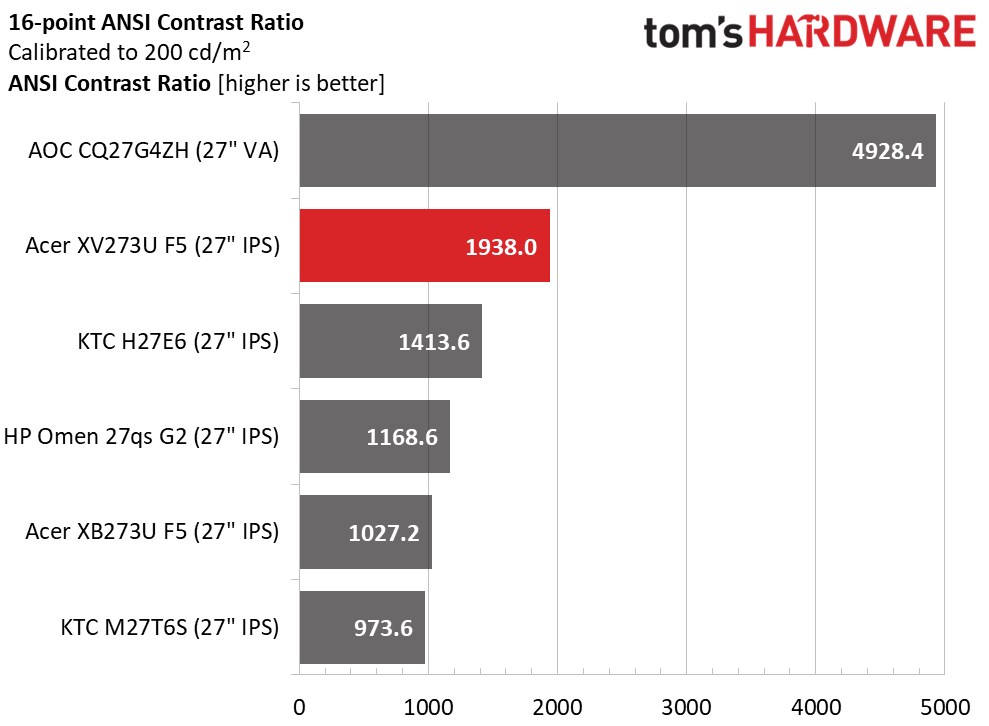
During calibration, I had to lower the contrast slider a bit to solve a clipping issue, but that didn’t make much difference in dynamic range. It’s still an excellent 1,937.2:1, well ahead of the next best KTC. The ANSI score is even more impressive at 1,938:1. It’s rare that any monitor matches its static and intra-image results in my tests. This is excellent performance.
Test Takeaway: The XV273U F5 tries hard to be an OLED with its superb contrast and deep black levels. It’s bright when needed as well, with nearly 500 nits of peak output for SDR content. It also shows excellent quality control with near-identical static and ANSI contrast numbers.
The XV273U F5 ships in its Standard picture mode and includes plenty of picture options like gamma presets, color temps, RGB sliders with two-point control and a gamut selector.
Grayscale and Gamma Tracking
Our grayscale and gamma tests use Calman calibration software fromPortrait Displays. We describe our grayscale and gamma tests in detail here.
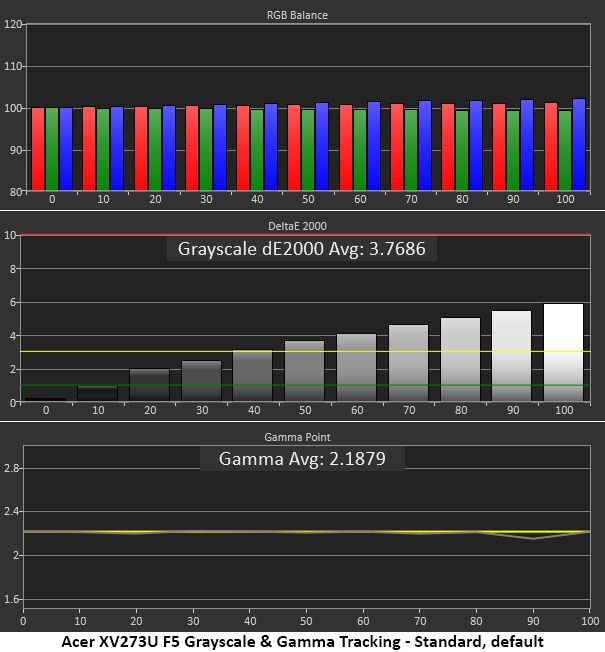
The initial grayscale run shows visible errors starting at the 50% brightness step. The pattern looks a little cool in tone though it’s not too far off the mark. I would definitely calibrate, but many users will be satisfied with the image. And that’s largely because gamma is within a hair of perfect. Only the tiniest dip happens at 90%, and that is well below the visible threshold. Gamma this good makes the image more textural and realistic. It also increases perceived color saturation.
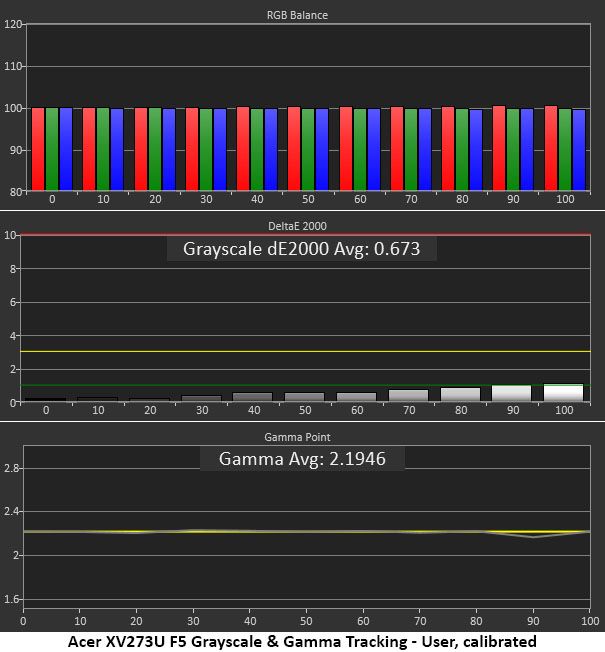
Calibration takes the XV273U F5 to reference level. All errors are under 1dE except 100%, which just cracks the line. It doesn’t get much better than this. Gamma improves a tad as well, with that 90% dip almost gone. This is excellent performance.
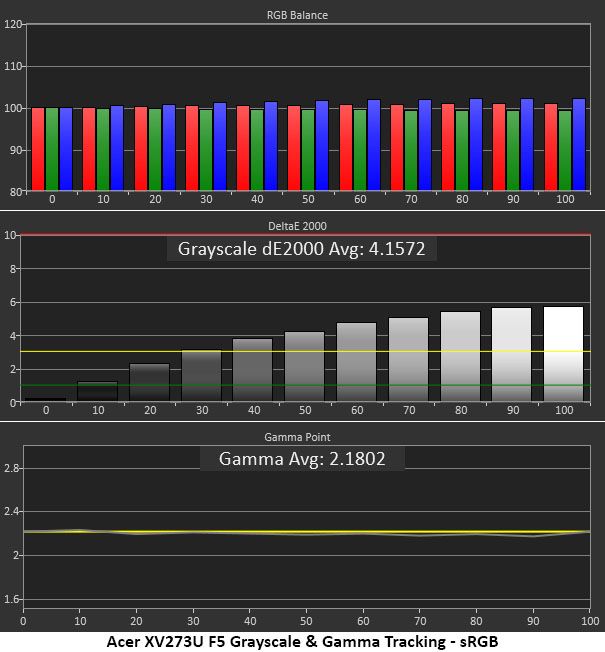
Picking the sRGB color space grays out all other calibration controls, so you get great gamma, but that cool grayscale returns. It’s not a big deal, but I'd like the RGB sliders available. This is decent performance.
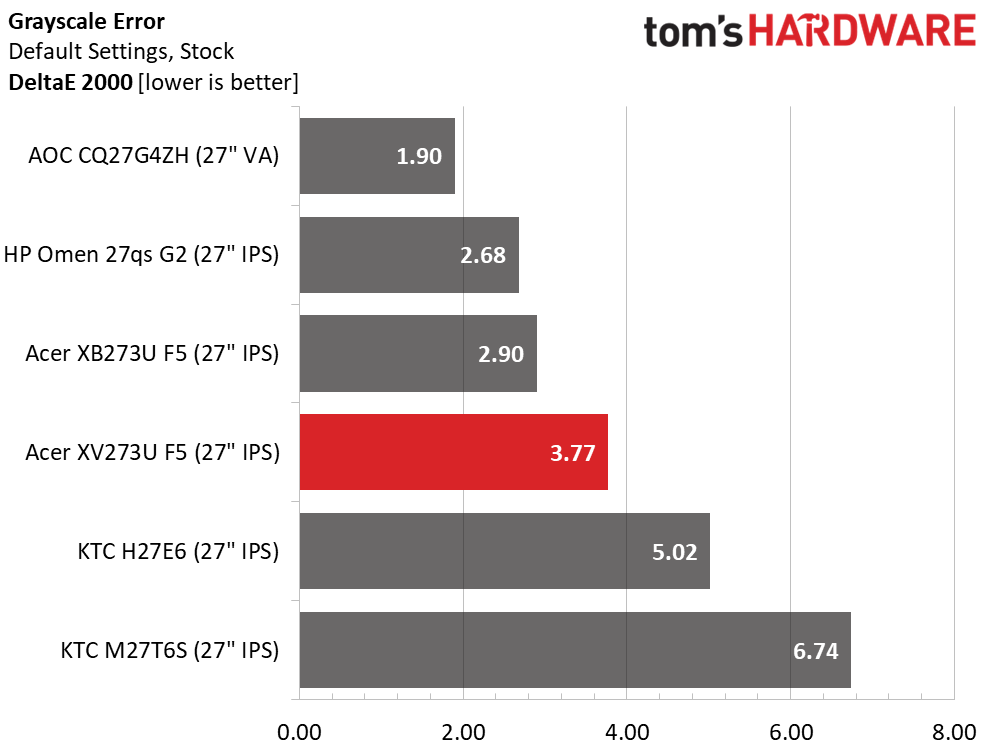
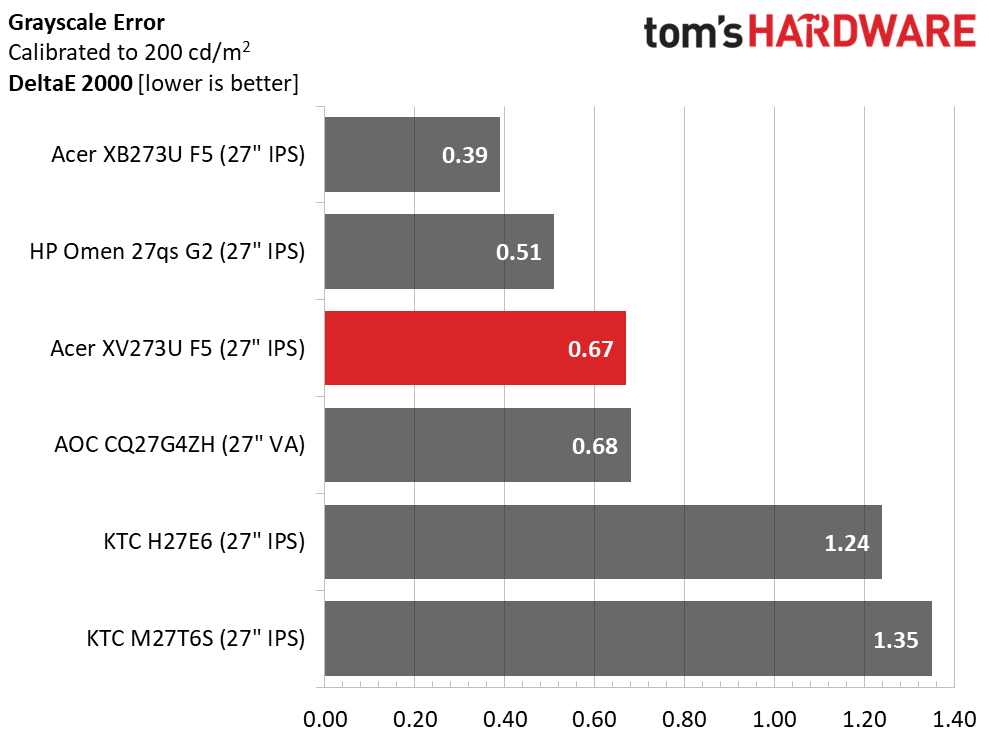
The XV273U F5 finishes fourth in the comparison and just cracks the “should calibrate” line. Most users will be satisfied with the picture, but since a few adjustments can produce reference-quality results, it’s worth a little effort. That takes the average error down to 0.67dE, which is awesome but not quite as good as its predecessor, the XB273U F5, or the HP.
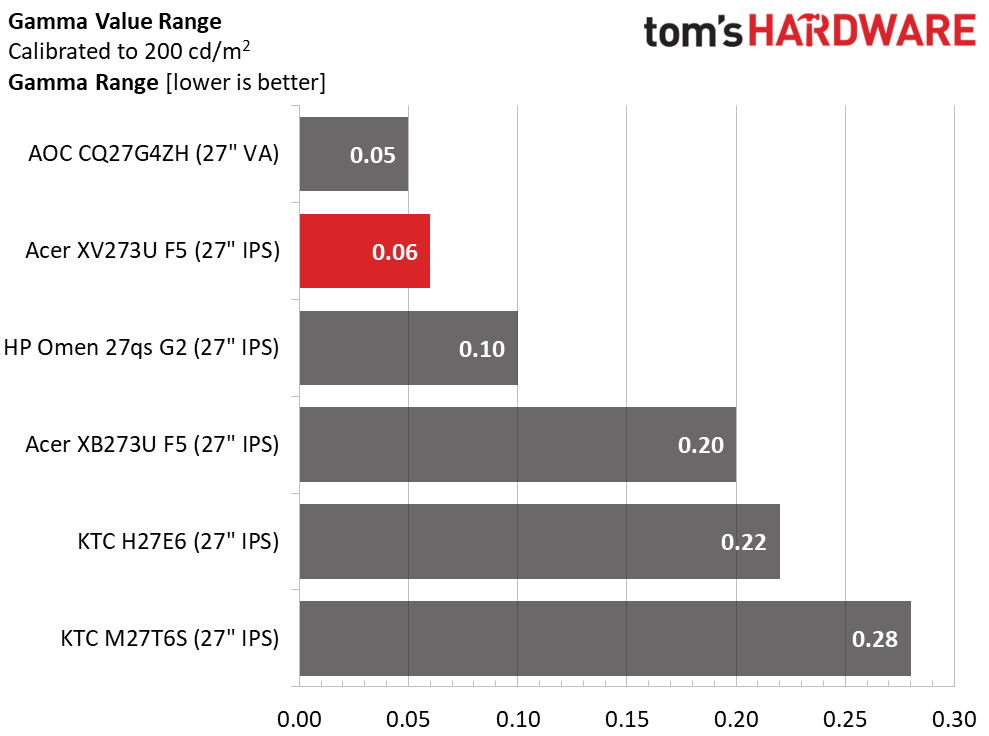
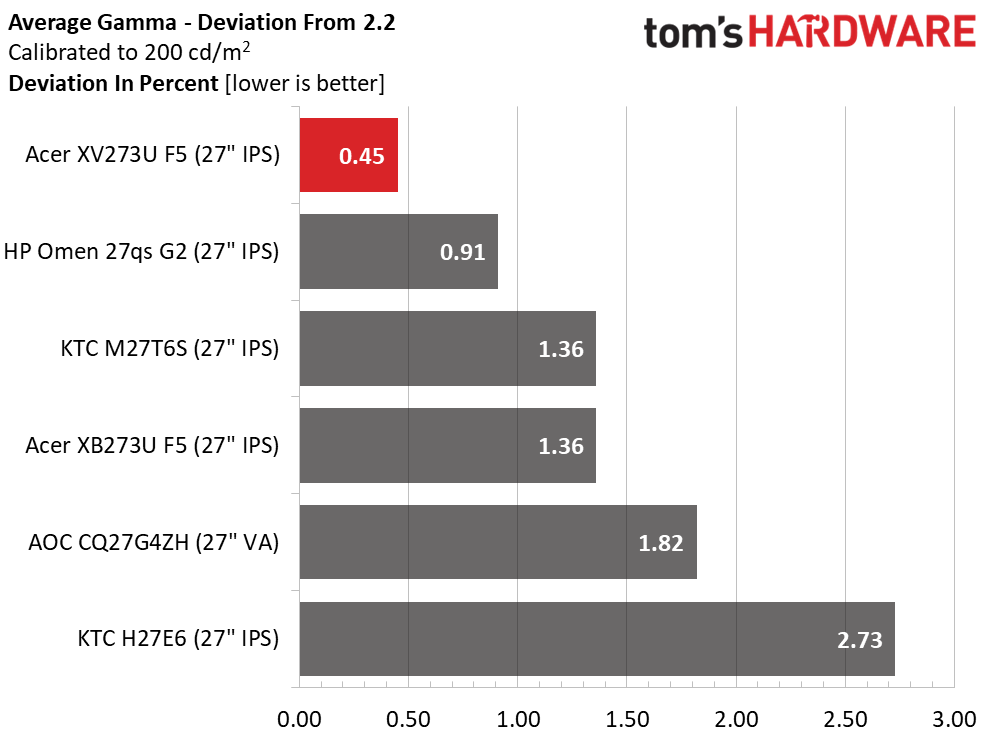
The gamma value range is about as tight as it gets, though the AOC is 0.01 better. But when compared to the 2.2 reference, the XV273U F5 comes out on top with just a 0.45% deviation. The actual value is 2.19. The XV273U F5 has gamma on par with the most accurate pro monitors I’ve reviewed.
Color Gamut Accuracy
Our color gamut and volume testing usePortrait Displays’ Calman software. For details on our color gamut testing and volume calculations,click here.
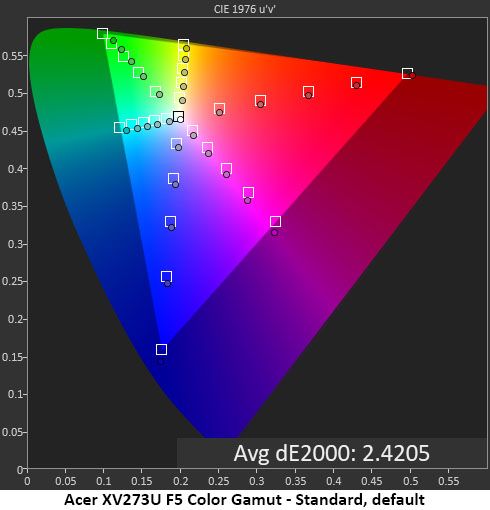
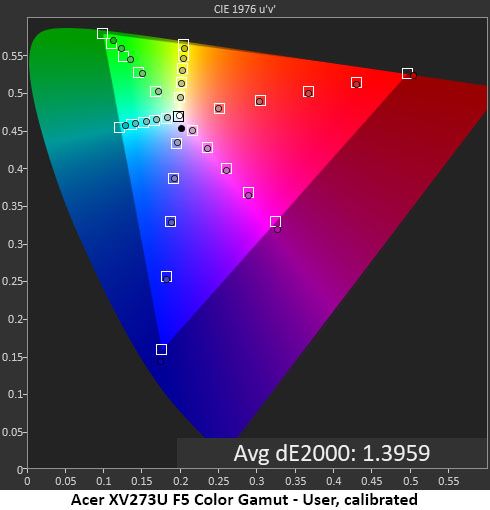
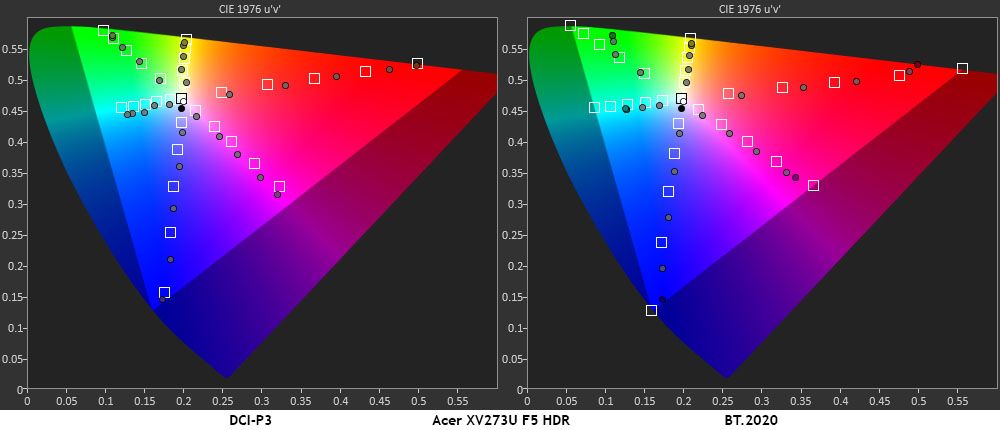
The XV273U F5’s initial color measurement is good, but there is room for improvement. Saturation levels are spot-on thanks to the near-perfect gamma, but hues are slightly off due to grayscale errors. You can see what I mean in the next chart where my grayscale calibration has been done. Now, every point is either inside or in contact with its target box. It doesn’t get much better than that.
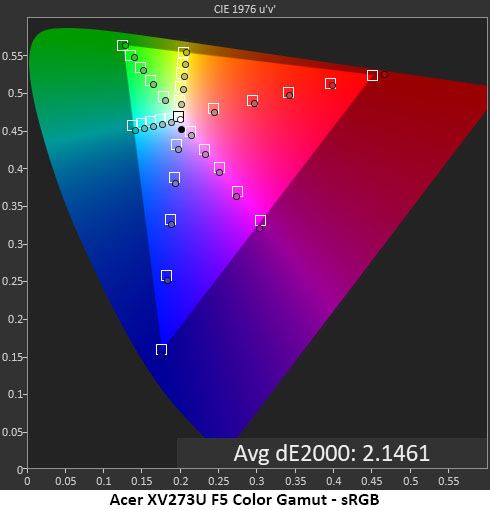
The sRGB mode is quite close to the mark, with a slightly warm grayscale but perfect gamma. There are slight hue errors in cyan and magenta, but other colors are spot-on. If the RGB sliders were available in sRGB mode, this chart could be improved, though it is already good enough for color-important applications.
Comparisons
Tom's HardwareTom's Hardware
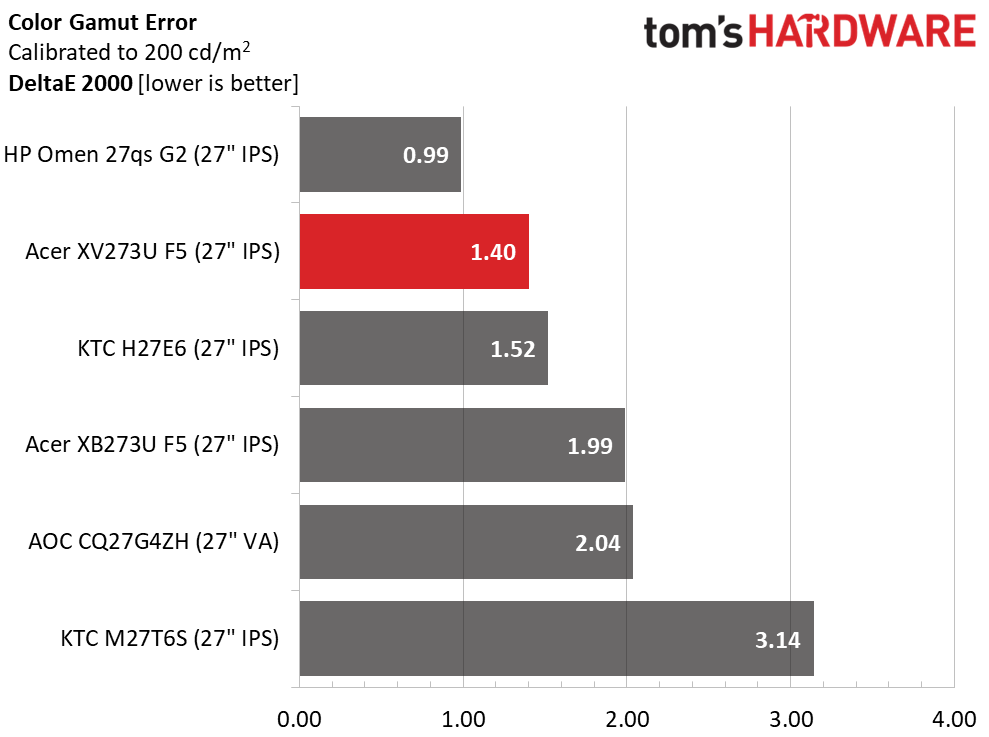
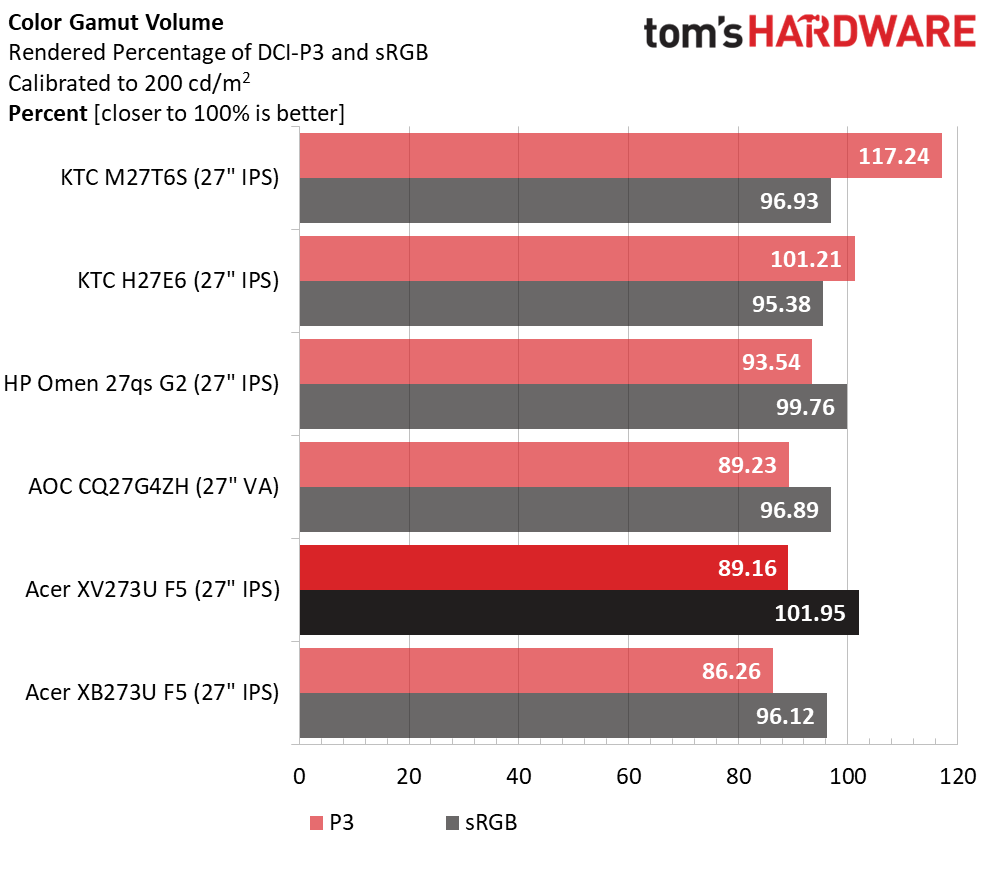
The XV273U F5 has superb color accuracy and gamut coverage, with only minor errors that won’t diminish the picture. A 1.40dE final color score is among the best I’ve recorded. In the gamut volume test, it achieves 89.16% DCI-P3 coverage, which is about average for non-Quantum Dot LCD panels. It only comes up a tad short in the green primary. sRGB coverage comes close to 102% thanks to a little bonus red.
Test Takeaway: The XV273U F5 has excellent color accuracy once calibrated. Out of the box, it’s still solid. In either case, it has gamma tracking on par with the best professional monitors. Color coverage is about average for non-Quantum Dot screens with around 90% of DCI-P3. That suits it well for HDR material.
The XV273U F5 accepts HDR10 signals with a manual switch. You must apply the signal first, then choose one of the two HDR picture modes, Auto or HDR 600.
HDR Brightness and Contrast
Tom's HardwareTom's HardwareTom's Hardware
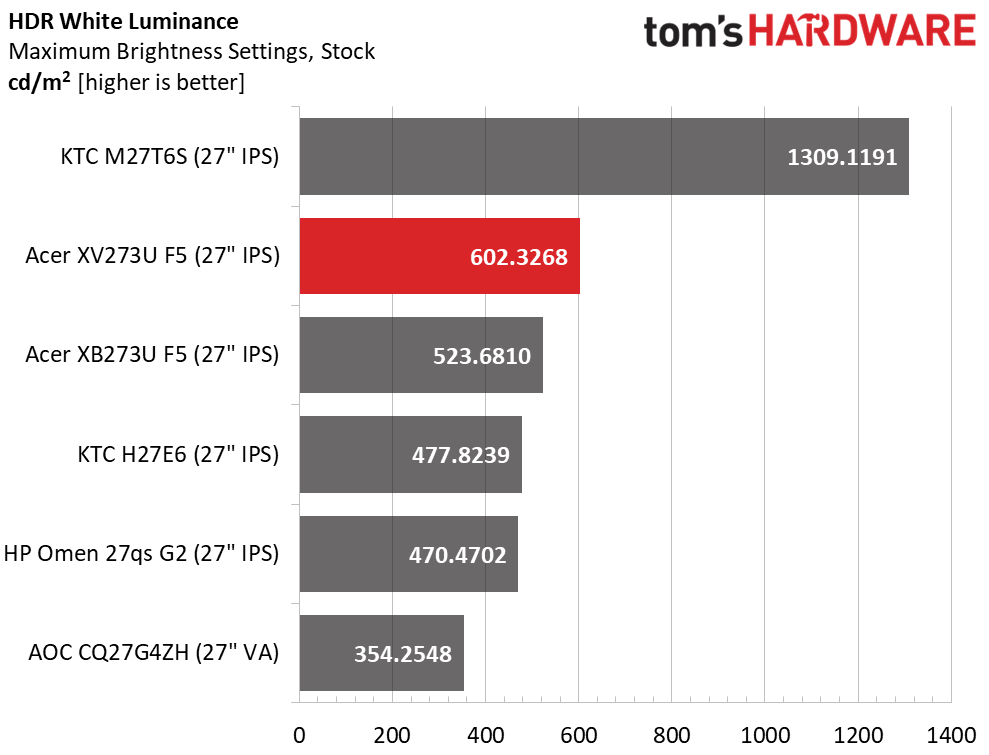
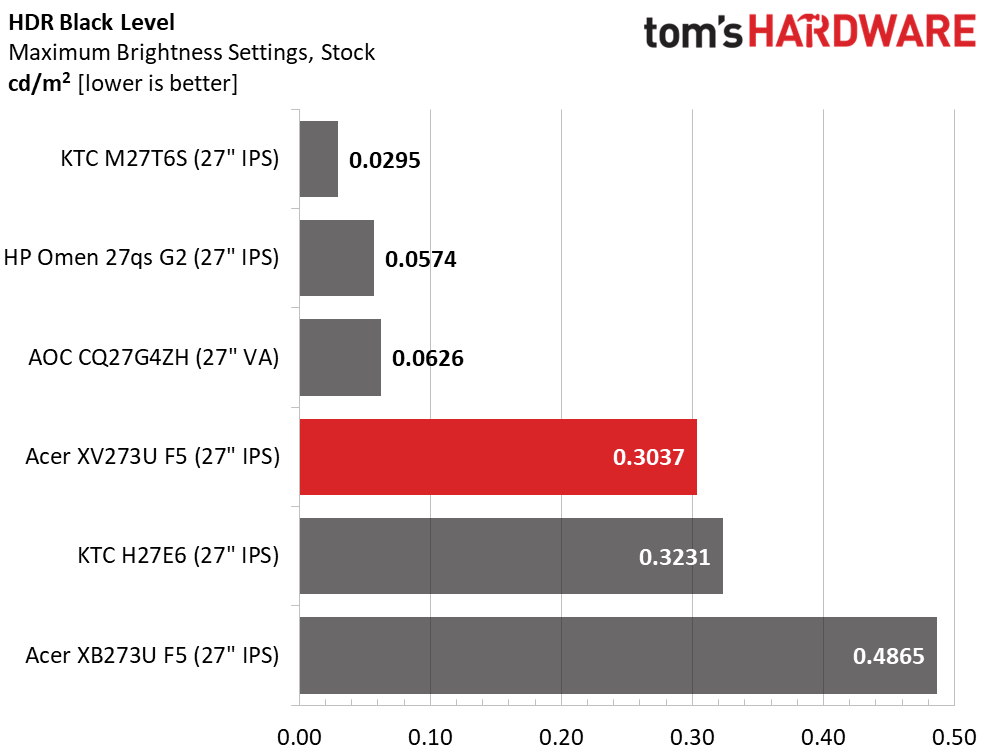
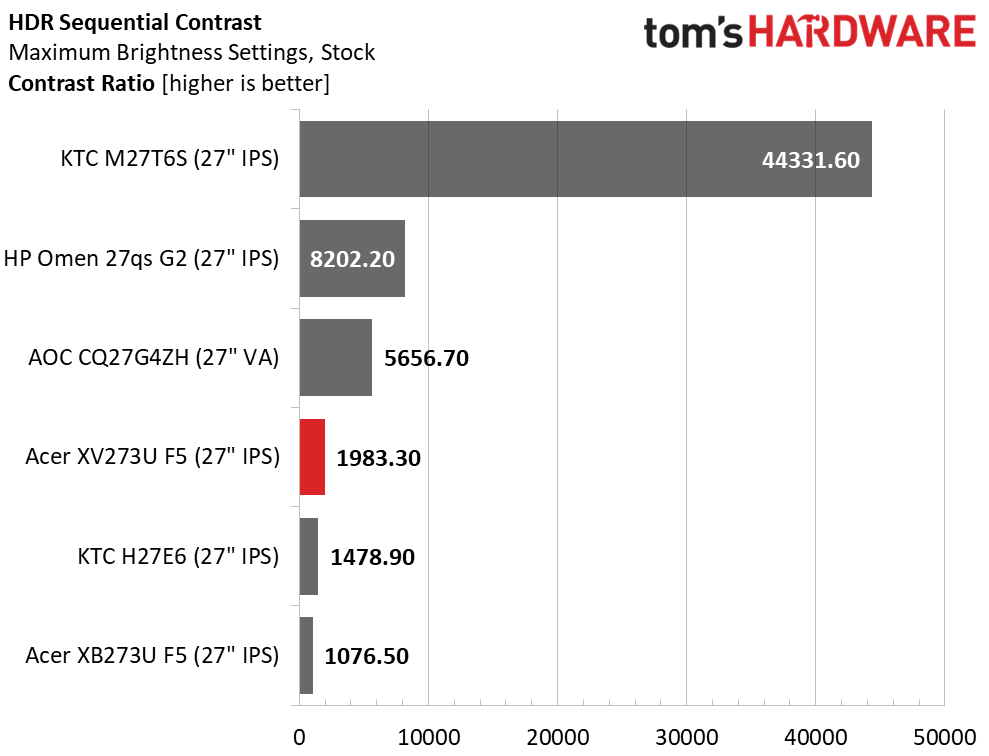
I measured the same peak output in both HDR modes, Auto and HDR 600. The XV273U F5 just cracks the 600-nit mark, earning its VESA Display HDR 600 certification. There is no dimming, either field or zone, to reduce the black level, so contrast is the same as SDR, 1,983:1. This is solid performance, but the HP, KTC, and AOC use dimming to lower their black levels and increase dynamic range, which ultimately provides more impact.
Grayscale, EOTF and Color
Portrait Displays CalmanPortrait Displays Calman
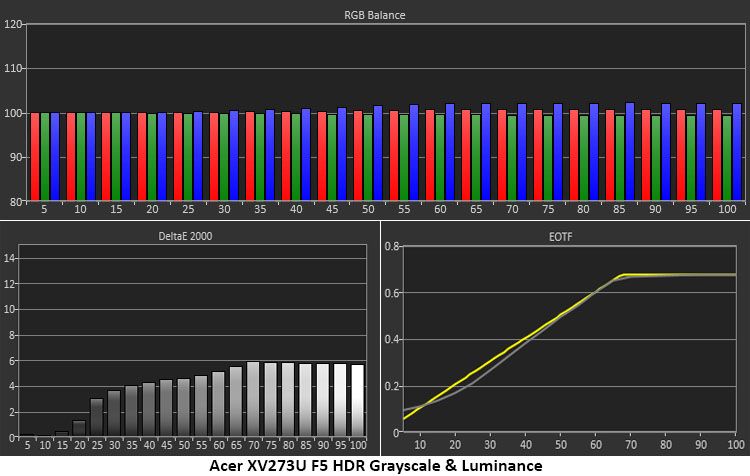
The XV273U F5 has a slightly cool grayscale in HDR mode, with errors visible from the 25% step and brighter. This flattens the image a little, but that is mitigated by excellent EOTF tracking. Aside from a light 0% reading, the measurements stick close to the reference line and hit the correct tone map transition point at 65%. This is where it should be for the measured black and white thresholds.
In the color test, you can see some oversaturation in red and blue while green is close to its targets. That primary comes up a tad short at 100%, which was also the case in my SDR tests. You’ll need Quantum Dots or a Tandem OLED to get more green than this. Hues are true for all colors except magenta and cyan, which are pulled off target by the cool grayscale. In the BT.2020 test, color runs out at 85% red, 70% green, and 95% blue.
Test Takeaway: The XV273U F5 has solid HDR contrast but gives away some performance to other monitors that have zone or field dimming. It mitigates this somewhat with very accurate EOTF tracking. Color is also close to the mark and there’s plenty of saturation there to provide decent impact for HDR content.
There’s no question that OLED gaming monitors have raised the bar for motion quality, gaming feel and quick response. But LCD isn’t done yet. With a high refresh rate and good video processing, an IPS panel can provide the same experience. Acer has clearly raised the bar with its Nitro XV273U F5.
(Image credit: Acer)
At 540 Hz, the XV273U F5 has no visible motion blur. At lower refresh rates, the overdrive keeps motion smooth and if you want a backlight strobe, it’s available and is one of the best implementations out there. You can run this monitor with any gaming PC or console. It isn’t limited to just expensive video cards. And it’s super cool to see “1000” displayed on the screen’s frame counter.
The XV273U F5 panel also provides superb contrast. Though it isn’t going to displace OLED or VA in the black level contest, I measured a 2,000:1 ratio, which puts it well ahead of the IPS average. I also measured perfect gamma, which resulted in a highly textured image with vivid color saturation and 90% DCI-P3 coverage. It can be enjoyed without calibration, but a few tweaks of the RGB sliders put it in pro-monitor territory.
(Image credit: Tom's Hardware)
I also enjoyed the white aesthetic, mainly because it’s something different. It stands out from the sea of black monitors in a good way. The only misses for me were the lack of USB ports and the lack of dimming to increase HDR contrast. But neither of these things diminishes its gaming prowess. It’s addictive in every respect.
If you want the smoothest motion and the quickest response from your next gaming monitor, and you don’t want an OLED, the Acer Nitro XV273U F5 deserves serious consideration. Definitely check it out.
A team of researchers at Maynooth University, Ireland, has created a “first-of-its-kind” DNA molecular computer that uses DNA strands to perform complex mathematical operations without electricity. Detailed in the journal Nature on September 16, the system — called a Scaffolded DNA Computer (SDC) — is one of the most complex and fastest molecular computers, and “points to new possibilities for long-term data storage, energy-efficient computation and, in time, molecular systems that could operate inside cells for applications such as disease detection,” according to the researchers. The system successfully executed 10 different molecular programs, including complex 100-bit calculations.
The researchers designed the computer via a technique known as DNA origami. Using specialized software, they mapped out a long primary DNA strand and hundreds of shorter, custom-synthesized “staple” strands. They then added the physical DNA strands to a test tube containing a drop of water and salt. When they heated and then cooled the mixture, the strands self-assembled into a highly organized, microscopic computing grid, with the long strand acting as a structural scaffold.
Traditional silicon computers use transistors to switch electrical voltages between 1 and 0. On the other hand, the molecular computer uses the binding and unbinding of genetic base pairs (A, T, C, and G) to process information. The researchers write the program into the DNA sequences themselves before putting them into the test tube and applying heat. The thermal energy kick-starts chemical reactions, causing the DNA strands to rearrange. As the molecules naturally shift toward their most stable structural state, they mathematically solve the programmed algorithm, with the final structure representing the mathematical answer.
The researchers ran 10 different molecular programs to test the system. The DNA computer successfully performed addition, subtraction, multiplication, and division. It successfully processed 100-bit calculations, proving it could handle complex data reliably without errors. Because the system is constrained by the laws of physics, it removes the need for error-correction software. More importantly, the computing requires zero electricity as the computer runs on chemical reactions. This could have huge potential for the future of computing, particularly in the researchers’ home country, Ireland, where data centers consumed 23% of the country's electricity in 2025
It's been quite a week over on Tom's Hardware Premium: let's go through all of the articles that we've published throughout this week so far.
Kicking things off with a bang, Valve officially released the Steam Frame, its latest VR headset, which adds functionality that allows the headset to act as both a standalone and PC VR headset. Our VR expert Brandon Hill reviewed the headset itself and managed to interview the engineers at Valve about their efforts on the new hardware and the software powering the company's next generation of Virtual Reality.
Reporter Chris Stokel-Walker investigated the deepening DRAM and NAND crisis, honing in on how SLC and NOR Flash are the next products that have been affected by the ongoing demand for AI. Featuring expert interviews and a grim outlook on the electronics the world relies on, he explored how the ongoing data center gold rush is leaving other supply chains decimated in its wake.
Nanya-backed company PieceMakers debuted on Taiwan's stock market this week, making a bold bet that it's not just HBM that's useful for integration in AI devices. Instead, the company offers a different look at how hybrid-bonded chips might also be useful for inference chips. We've broken down exactly how the company views the future of memory for inference accelerators.
Next up, AI leaders butted heads this week over alleged safety concerns about new, advanced models. It all started with one ex-OpenAI and Anthropic worker warning that the technology could endanger human existence and 'kill us all' by 2030. In response, AI leaders like Dario Amodei and Sam Altman have committed to delivering safe AI and 'pacing the frontier' of AI development, while figureheads like Mark Zuckerberg and Jensen Huang argue against the claim that AI models would do such drastic things, so long as they are developed responsibly.
Despite the company's CEO telling us all that responsible AI development is indeed necessary, Anthropic published its economic forecasts on how widespread usage of Artificial Intelligence might impact the economy. Despite forecasting that GDP growth in the U.S. might shoot up by as much as 32%, it also warns that other 'knowledge workers' might be left in the lurch, with unemployment rising as the technology threatens to displace professional workers.
An investigative report has detailed exactly how advanced AI accelerators are reaching Chinese shores through a series of shell companies. We go over the specifics of two reports and see exactly how supposedly export-controlled accelerators are allegedly being funneled through illicit channels in an economy where compute and powerful silicon create AI kingmakers.
Despite the country's access to advanced AI accelerators through illicit channels, some leading frontier companies out of China are also allegedly using distillation attacks to learn how leading Western AI models think, and how extracted thinking traces and grey-market user logs are being used to train cheap models originating from the Eastern hemisphere.
Premium Subcription: $29 Don’t miss out on this Tom’s Hardware Premium. Get a full year of access for just $29, or from $7 per-month. Get daily news analysis, deep dives into specialist topics in the semiconductor industry, as well as access to Bench, the largest benchmarking database around.View Deal
If you'd like to read any of the articles above and gain access to Bench, you'll need to purchase a subscription. Your support goes a long way in helping us to publish deeper, more insightful stories that might otherwise fall outside of our regular areas of coverage.
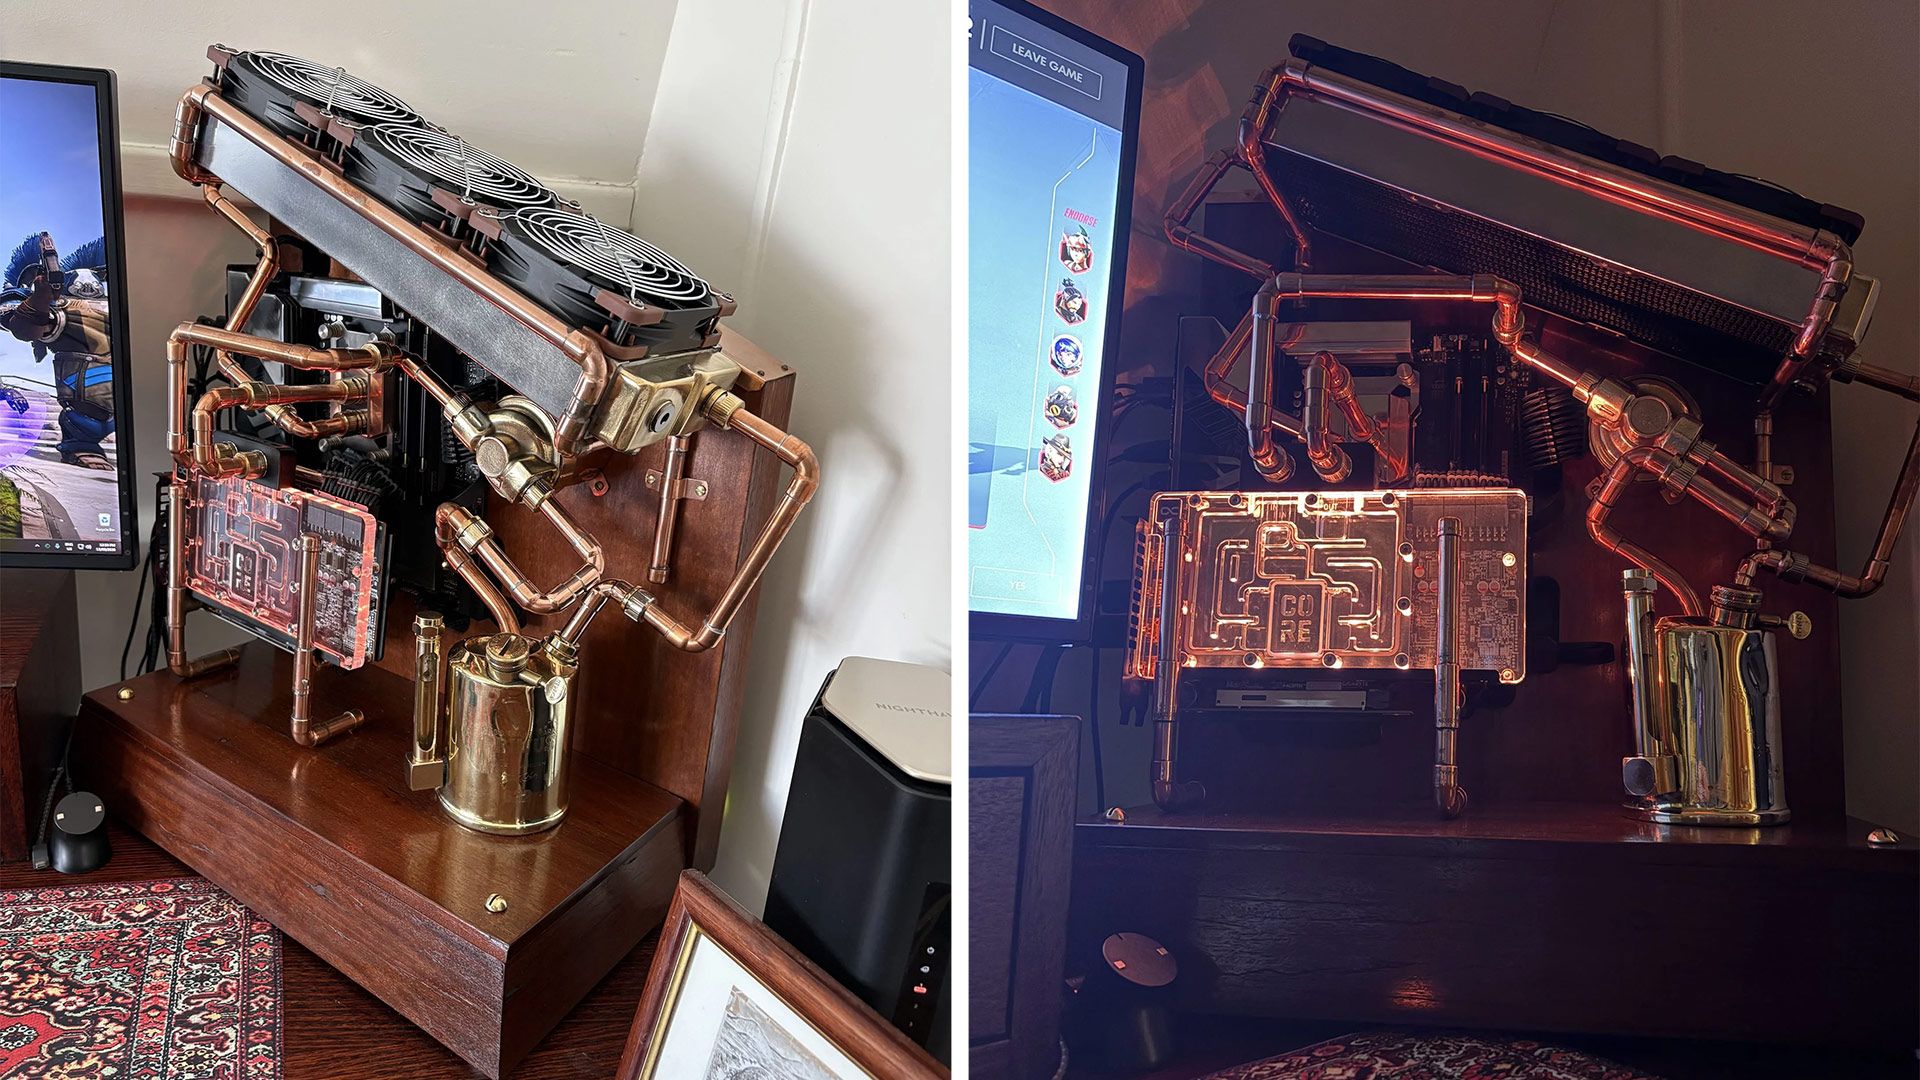
A PC enthusiast has showcased their new all-AMD build on social media, packing a Ryzen 7 9800X3D and Radeon RX 9070 XT. That’s an awesome combo to behold, paired with 32GB DDR5-6000 during the AI-RAM-pocalypse. However, this build has become headlineworthy entirely due to its steampunk-inspired aesthetics. If Thomas Edison and George Stephenson had teamed up to build a gaming PC, it might have looked like this. Meanwhile, the weight of Redditor voting suggests that most think it looks like some kind of espresso coffee machine.
The crafty PC builder behind this new battlestation is Old-Mate-Fetus. Key to its visual appeal is the extensive use of copper cooling apparatus and wood. The images clearly show this open-build PC made with a custom liquid loop using copper pipes, elbow joints, and welds. These pipes meander around the build, feeding the Alphacool GPU block, the Heatkiller IV CPU block, and circulating around a large radiator up top. A copper design feature that really stands out, though, is the “reservoir made from an old Primus Blowtorch with sight gauge fitted to it.” Nice.
Old-Mate-Fetus sits the PC on a base/backing frame they also handmade using a dark hardwood with an antique finish, and brass screws. We can’t see it in the photos, so it's probably pretty safe to guess that the Corsair 850W SFX power supply is hidden in the wood base. The builder says that they also made custom cables from the PSU to the various components.
Custom PC component list:
AMD Ryzen 7 9800X3D
Gigabyte Aorus Elite B650M Wi-Fi
Gigabyte Radeon RX 9070 XT Gaming OC
32GB Klevv DDR5-6000 CL28 (wanted 64GB)
AlphaCool GPU Block
Heatkiller IV CPU Block
AlphaCool DDC pump with custom enclosure
Corsair 850W SFX power supply
Noctua Industrial 120mm Fans
If you are thinking the Old-Mate-Fetus design has some Billet Labs influence, and that it would be appreciated by them, “you are correct,” confirms the London-based copper pipe welder in the comments. The builder of this all-AMD machine warmly accepted the compliment. Redditors also joked about this new gaming PC possibly being the ultimate Steam Machine.
In an unexpected turn of events, Terafab has faced an odd roadblock as a small U.S.-based company called Tera-Print sent a cease-and-desist letter to SpaceX and Tesla back in May to stop using the Terafab name. The company with tera-scale ambitions has run into a tabletop-sized problem because the Tera-Fab name has already been used for about a decade by Tera-Print, according to PCMag.
As it turns out, Tera-Print sells tabletop-sized Tera-Fab-branded beam pen lithography (BPL) tools primarily aimed at bioengineering and prototyping of microfluidic devices and has used the brand for about a decade. The U.S. Department of Defense appears to be a client of Tera-print, which uses Tera-Fab.
While Tera-print claims that the Terafab name could be confused with its Tera-Fab product family, Tesla, SpaceX, and SpaceXAI counter that the operations are fundamentally different: Terafab is set to produce chips in extremely high volumes to serve AI, automotive, robotics, and eventually (at least some) space applications, whereas Tera-print's Tera-Fab is a compact lithography tool that can be used for bioengineering or prototyping of electronic or optical devices.
Formally, the trademark coverage puts both names into the same semiconductor technology bucket, albeit with different descriptions:
Tesla's Terafab covers 'custom manufacture of semiconductor chips, memory chips, integrated circuits, and wafers' (IC 040) as well as 'distribution services, namely, delivery of semiconductor chips, chip carriers, namely, semiconductor chip housings, memory chips, integrated circuits, semiconductors, and microchips' (IC 039).
Tera-print's Tera-Fab covers 'Polymer pen and beam pen lithography instruments in the nature of 3D micro-printers and 3D nano-scale printers' (IC 007); 'Polymer pen and beam pen lithography instruments in the nature of 2D micro-scale molecular and material printers and 2D nano-scale molecular and material printers' (IC 009), 'Light-directed photochemical synthesis tools; Industrial advanced materials synthesis tools; Advanced light projection systems; High precision force-feedback sample alignment modules; Environmental control sample chambers' (IC 009); as well as 'training services in the field of AI design and development, electronics, computer science, biology, and material science' (IC 042).
The two companies reportedly entered settlement talks, which included an offer from Tesla, but Tera-Print alleges that Tesla expressed interest in continuing negotiations instead of taking the dispute to court. Tera-Print says it will now defend its registered trademark and argues that the companies operate in related fields, which could lead to confusion.
Phoronix reported that Intel appears to have suspended its bounty program that once paid up to $100,000 per bug. Intel’s replacement for the Intigriti program offers no rewards, and no reason was given for the change. The Intigriti site states that it “is a responsible disclosure program without bounties,” confirming the report. A check of the site shows that the bounty board is still up but lists the program as suspended.
Intel’s site still lists details on the bug bounty program with awards that range “from $500 up to $100,000, based on quality of the report” and other factors. This program launched, invite-only, in 2017, and became open to all researchers in 2018, covering software, hardware, firmware, and open-source projects. Almost half of the CVEs Intel addressed in 2020, 105 out of 231, arrived through the bounty program, Intel said.
The old bounty board split vulnerabilities into four tiers, which were priced accordingly: Tier 1 from $2,000 to $100,000, Tier 2 $1,000 to $30,000, Tier 3 $500 to $10,000, and Tier 4 $250 to $5,000. Intel expanded the program’s scope to include web services between mid-2025 and October 2025, but it said in a January 6 update on Intigriti that it was evaluating “enhanced bounty and bonus criteria.” In about eight months, the bounties went from evaluation to suspension.
The outlet speculated that with the Linux kernel and other open-source projects being “bombarded” with security reports, it would not be surprising if AI bug-seeking played a role. Linux kernel CVEs have approached 2,000 per release, a fourfold increase from about 500, with maintainers “completely overwhelmed.” Linus Torvalds, the creator of the Linux kernel, has said that duplicate AI reports on the kernel security list are “almost entirely unmanageable.” Curl, for one, closed its bounty program due to AI slop floods.
As a point of reference, HackerOne’s Internet Bug Bounty (IBB) program paused submissions effective March 27. “AI-assisted research is expanding vulnerability discovery across the ecosystem, increasing both coverage and speed,” HackerOne said on the program’s page. HackerOne is still paying queued submissions, with rewards from $68 to $2,257 based on severity. This supports the idea that AI has affected software programs, but it may not be as significant for hardware and firmware.
Intel’s next steps are worth watching to see if this suspension ends up permanent in a fast-changing landscape. Researchers are still able to submit vulnerabilities through the new program; it just offers no bounties for them. Checking AMD’s Intigriti page today shows that the program there is also suspended, although Intigriti does have an auto-suspend mechanism. This follows an earlier payment dispute over scope with a bounty hunter in June.
Even if AI tools carry a stigma and may be a factor in these recent events, they have proven handy. AI company OpenAI paid Hacktron researchers a $6,500 bounty for a discovered exploit chain using rival Anthropic’s model. Torvalds, who previously dismissed AI as mostly marketing, has also called AI “clearly a useful” tool, and acceptance in the field may grow.
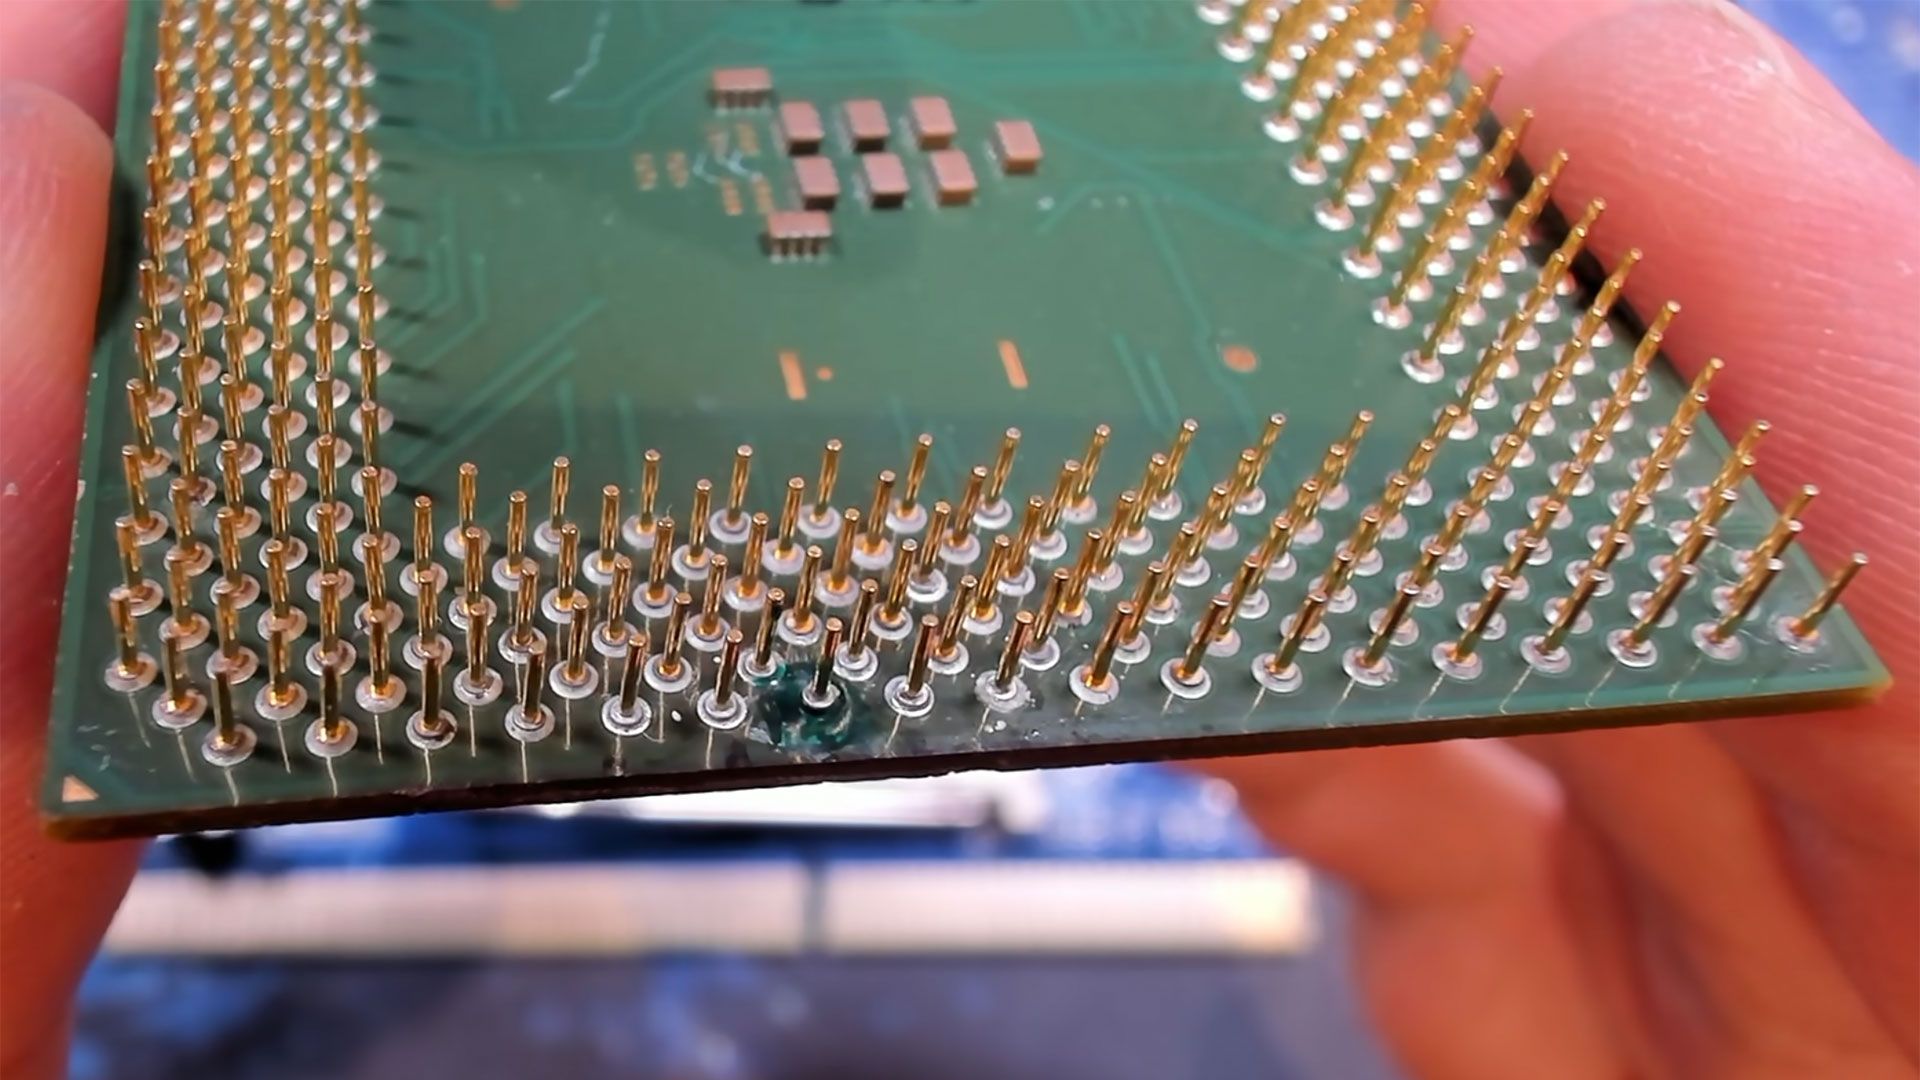
An Intel Celeron 1200 (Tualatin) was revived from the dead following an intricate bit of repair work by Bits und Bolts. The quarter-century-old chip looked like it had a fatal injury, with one of the pins missing and the underlying pad ripped off. As things stood, a system with this close relative of the Pentium III installed simply wouldn’t boot. However, thanks to careful digging “deep into the substrate” and some delicate preparation work, the enthusiast managed to solder on a donor pin and get this CPU running again – and then overclocked it by 33%.
As the Celeron 1200’s missing pin was a data pin (D47), this was a definite fix-or-be-damned situation. Sometimes CPUs can have a pin or two missing, and they will work anyway. I’ve seen CPUs shrug off such missing connections when several remaining pins duplicate a function – power or ground pins, for example.
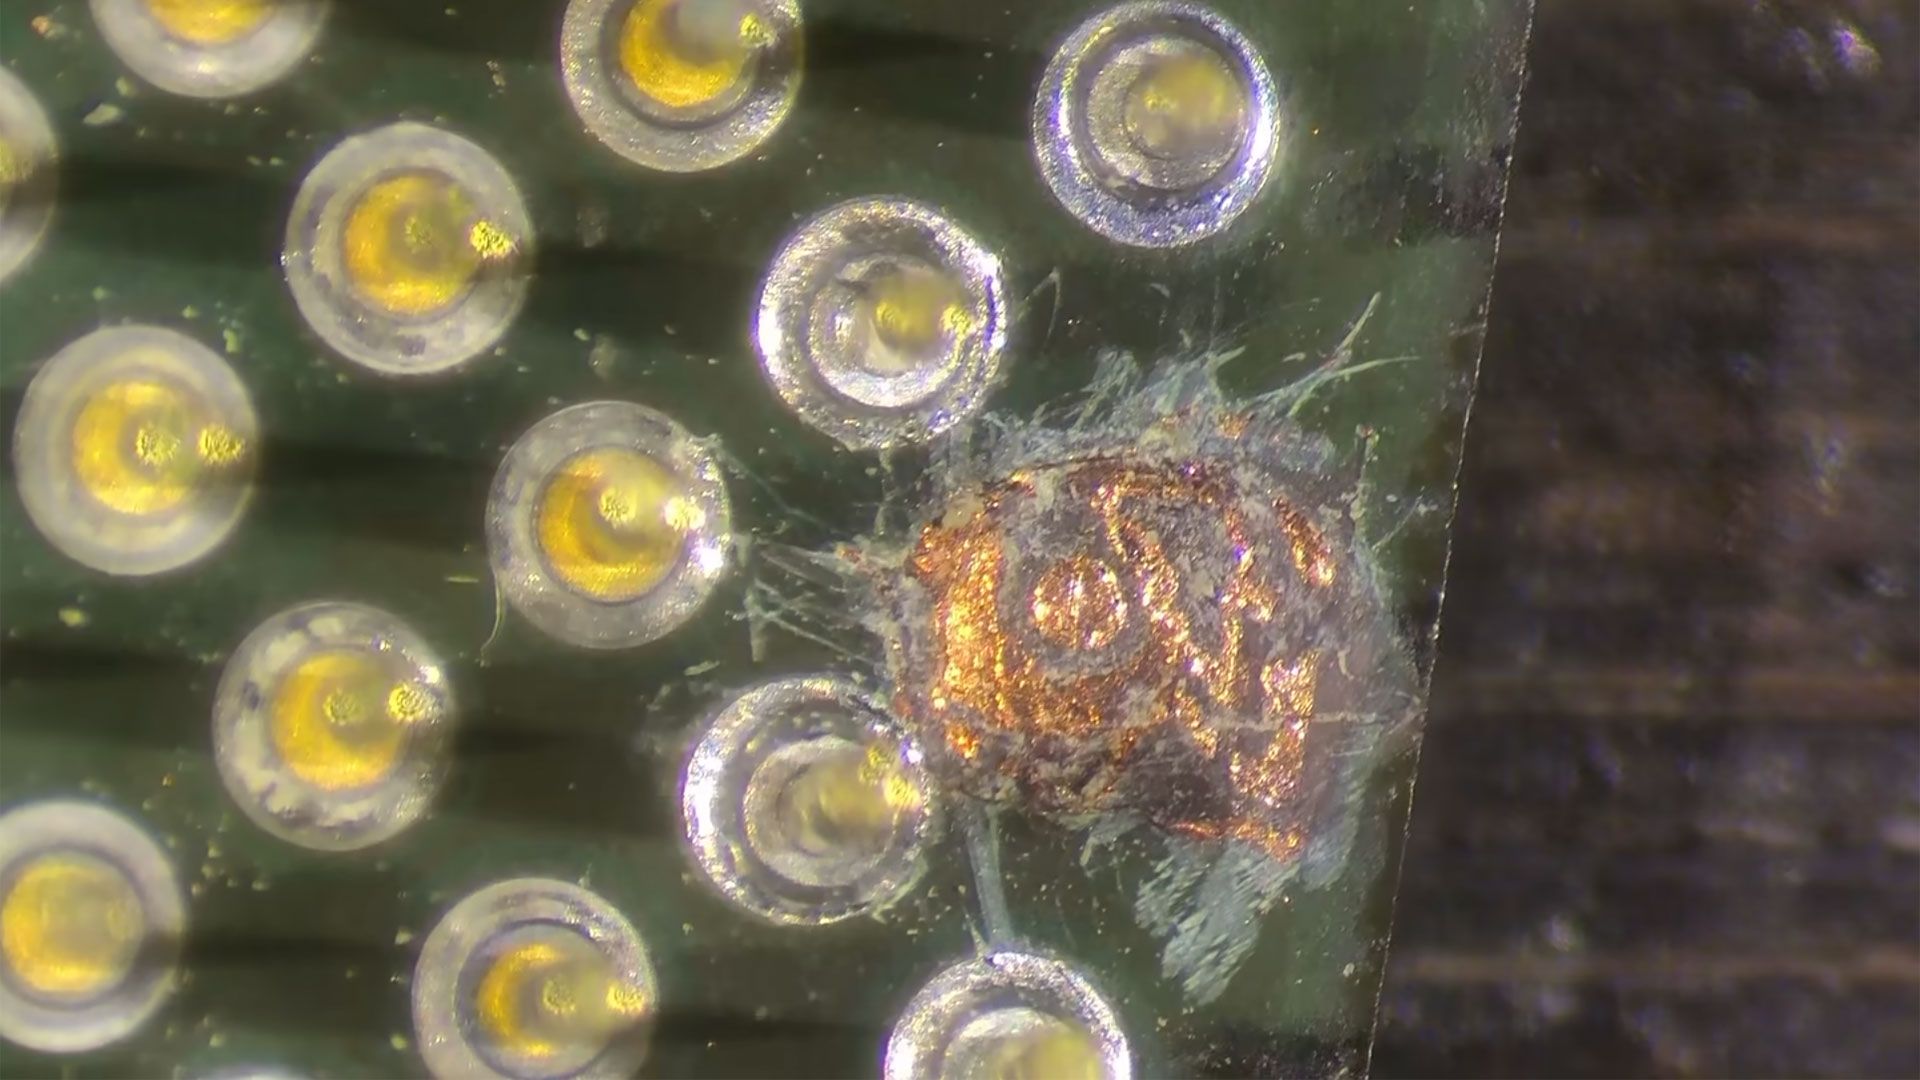
Bits und Bolts started the repair process with a close-up of the serious-looking damage. Then we see the missing pin area after they have apparently “dug a hole” so that the work/issue can be seen more clearly. Zoomed-in images show that there were several layers of copper exposed from under the green surface. The new pin must be connected solely to the central circular area you can see, and not accidentally connect with any of the copper planes surrounding it. Thus, the TechTuber started by applying solder mask to this area. Remember, these pins are very small, and it would have been an intricate job to mask the surrounding area solidly yet cleanly.
While the solder mask surrounding the Intel Celeron 1200’s vacant pin cured, Bits und Bolts harvested a few pins from another Tualatin chip that was “definitely broken.” Returning to the CPU under repair, it was time to add flux, then try to ‘tin’ the central circular copper area to which the donor pin would be soldered.
Soldering the donor pin went smoothly, leaving it perfectly in position and upright. You can definitely see which pin has been added by Bits und Bolts, but after nervously adding the repaired Celeron 1200 to a socket, the TechTuber was relieved that everything mated cleanly.
Bits und BoltsBits und BoltsBits und Bolts
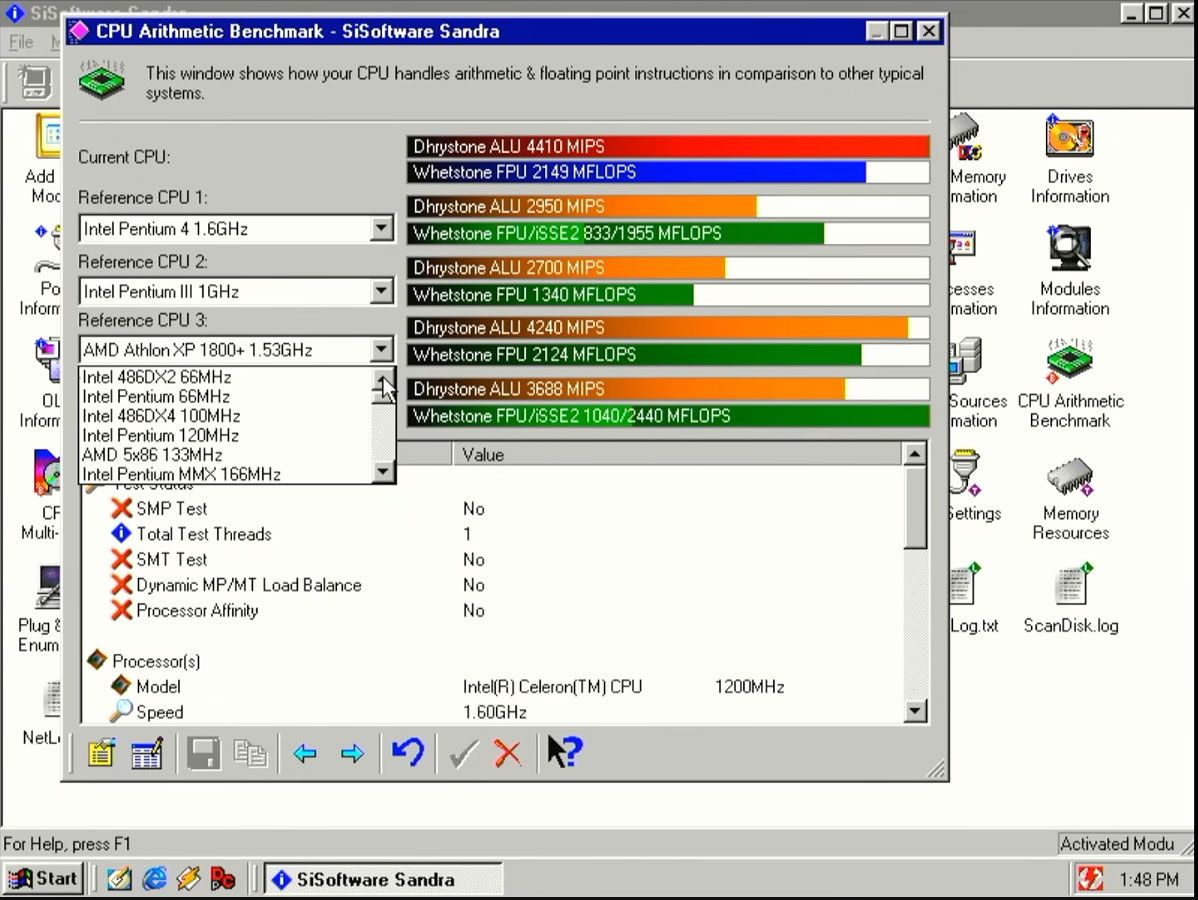
Instead of firing up the computer with the repaired processor installed straight away, the tech tinkerer took a few readings with their multimeter. There were no obvious issues. At last, the moment of truth came, and the patched-up processor-packing PC system booted without issues. Bits und Bolts commented that this was the first time they’d repaired a processor pin issue that looked so grave. The end of the video sees the CPU tested in various benchmarks, including SiSoft Sandra. Moreover, it was even overclocked by 33%, stable at 1,600 MHz.
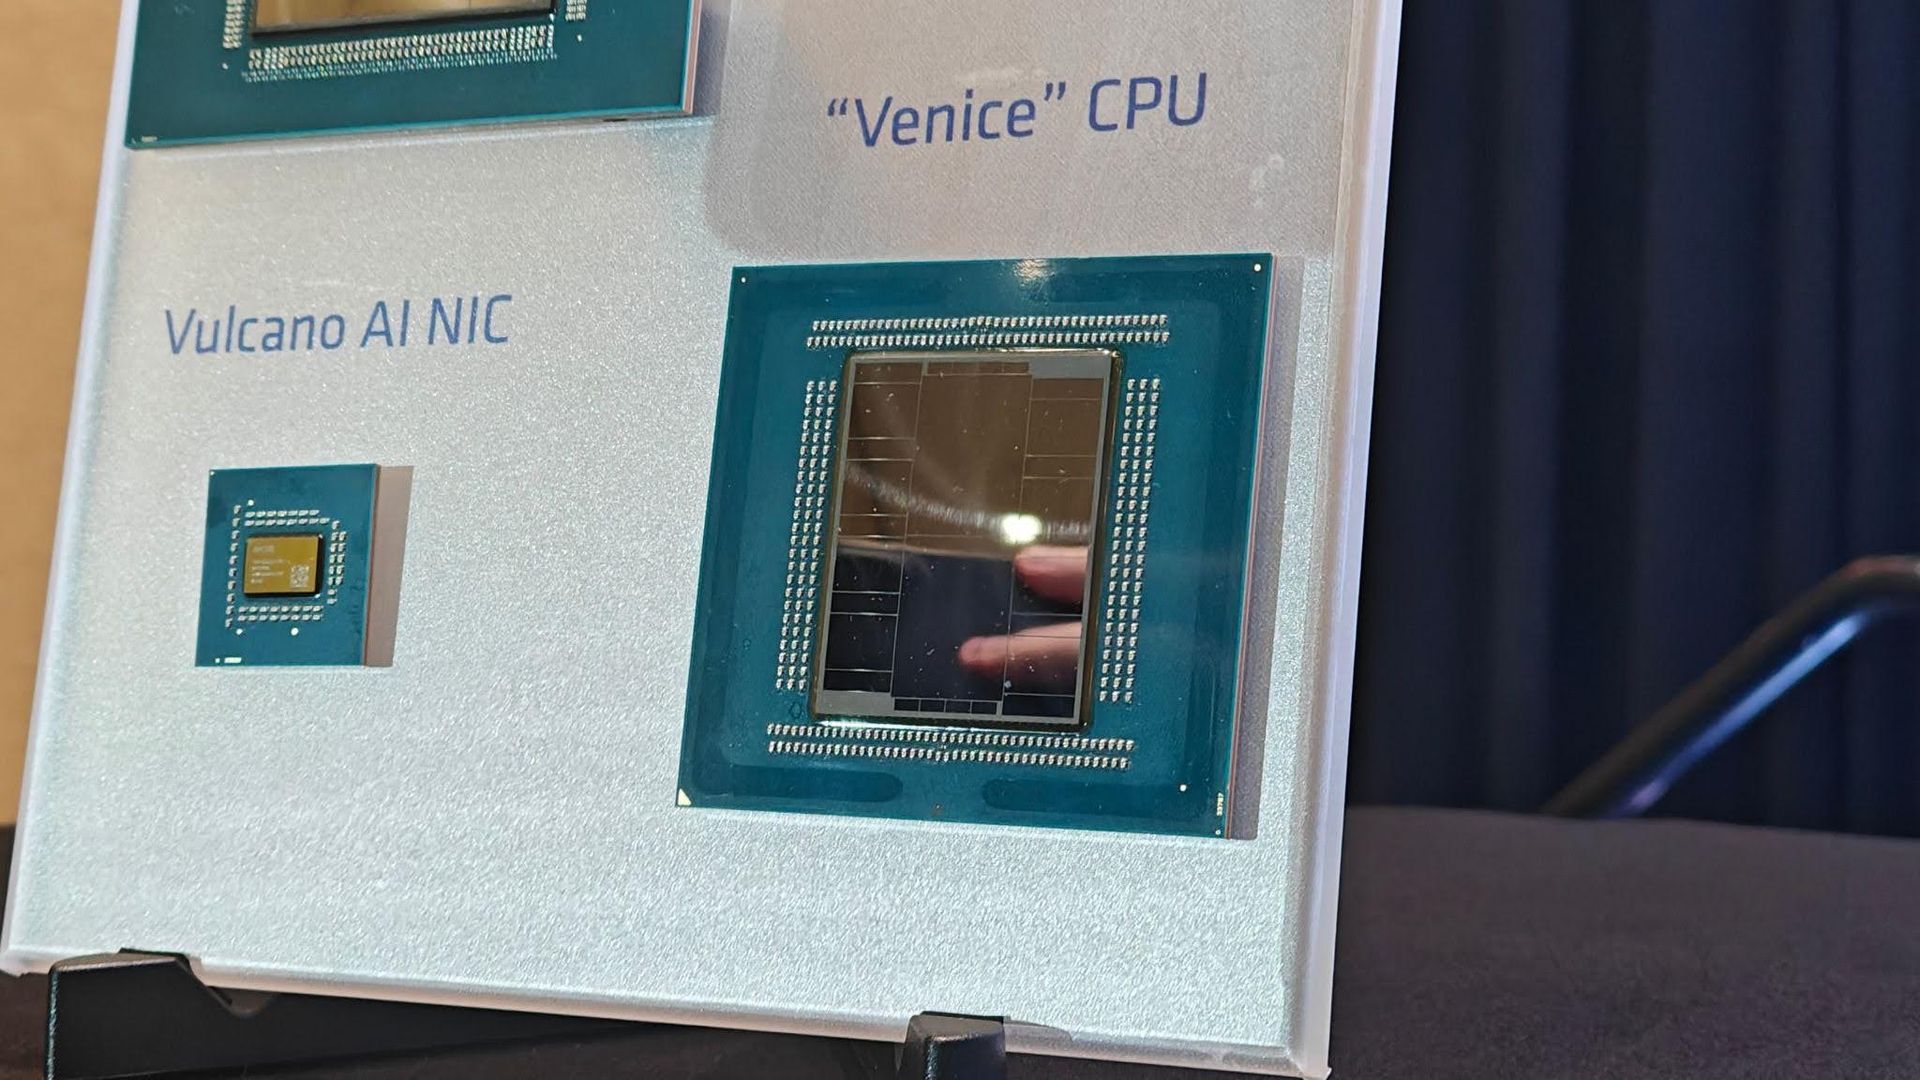
Following the launch of AMD's EPYC 'Venice' CPUs in July, AMD extended the performance claims for its upcoming generation of server chips on Friday. The high-level claim hasn't changed. AMD still says a 96-core, high-frequency Venice chip is around 20% faster than Nvidia's 88-core Vera in SPEC CPU 2026's Integer Rate test. However, the company went into far greater detail about the benchmarks in a new white paper.
There are several configuration differences depending on the benchmark throughout AMD's white paper, and although we'll call out those differences here to the best of our ability, we don't have all of the details. For the Vera comparison, in particular, AMD is mixing data from different sources, and in some cases, using different major releases of the GNU Compiler Collection (GCC). That can have a substantial impact on performance, so keep your salt shaker handy.
(Image credit: AMD)
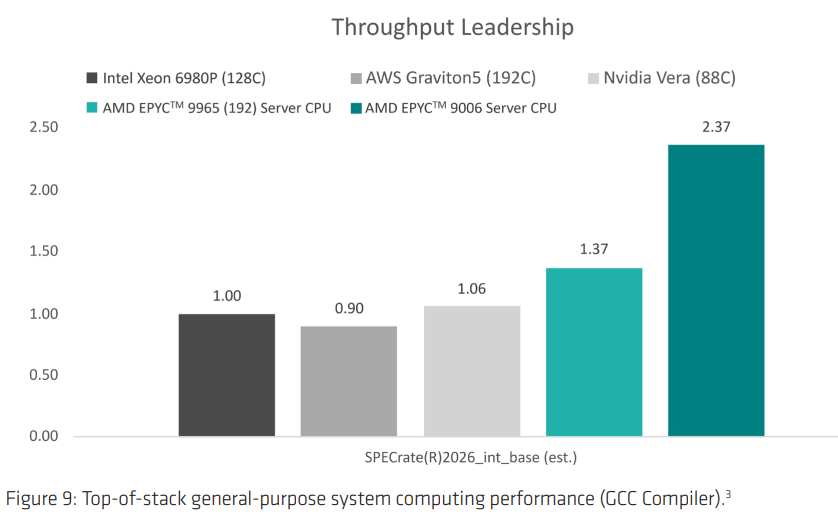
First up are results in SPEC CPU 2026 with the intrate test, looking at total throughput. These are older numbers, gathered in July with GCC 15.2. The intrate test runs multiple copies of an application on the same CPU, and the SOP is to run one copy per thread. Presumably, that's what AMD did here, but the white paper doesn't clarify, even in the footnotes.
The 256-core 9996 is 2.37x faster than the Intel Xeon 6980P and 2.24x faster than Vera according to the slide. The white paper clarifies the mystery 9006 CPU is the 256-core flagship. Perhaps most impressive is AMD's gen-on-gen comparison. According to these results, the 9996 is around 78% faster than last-gen's 192-core EPYC 9965.
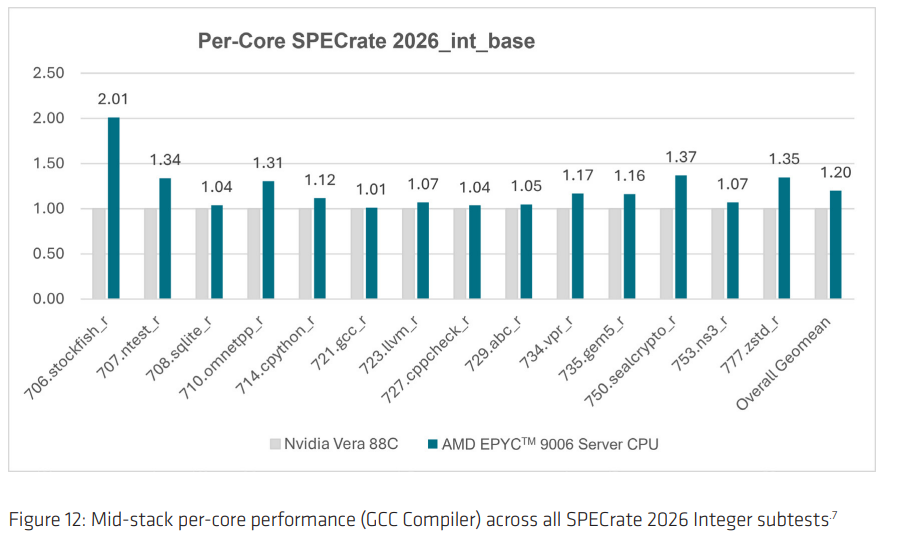
Although the high-level results bring in data from Intel and AWS, much of the white paper focused squarely on the comparison between Venice and Vera. AMD broke down the individual subtests of SPEC CPU 2026 intrate in the white paper, which you can see below.
(Image credit: AMD)
The comparison looks good for AMD, naturally, though there are a few wrinkles in the configuration. AMD is testing a down-cored EPYC 9996, dropping from 256 cores to 96 cores. It made no mention of power budget, but when AMD originally shared SPEC numbers, the 96-core model had access to the same 600W as the 256-core model — AMD's 96-core, high-frequency Venice SKU tops out at 500W. More consequential is the compiler, however. AMD is using GCC 16.1 and comparing the results to the ones Nvidia shared in its Vera white paper. Nvidia used GCC 15.2.
Michael Larabel over at Phoronix has a nice write-up about the difference between GCC 15 and 16, but the short story is that there are performance differences, not always for the better. GCC 16 takes longer to compile due to better optimizations, hence the lower scores on the GCC and LLVM compilations above. However, that leads to faster binaries. By how much depends on the flags, software, and a whole host of other factors. Regardless, it's not best practice to compare benchmarks using two different compiler versions. It makes sense that AMD used GCC 16.1 — it includes support for Zen 6 — but ideally Vera would also be on GCC 16.1.
(Image credit: AMD)
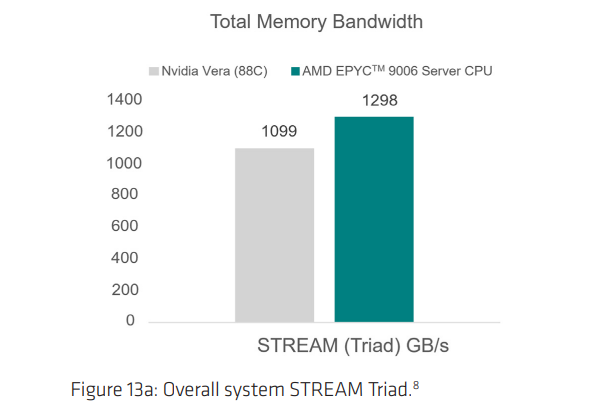
Speaking of Phoronix, AMD pulled some data for the publication's initial, controlled testing of Vera. Above, you can see the Stream, an industry-standard benchmark for measuring memory bandwidth. Again, AMD is using a down-cored 9996 from 256 cores to 96, and offering it a 600W power budget. Still, this is an impressive showing, as Vera absolutely clobbered the competition in the publication’s original Stream results. Here, AMD is ahead by about 18%, with per-core performance about 8% ahead.
(Image credit: AMD)
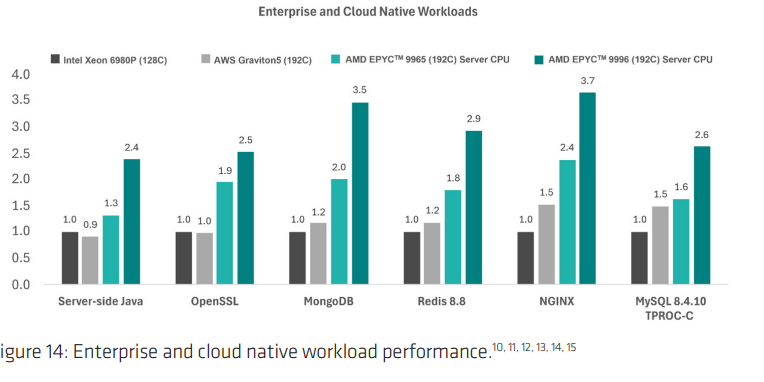
Breaking out of Vera, AMD also showed performance in cloud workloads, including database, Java, and cryptography. Once again, the gen-on-gen comparison stands out, as AMD was already leading in these workloads with its last-gen chips. AMD ran these tests itself, rather than relying on third-party data, though the Graviton5 results came from an AWS cloud instance.
(Image credit: AMD)
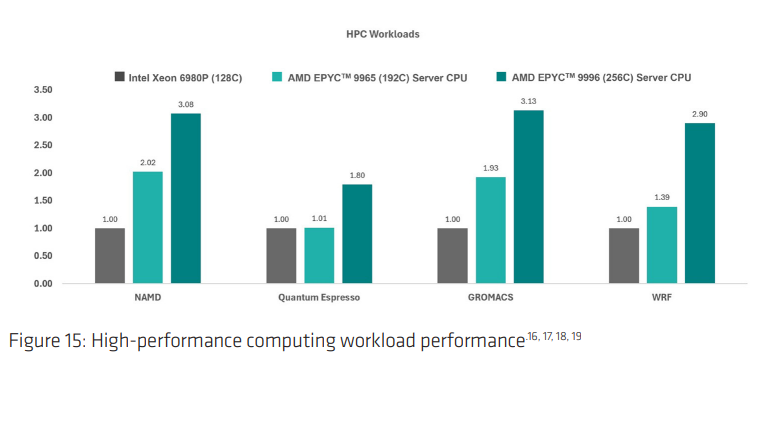
Similarly, in HPC workloads, AMD furthers its lead over Intel's flagship Granite Rapids-AP offering. Intel's next-gen data center CPUs, codenamed Diamond Rapids, are set to be released next year.
(Image credit: AMD)
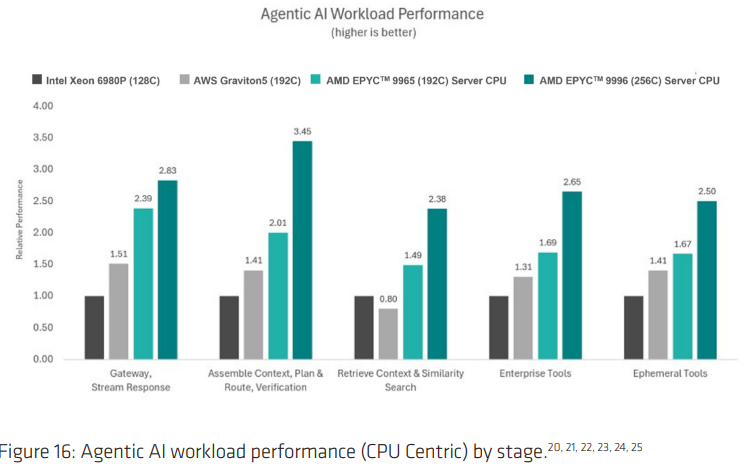
Finally, we have "agentic AI workload performance," which uses actual benchmarks for comparison, despite what the names in the chart above suggest. From left to right, AMD used NGINX, TPCx-AI kit, FAISS, TPC-H and TPC-C, and a replay of a multi-persona agent. For TPC-H and TPC-C, AMD says it derived workloads from those benchmarks, so the results here aren't comparable to published results.
Although looking at benchmark results is always interesting, it doesn't say much in the context of a server deployment, at least at the scale that AMD is targeting. Peak performance is only one of the major factors that go into server deployments, after all, and even then, performance can vary wildly depending on what software you're running and how it's built.
Still, Venice looks impressive, perhaps more so in the gen-on-gen comparison than any competitive comparison. Hopefully that bodes well for AMD's future Zen 6 rollout on consumer desktops, but we'll have to wait until Team Red has more to share before drawing any conclusions on that front.
Intel's Nova Lake CPUs are no stranger to leaks. We've been talking about the processors for close to two years now, with rumors swirling about bLLC and a 52-core flagship for well over a year. However, this week (and this month more broadly), we've seen leaks hit a fever pitch, suggesting that Intel is finally gearing up to release a generation of processors that's been the zeitgeist for over 24 months.
There are three stories that have come out over the past week and a half. First, a screenshot of some high-level details about Nova Lake surfaced online, showing the launch schedule and platform details. The slide in question is almost certainly from one of Intel's partners and not Intel itself.
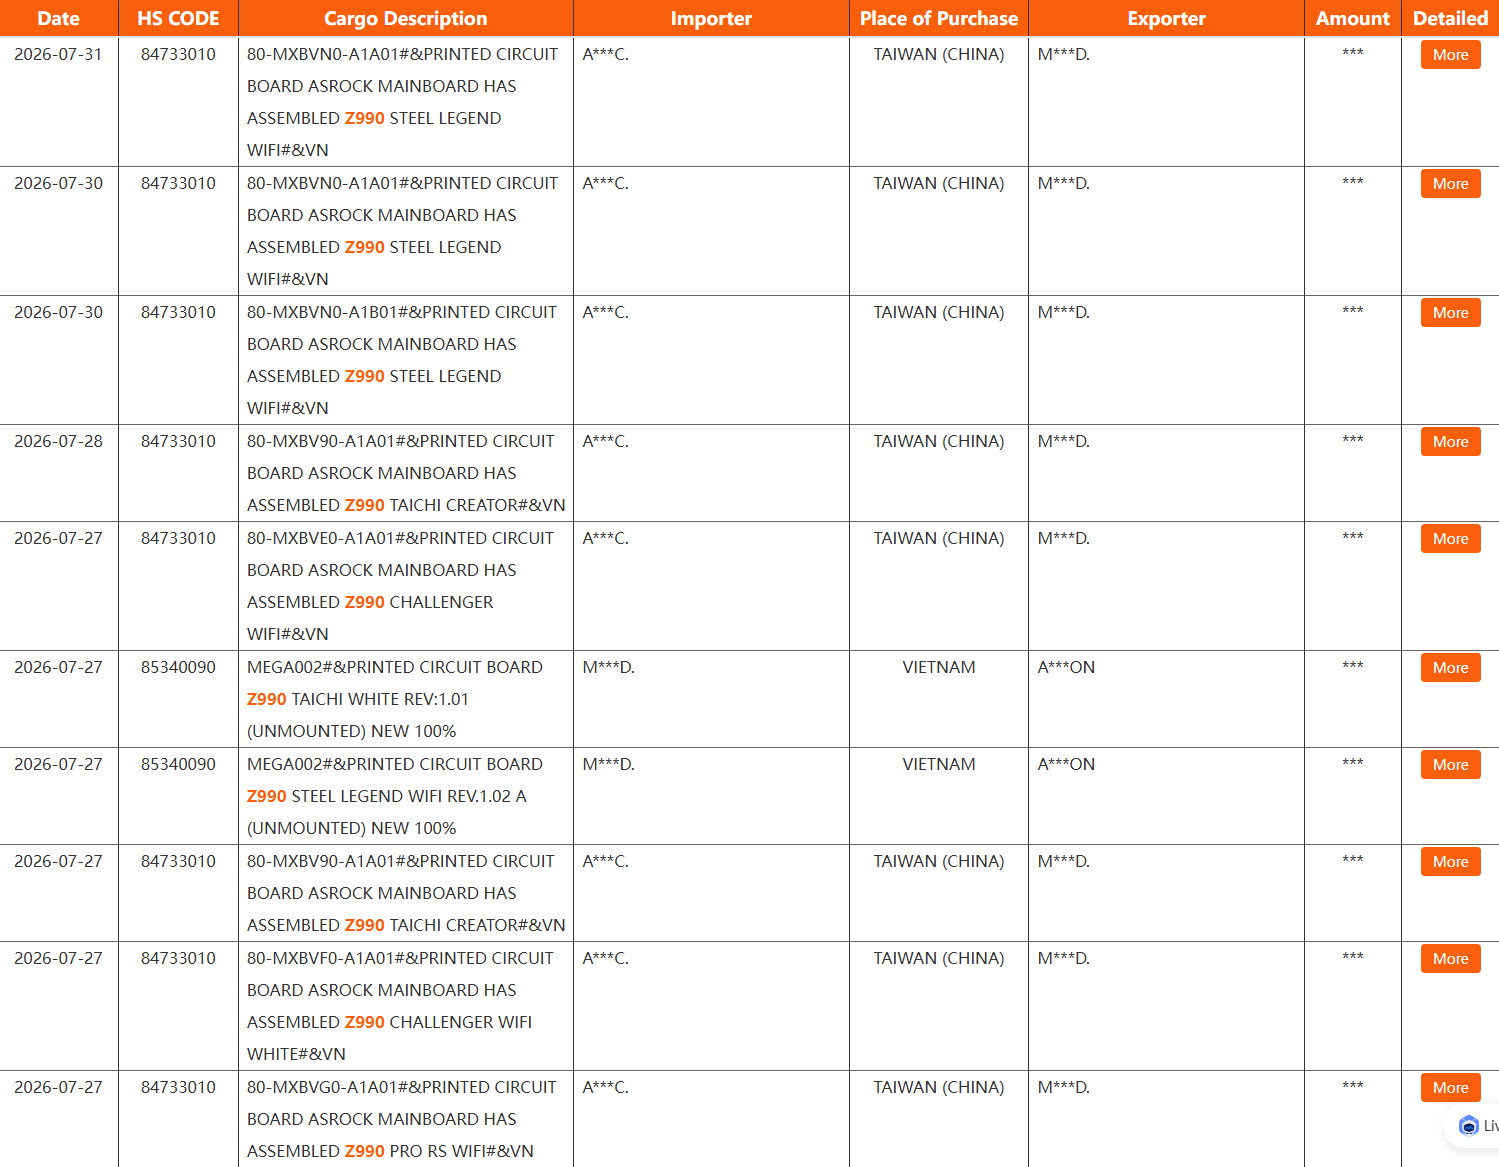
Just in the past few days, we've also seen a barrage of Z990 motherboards from ASRock surface in the NBD shipping database, as well as some entries in the SiSoftware database for a next-gen HP EliteBook X sporting an unknown Intel processor.
(Image credit: Tom's Hardware)
An increase in the number of leaks/rumors, especially those that are more than a known leaker writing up a post on X, usually points to an imminent launch. We've heard about Nova Lake for over two years, yes, but now we're seeing more concrete details. In addition to the shipping manifest, snapped slide, and SiSoftware results, we also saw two Z990 motherboards ourselves at Computex earlier this year, with a third rumored. We will not predict the Nova Lake release date here. However, the launch is coming soon. That much we're confident in.
Intel's typical release cycle for desktop CPUs
In order to establish a timeline, we first need to look back. We could go back far, but we're cutting the timeline short here at Alder Lake. That was when Intel finally moved off 14nm, following generation after generation of either an underwhelming launch or a delayed one, and it's most relevant to what Intel is doing today.
Intel desktop CPU release cadence
Generation
Announcement Date
Release Date
Alder Lake (12th-Gen)
October 27, 2021
November 4, 2021
Raptor Lake (13th-Gen)
September 27, 2022
October 20, 2022
Raptor Lake Refresh (14th-Gen)
October 16, 2023
October 17, 2023
Arrow Lake (15th-Gen)
October 10, 2024
October 24, 2024
Arrow Lake Refresh (15th-Gen Plus)
March 11, 2026
March 26, 2026
The timeline above is fairly straightforward. Intel has, short of 2025, launched a new generation of desktop processors in the fall every year for the past five years. This annual cadence was even more intense previously; 7th-Gen and 8th-Gen CPUs were both released in 2017, and 9th-Gen in 2018. Then, Intel took a year off and followed up with 10th-Gen in 2020 and 11th-Gen in early 2021. Keep in mind that we're talking about desktop CPU launches with a new microarchitecture here. Obviously, Intel has released a ton of other products in between the gaps.
The interesting bit about the timeline is actually the end with Arrow Lake Refresh. When we spoke to Robert Hallock earlier this year, he told us that a team that was "pretty much completely different" worked on Arrow Lake Refresh compared to Arrow Lake. That might explain the strangely large gap between Arrow Lake and Arrow Lake Refresh. Even looking at the Arrow Lake and Arrow Lake Refresh stacks side-by-side, it's obvious that a different mentality went into how they were positioned in the market. That team is in in-place now, and Hallock told us the team is "moving faster than we ever have in product, in release cadence."
Don't take Hallock's comments about Intel moving faster than ever at face value — he was probably being at least a little hyperbolic — but the sentiment is clear. Following the poor reception of Arrow Lake, Intel reorganized and set a new roadmap in motion that extends out to 2030, and now, that roadmap is being executed, starting earlier this year with Arrow Lake Refresh. That sets up Arrow Lake Refresh similar to 11th-Gen Rocket Lake, serving as somewhat of a stopgap before the next generation properly arrives (that is, thankfully, where the comparisons between Arrow Lake Refresh and Rocket Lake end).
Back to Nova Lake. Earlier this year at Computex, we saw two Z990 motherboards, one of which we confirmed was not a finalized unit. The complete development process takes generally four to six months for a motherboard, and you can add another two months or so on top of that for channel sales, as pallets of PCBs are loaded onto ships and swim across the Pacific Ocean. That was in June.
The shipping manifest that surfaced this week showed shipments in July for ASRock. Critically, it also shows shipments from two different sources: Taiwan and Vietnam. Given what we saw at Computex and the two different sources for ASRock, we're firmly past the early prototype and engineering validation stage of motherboard design. Assuming everything goes according to plan, that means Z990 motherboards should be ready to go on store shelves by no later than October or November.
Keep in mind that does not mean Nova Lake will launch in October or November, just that motherboards will most likely be ready by then. This aligns with what motherboard vendors told us earlier this year, with some brands pointing to Q3 but most to Q4 for a Z990 rollout.
Parsing the details about Nova Lake so far
Currently, there are two camps when it comes to when Nova Lake will release. Some say it'll arrive this year, likely in Q4, while others say CES 2027 in January of next year. As we wrote earlier in the article, we will not predict the Nova Lake release date. However, we will side with one of the camps here as more likely based on what we've seen so far.
Given everything we've seen, a late 2026 launch is more likely. The strongest evidence of that is the comment from Tan earlier this year, where the executive said Nova Lake is "coming at the end of 2026." The critical context is that Tan made that comment as part of his prepared remarks, preceding the actual financials that you hear in an earnings call. An earnings call is not a keynote, and making material promises you knowingly can't keep can land you in hot water.
Executives massage the truth all the time during earnings calls — that's half the reason there are prepared remarks ahead of the financials. However, that key detail about an end of 2026 launch isn't massaging the truth. It's a concrete claim devoid of weasel words and qualifiers. In addition, Intel's fiscal year aligns with a calendar year; when Tan said end of 2026, he meant end of 2026, regardless of fiscal or calendar year.
It's possible that something changed between now and January when that call took place. However, the timeline still lines up given the various motherboards that showed up between June and July of this year. At this point, Intel can slide the actual release date around by a bit, but not by months. Retailers aren't going to sit on pallets of motherboards with no home indefinitely.
The one wrinkle in this is the leaked slide you can see above, which claims Nova Lake will enter mass production in Q4, with a launch in Q1 2027. There are reasons to be skeptical of this slide, however. For starters, the slide doesn't say anything that hasn't been heavily rumored for months (sometimes even years) at this point: 52-core flagship, up to 288MB of bLLC, LGA 1954 socket, and multi-generation socket support. The strange bit is a mention of Hammer Lake at the bottom of the slide.
We've heard very little about Hammer Lake, and nothing that's passed muster for us to cover on Tom's Hardware. Even among the rumors, the launch has been pinned somewhere in the 2029/2030 range, if the lineup is even real to begin with. Regardless, Hammer Lake isn't what we'd expect to see next to Razor Lake — the generation rumored to follow Nova — and certainly not what we'd expect to see under a "Q4 2027+" badge.
That doesn't mean the slide is fake; it doesn't appear to be fake. There's some very critical context missing from it, though. It's a Chinese source, but did it come from an OEM? A distributor? A retailer? The validity of the slide changes dramatically depending on that. Further, we're only seeing maybe half of a single slide here. There's too much context missing to take this single slide and run with it as concrete truth.
At the very least, it fares poorly against prepared comments made by Intel's CEO, motherboards we've seen (and held) ourselves, and have circulated through photos online, and strong indications from Intel's motherboard partners that they'll be ready for a launch in Q4. Add on top of that the fact that Intel took 2025 completely off for new desktop launches (and its usual cadence of launching in the fall), and a Q4 rollout of Nova Lake looks far more likely.
Likely isn't the same as confirmed. We're still awaiting details on Nova Lake from Intel proper, and hopefully those will arrive soon. Given the anticipation Intel has already built around Nova Lake without a single performance claim or spec shared, we'll have a lot to talk about.
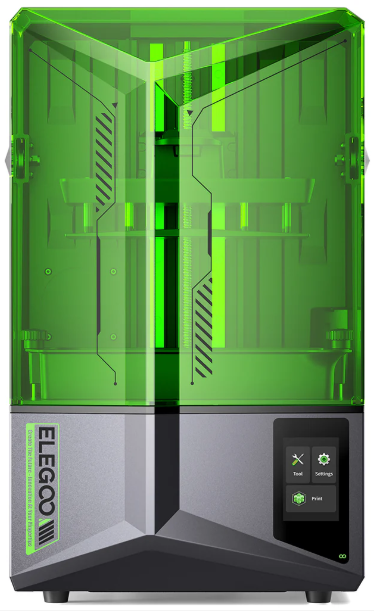
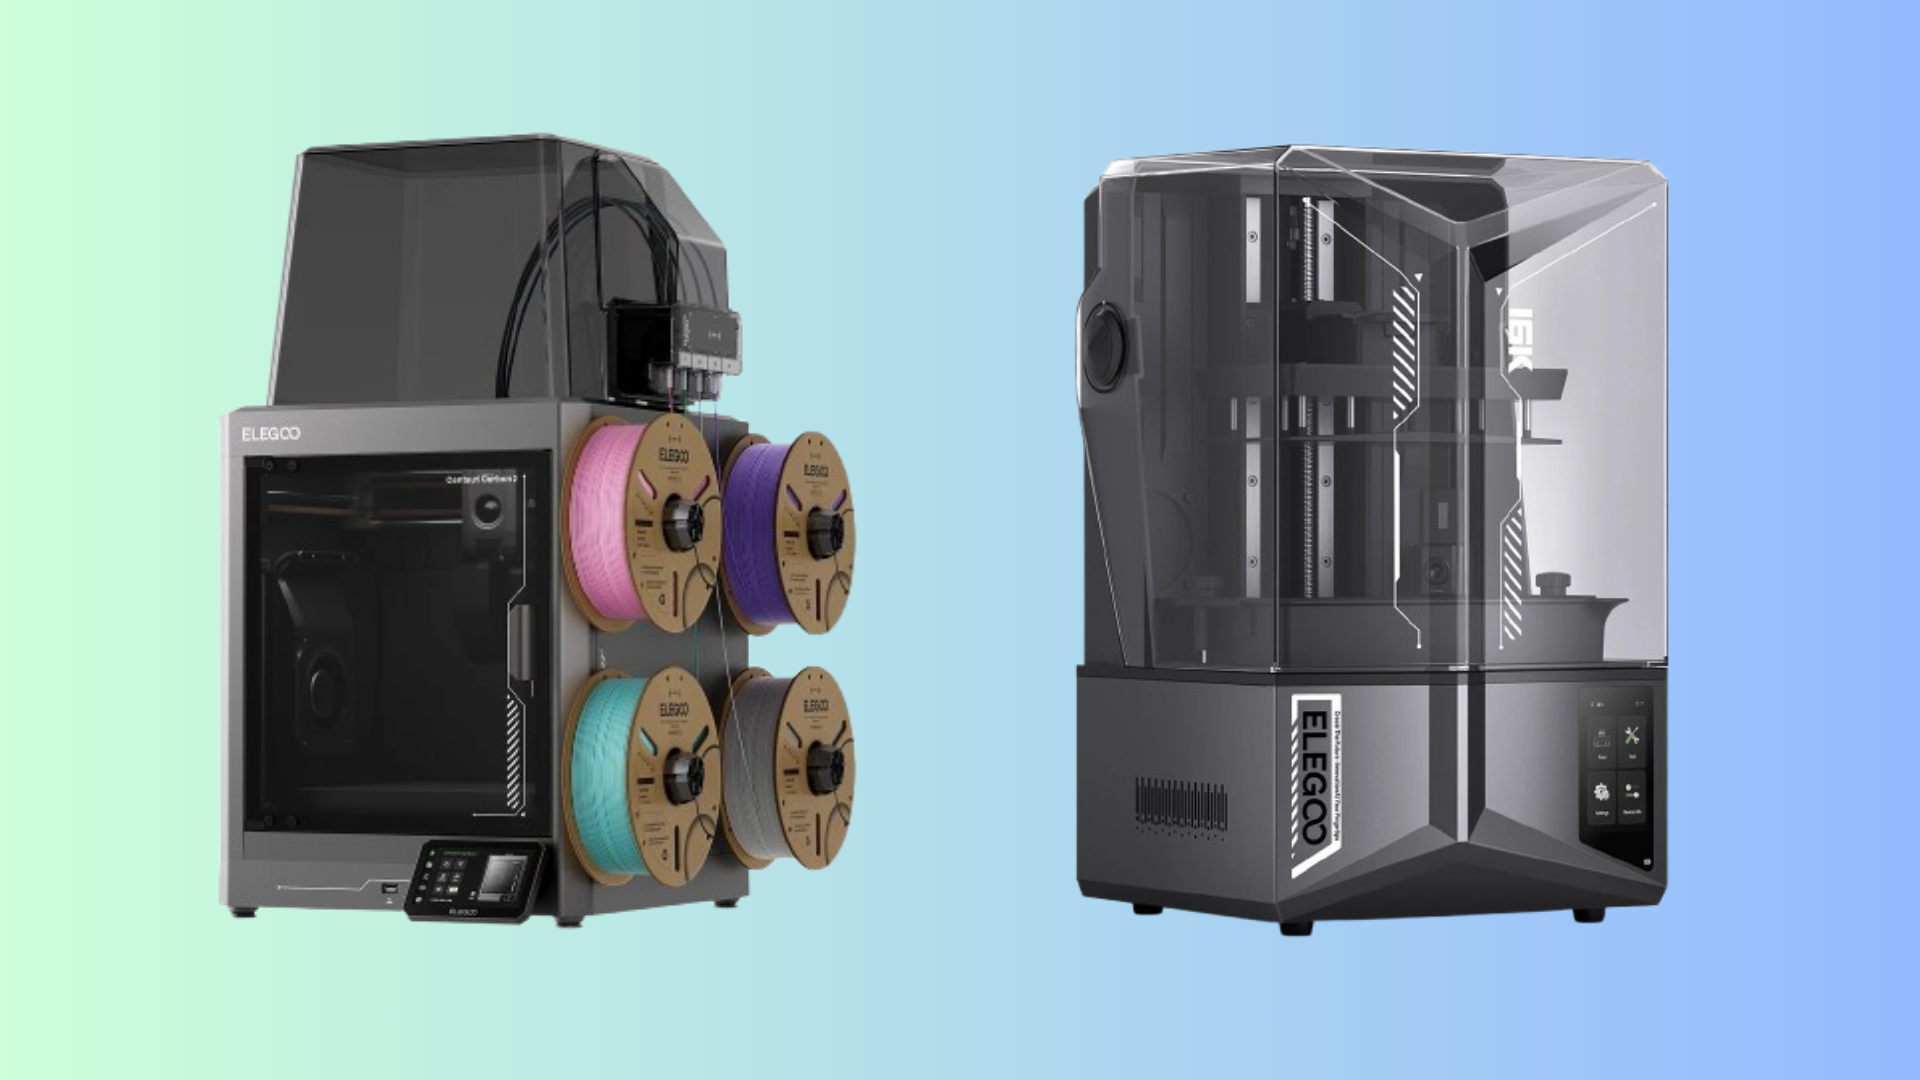
Elegoo has a huge sale right now, making it a great time to pick up a new 3D printer. This special Elegoo Day sale on new 3D printers is running throughout September to celebrate its community of makers, with limited-time discounts across its whole range, with resin and filament also on sale. You can score up to 40% off a new 3D printer right now, but you'll have to be quick about it.
This Elegoo Day flash sale isn't going to be around forever. The discounts will end on September 29, 2026, at 3 AM ET, but there's no guarantee that the stock will last until then, so you'd better be quick.
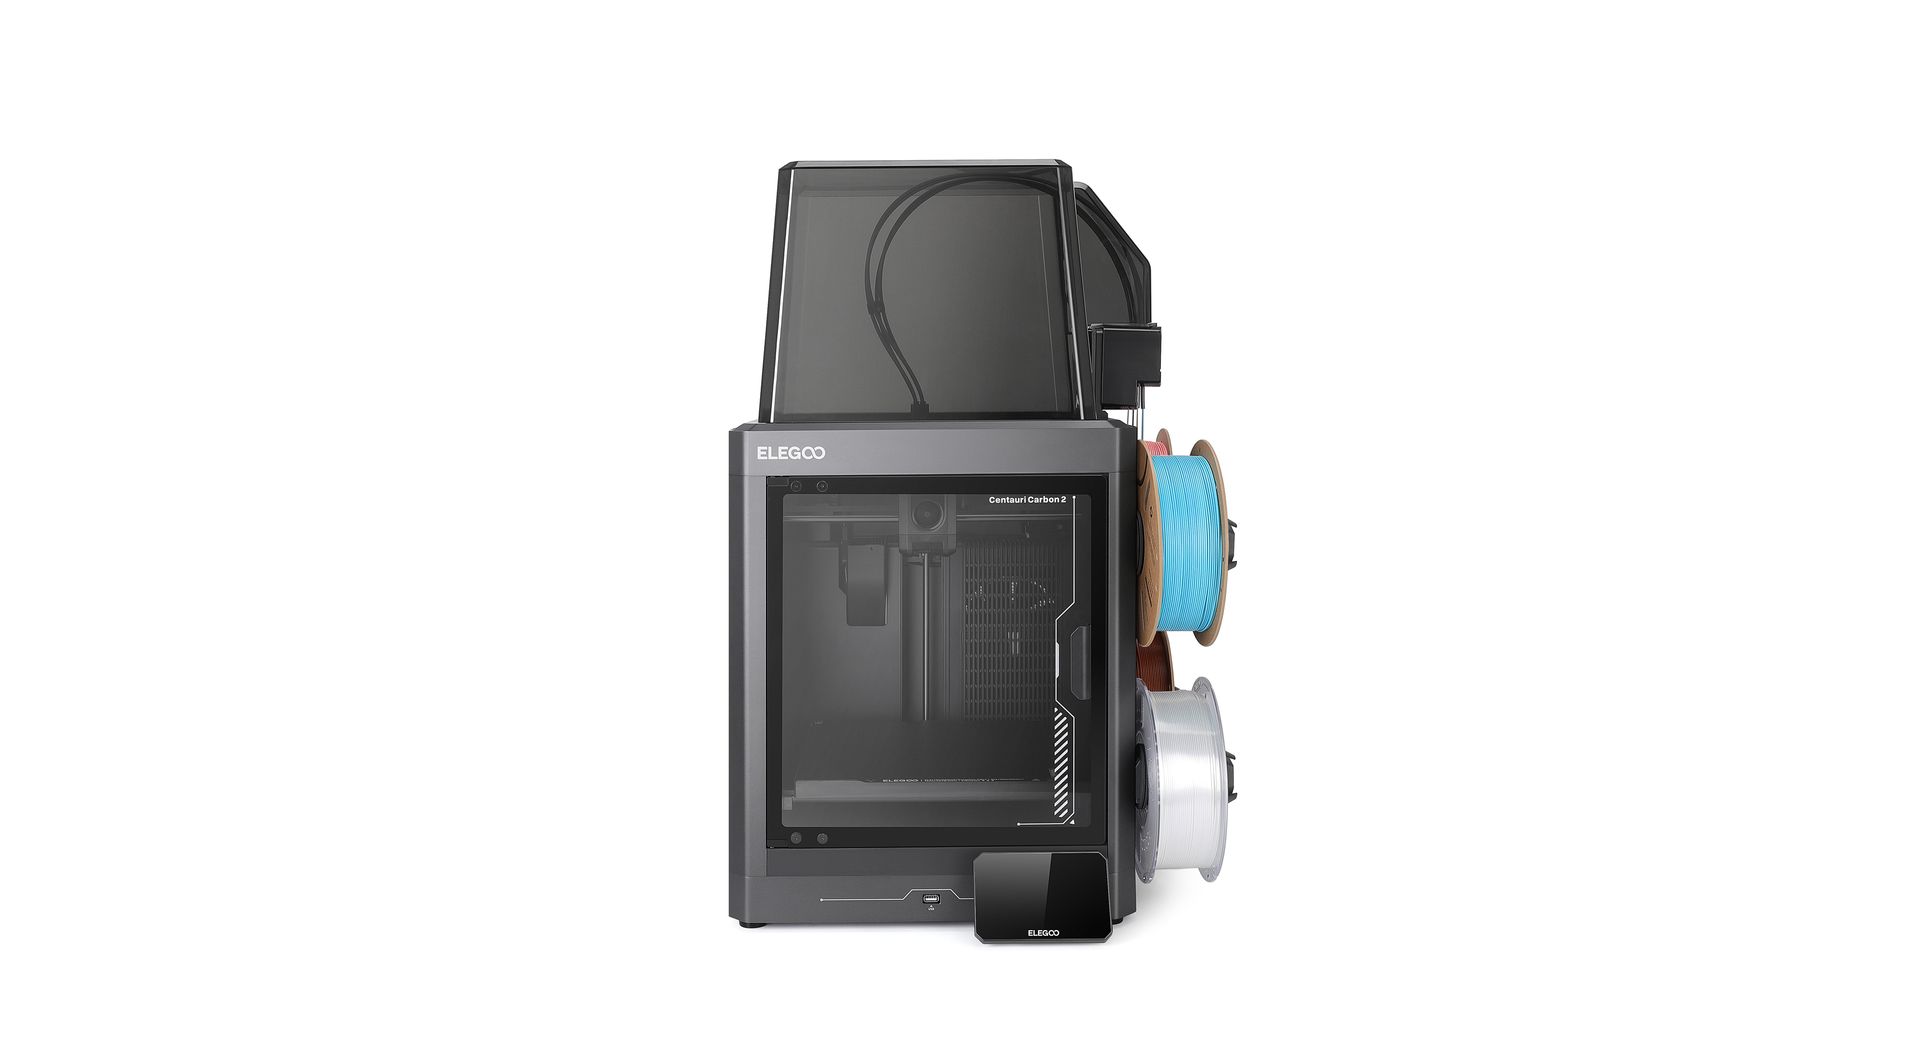
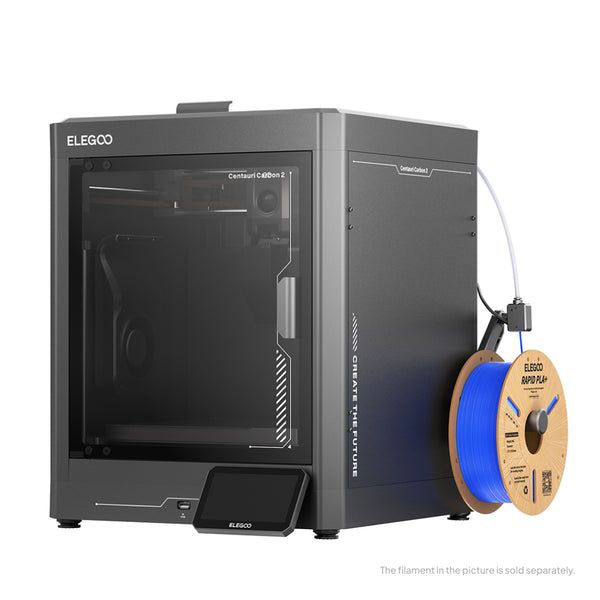
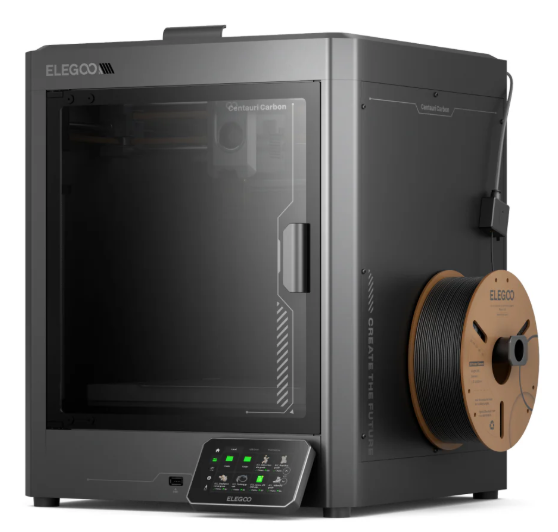
The Elegoo Centauri Carbon 2 is a fully enclosed, fast Core XY printer with a 256 mm cubed build volume, a solid metal frame, metal side panels, and a glass front door.
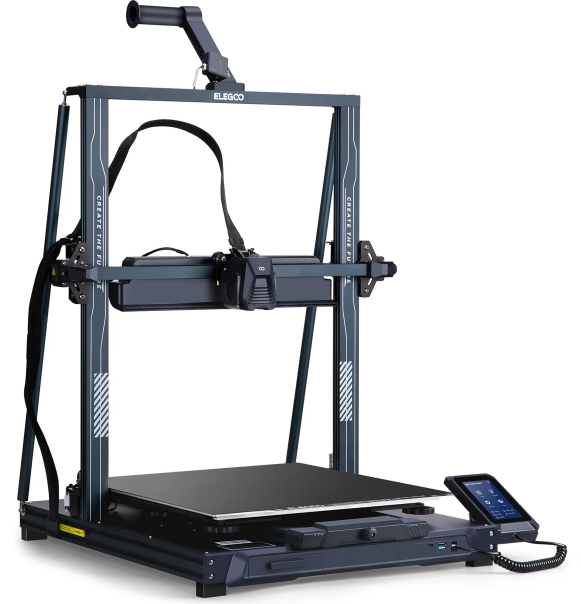
The Neptune 4 max has a 420mm x 420mm x 480mm build volume and can print with speeds up to 500 mm/s. Other features include a 300 °C high-temperature nozzle and automatic print bed leveling.
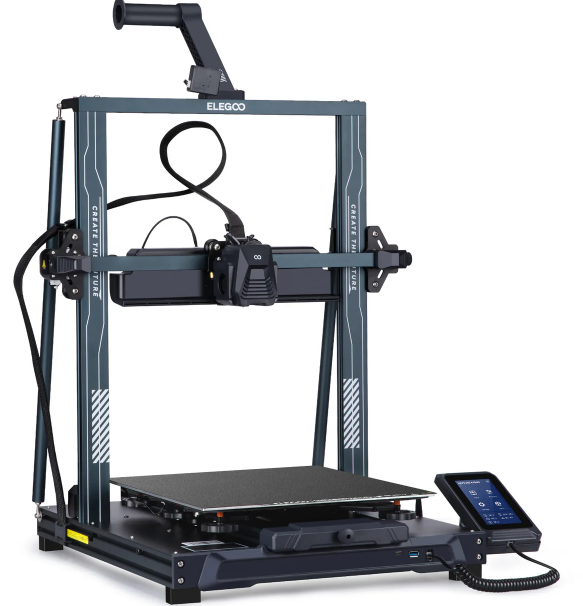
A 320 x 320 x 385 mm build volume with up to 500 mm/s print speeds, a 300 °C high-temperature nozzle, and automatic print bed leveling. Includes Wi-Fi/WLAN/USB transfer for importing prints.
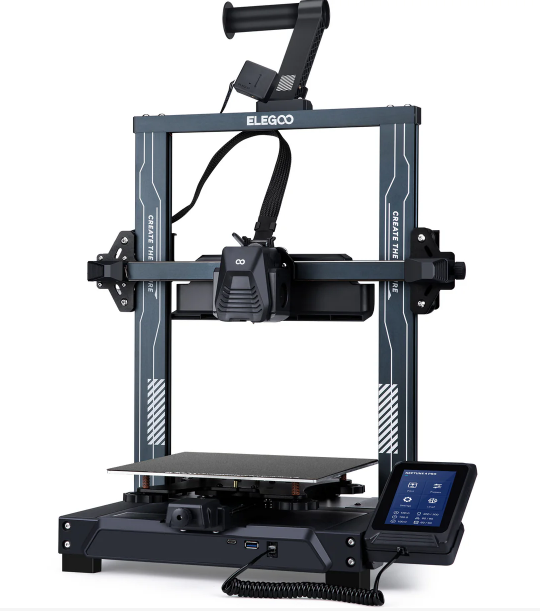
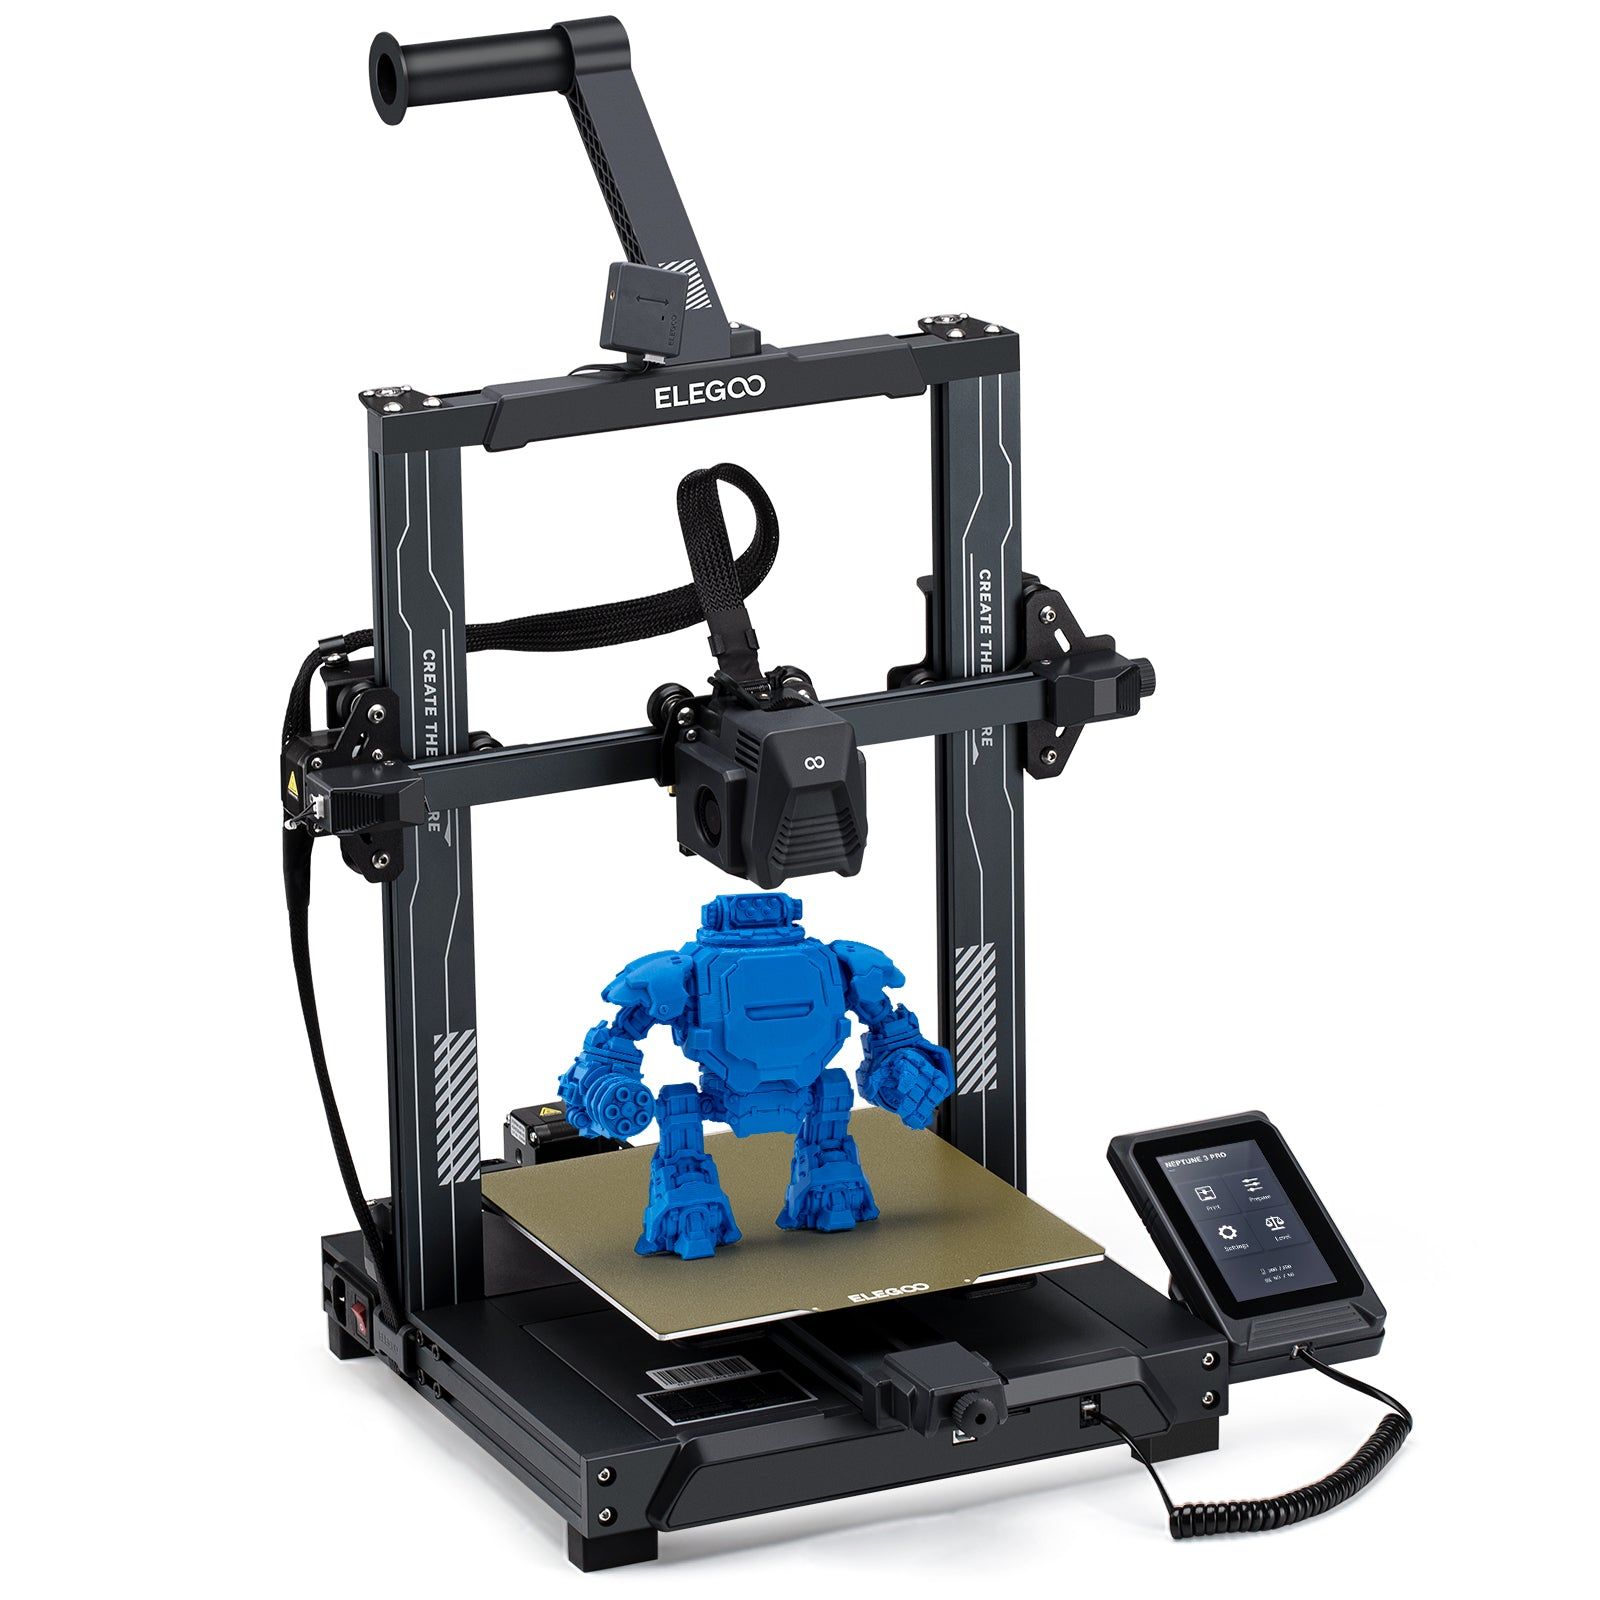
The Neptune 4 Pro has auto-bed levelling with a 225mm x 225mm x 265mm build area, an intelligent segmented heat bed, a 300 °C high-temp nozzle, and up to 500 mm/s print speed.
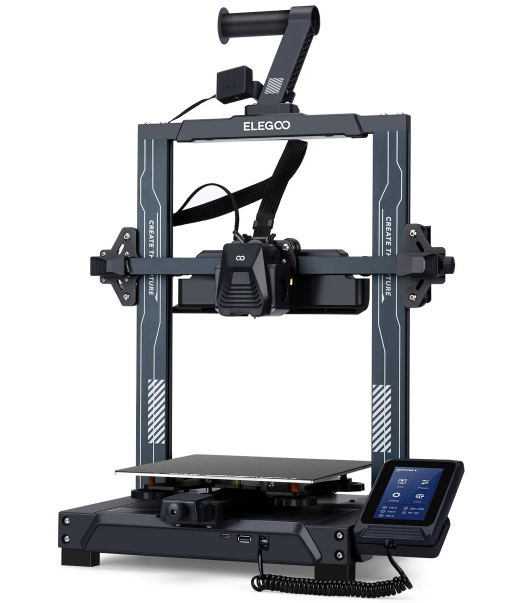
Very close in specifications to the Neptune 4 Pro, sharing the 225 x 225 x 266 mm build volume and 500 mm/s max print speeds. Use USB or LAN to transfer your prints to the printer. View Deal
This budget-friendly 3D printer comes with a direct drive suitable for use with TPU, PETG, and PLA, auto bed leveling, and a heated flex PEI textured platform, making it easy to use. Assembly takes less than an hour (seven screws) and produces clean, detailed prints.
Centauri Carbon: was $449 now $369 A budget Core XY 3D printer that prints fast and without compromising on quality. I love this printer and it works extremely well for all of my ideas and projects.
Check out our full review on this awesome 3D printerView Deal
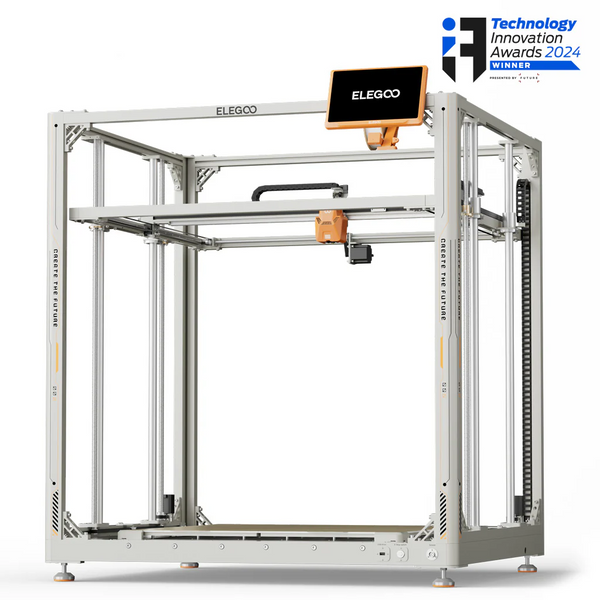
The OrangeStorm Giga is an absolutely massive machine for extra large prints that needs a room of its own and a dedicated power circuit. If you're planning to do industrial-style or large print jobs, this is the model you'll want to buy, as our OrangeStorm Giga review explains.View Deal
Elegoo Resin 3D Printer Deals
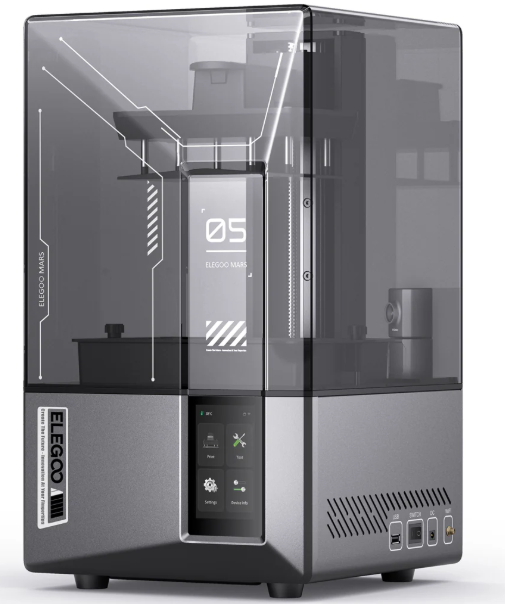
Mars 5 Ultra 9K: was $338 now $259 We loved the excellent 9K resolution as it brought crisp details to prints, making it ideal for gaming miniatures. As with many resin 3D printers, the small build volume is a downside, but these printers are made for detail, not large functional parts.
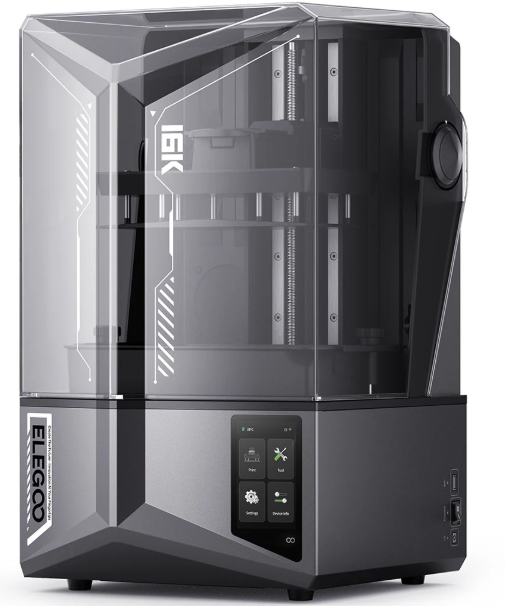
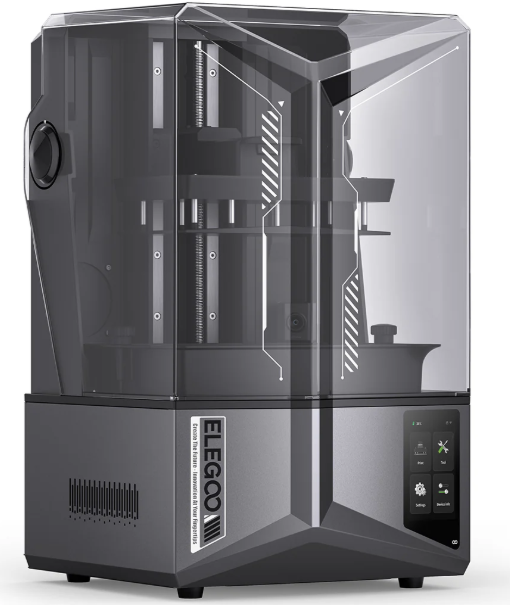
Saturn 4 Ultra 16K: was $649 now $399 Elegoo's top-tier Resin printer with a staggeringly detailed 16K print resolution for amazing, detailed prints. Comes complete with auto-bed leveling and tilt-release for easy print removal. There's even a camera for watching your prints take shape, with time-lapse stills. View Deal
Mars 4 Resin 3D printer: was $299.99 now $239.99 If you want to start 3D printing or need a second machine for detailed models, a resin 3D printer is a good buy. Elegoo's Mars 4 is a compact and easy-to-use resin 3D printer. With a 4K resolution, your prints will be crisp, and a layer cure time of 2.5 seconds means you won't be left waiting. When compared to FDM printers, the build volume is small at 143 x 89 x 175 mm.View Deal
The Elegoo Saturn 4 Ultra can make eye-popping 12K prints. Lots of tilting with a tilting resin vat and a tilting hood for easy access. Print fast whilst keeping an eye on your progress with a print monitoring camera that can also shoot time lapses.
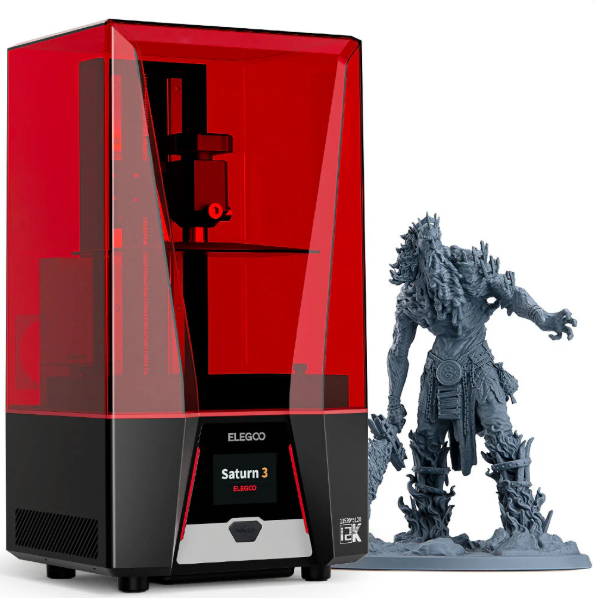
Elegoo's Saturn 3 uses a 10-inch 12K precision mono LCD with a 19 x 24 μm XY resolution. A laser-engraved build plate and 218 x 122 x 250 mm build volume. View Deal
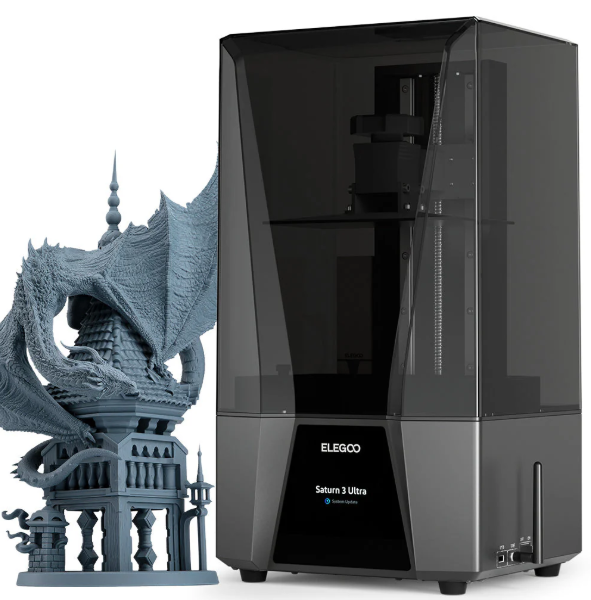
With a 10-inch 12K mono LCD display, the Saturn 3 Ultra has a large build volume of 128 x 122 x 260mm, while retaining a crisp print quality.
A Linux OS runs on the printer, enabling remote management of the print process and the ability to send files to the printer over Wi-Fi. In the box, you get a USB air purifier that pulls the nasty smell from the print chamber before it can leach out into the room.View Deal
The Saturn 4 has a 218 x 122 x 220 mm build volume, a 10-inch 12K Mono LCD, a COB Fresnel collimating lens, and auto bed leveling with a powerful cooling system. Its sharp 12K resolution will help make sharp prints - perfect for building your miniature collection. View Deal
10KG Rapid PETG: was $140 now $99.99 This is the PETG that Tom's Hardware editor Les Pounder recommends (and uses) in his own Elegoo Centauri Carbon 3D printer, and in his own words, it's superb. It prints beautifully, even running at high speed and high temperatures.View Deal
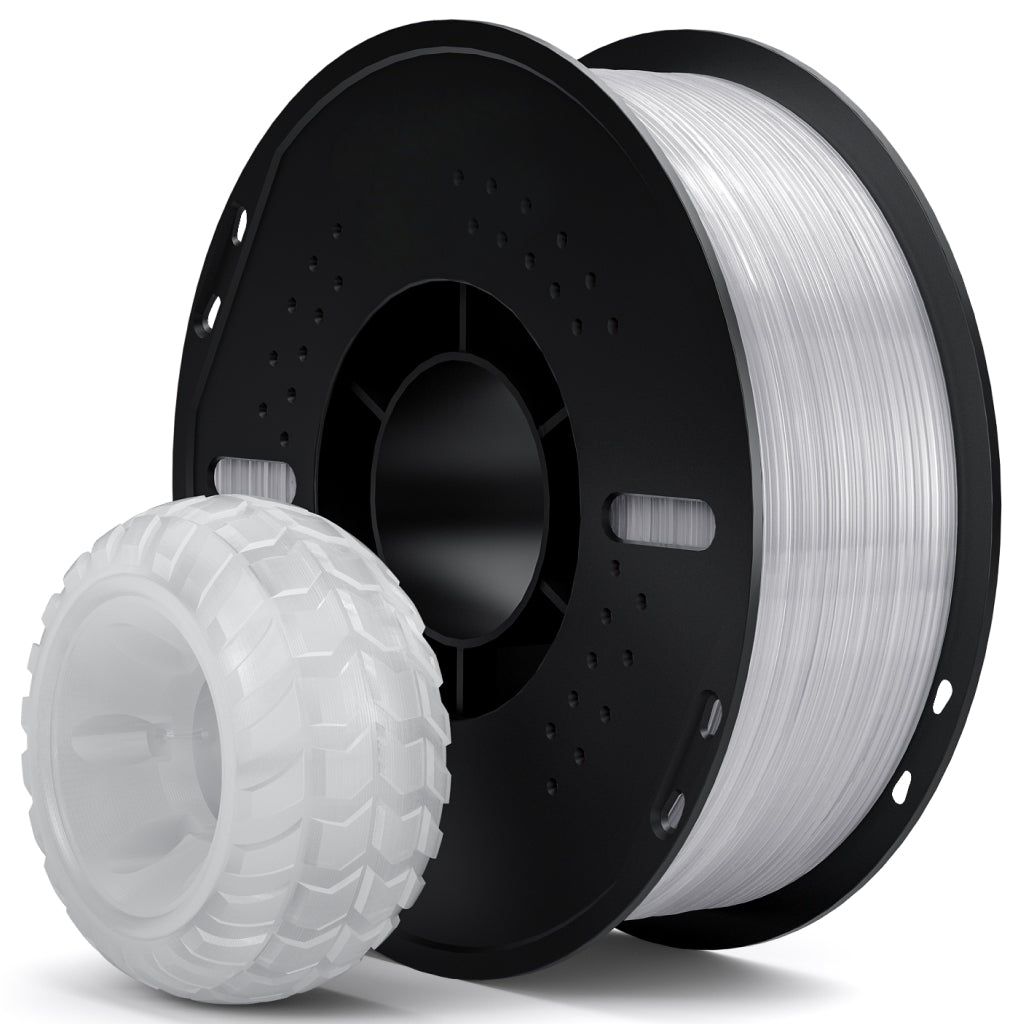
TPU Filament 1KG: $17.99 This 1KG spool of TPU 95A is great for projects that require a little flex and stretch. TPU is a soft material, best used for bumpers, wheels and objects that require a soft touch.View Deal
PLA Plus Filament: $14.99 PLA Plus is a stronger version of PLA. While not as tough as PETG, PLA Plus is stronger than, and prints using the same profile as PLA. We've used PLA Plus in a number of projects and found Elegoo's to be perfect for strong, functional prints.View Deal
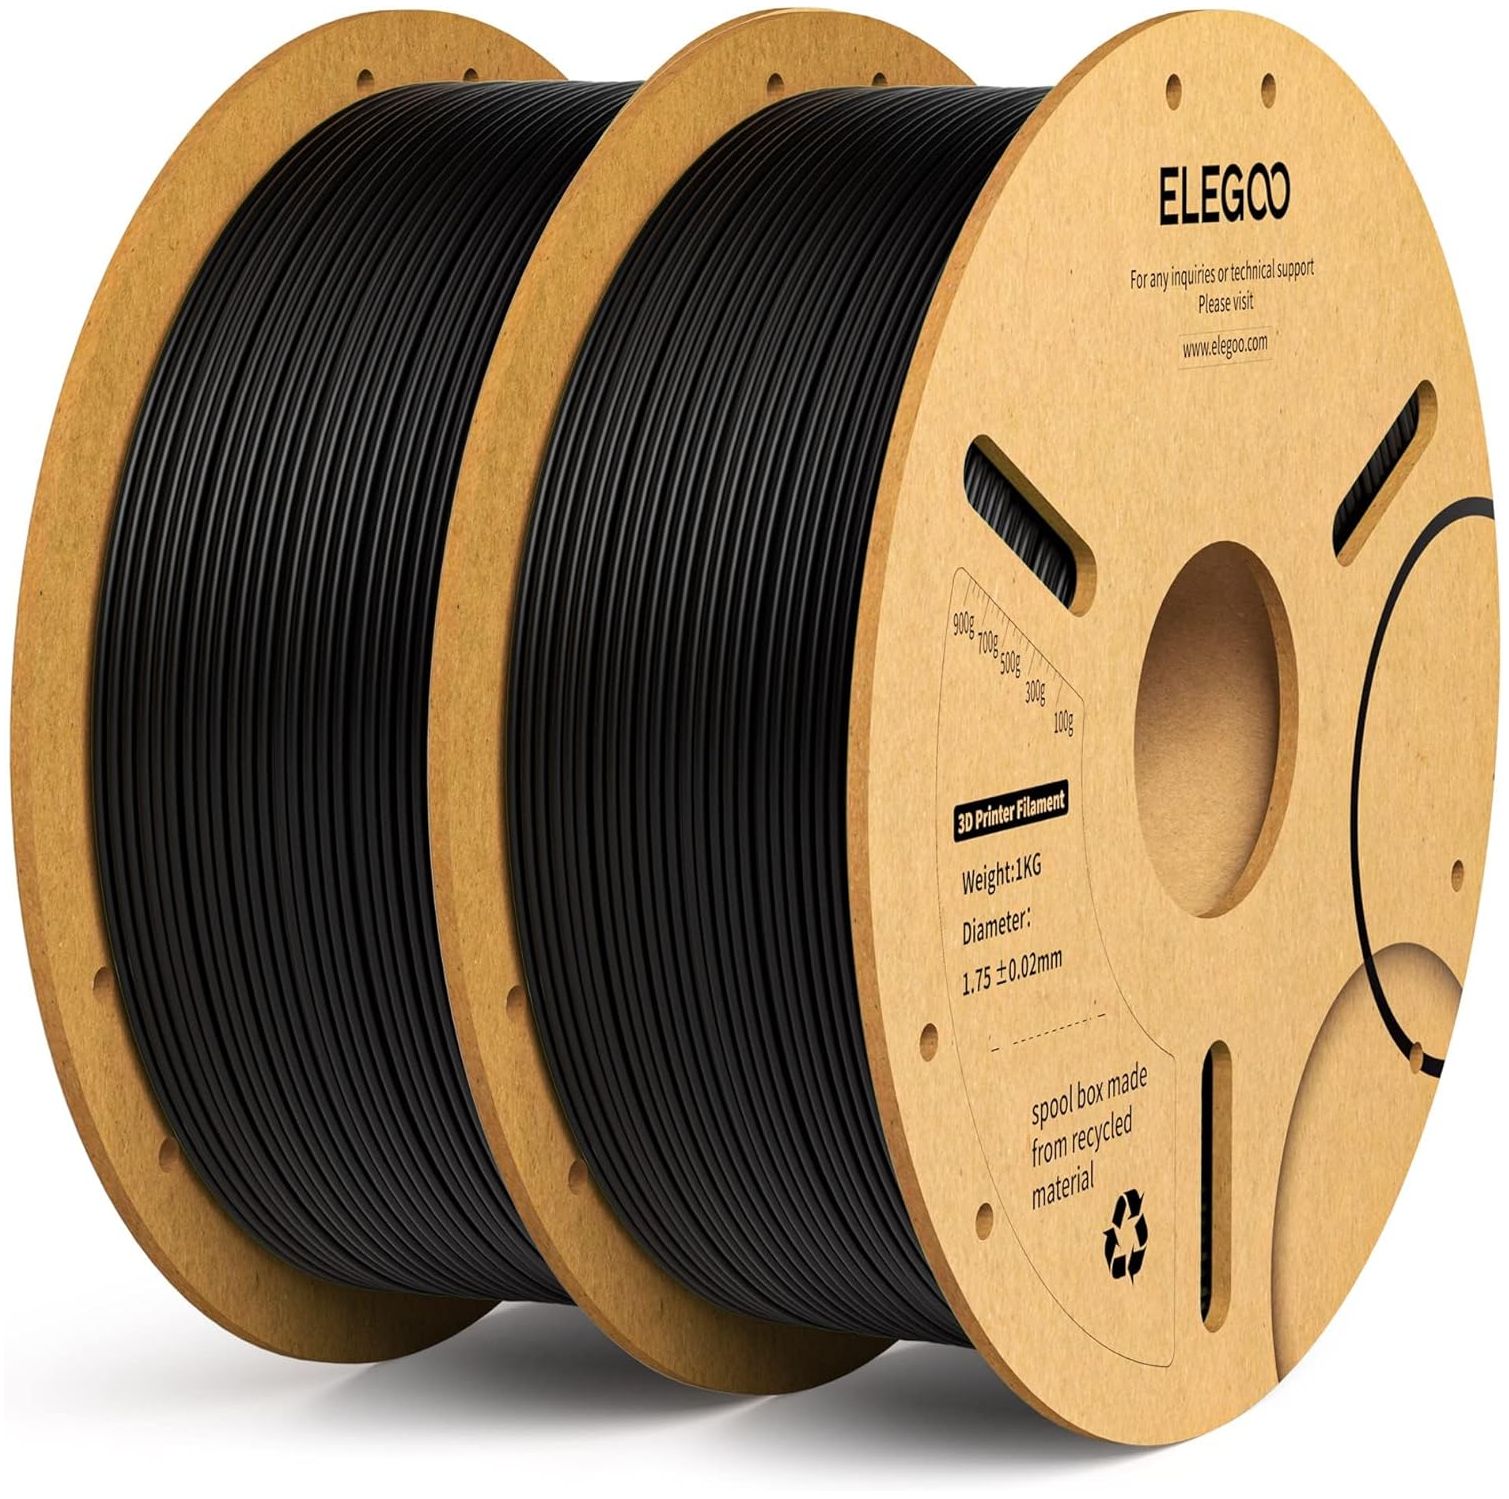
2-Pack PLA Plus Filament: $26.98 PLA Plus is a stronger version of PLA. While not as tough as PETG, PLA Plus is stronger than, and prints using the same profile as PLA. We've used PLA Plus in a number of projects and found Elegoo's to be perfect for strong, functional prints.
This two-pack is ideal for makers who want to stock up on filament to feed their latest 3D printer purchase.View Deal
The space grey color is ideal as a base for priming a model for painting.View Deal
3D Printer Resin LCD UV-Curing Resin: $19.99 This photopolymer resin is designed to reduce printing time and to reduce volume shrinkage during the curing process to ensure a smooth finish. Suitable for most DLP/LCD 3D printers. Less odor than other resins.View Deal
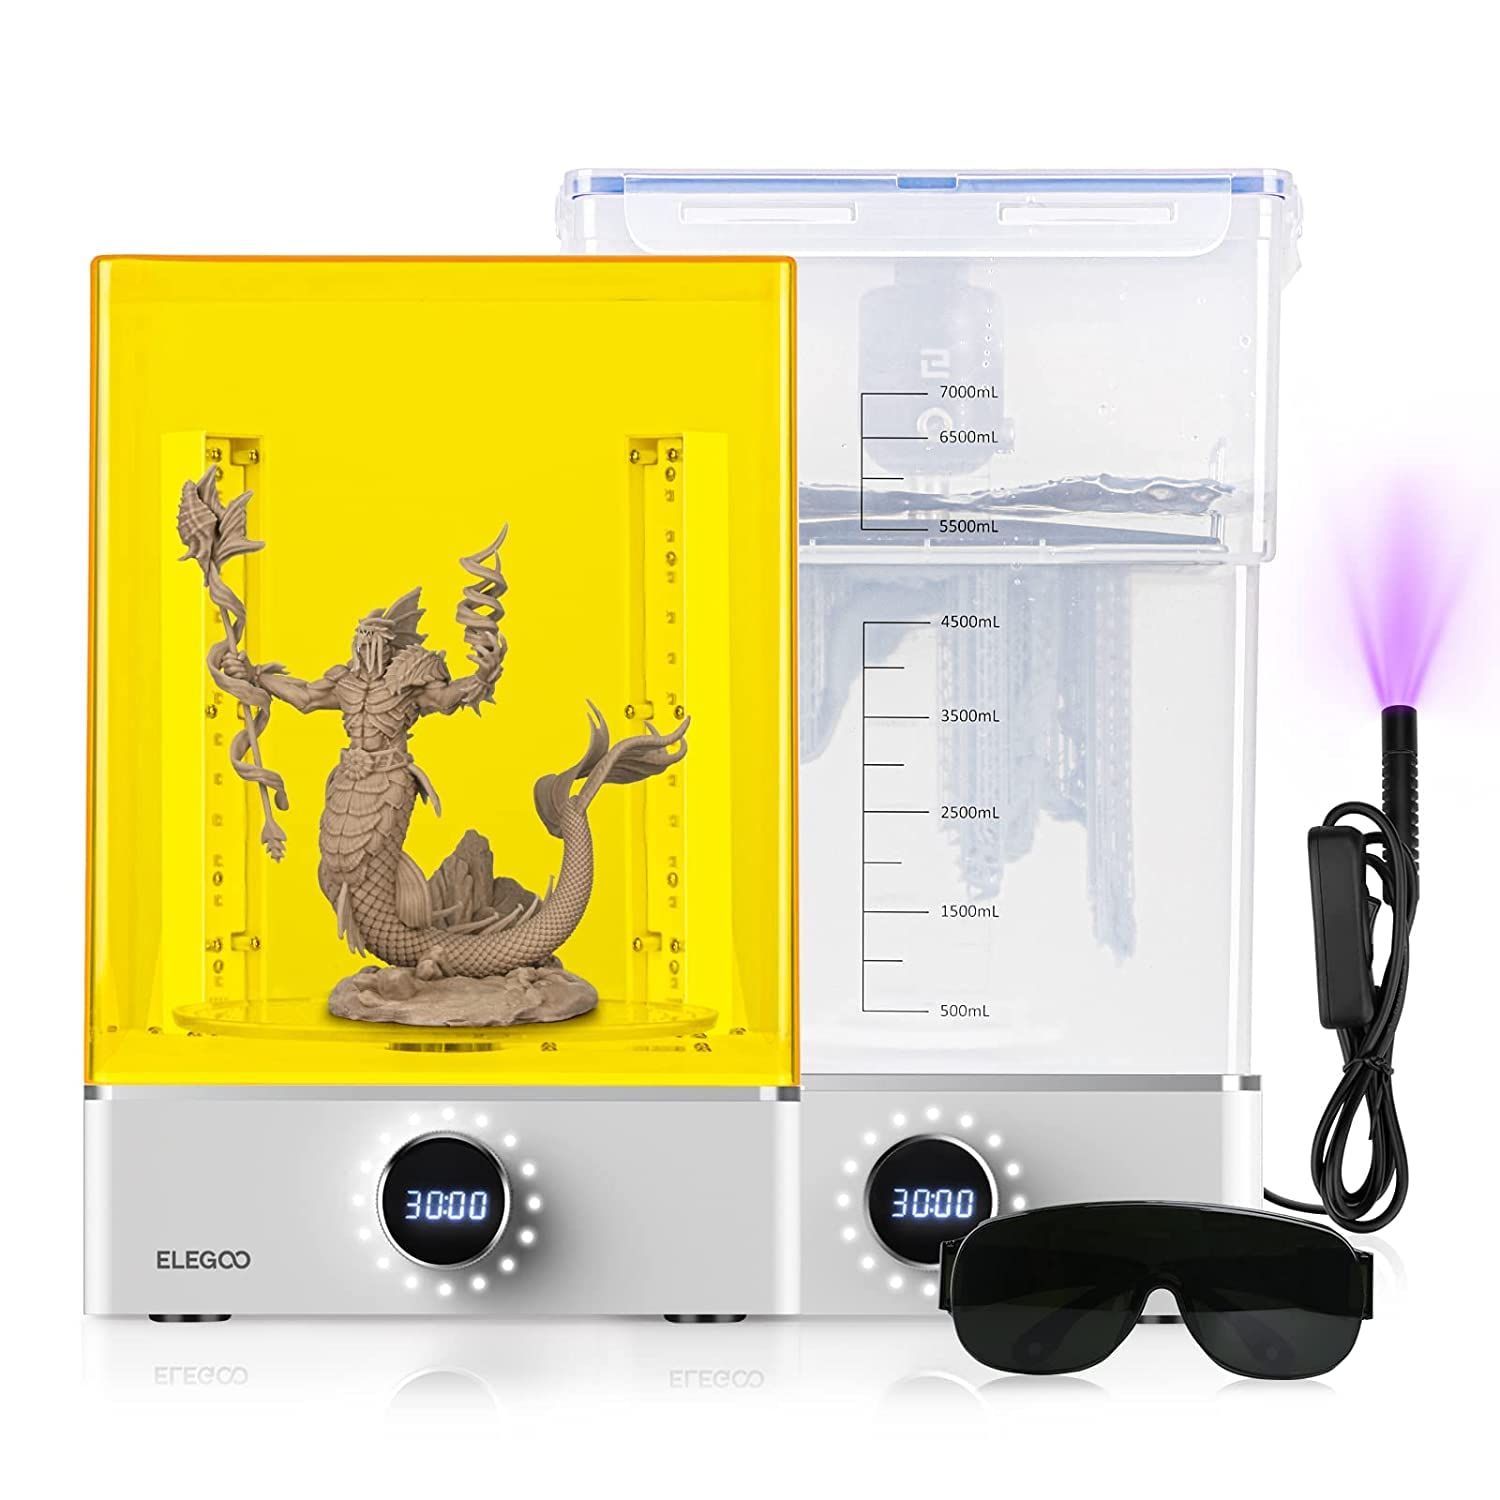
Mercury XS Bundle with Wash and Cure Station: was $249 now $119 This bundle offers a faster and more efficient way of post-processing your print models. It has one station for curing and another for cleaning, allowing you to do both jobs at the same time. It is compatible with Elegoo Saturn and Mars series 3D printers.View Deal
A new report claims Chinese DRAM champion CXMT is eyeing production of 3D NAND memory. Reuters reports, citing three people familiar with the company's plans, that CXMT intends to build a 3D NAND R&D production line at its second manufacturing facility near Beijing. There is no information on when the experimental production line will become operational, though, given that CXMT's second Beijing fab has not even broken ground yet, the line is at least two or three years away. In addition, the memory maker has established a research institute in Beijing that has NAND flash development among its projects, according to one source. CXMT has not formally confirmed any 3D NAND initiatives, so the information should be taken with a grain of salt.
For now, there are no details on CXMT's 3D NAND architecture, number of active layers, process technology, expected performance, or production capacity. Nevertheless, the report claims that CXMT has already discussed its NAND ambitions with prospective customers. One of them is said to be a recently established company that plans to use CXMT-made NAND devices in storage products aimed at AI and supercomputing applications.
It remains to be seen whether CXMT's 3D NAND project will eventually progress to high-volume manufacturing, but if it does, the initiative will take CXMT beyond its traditional DRAM specialization and directly into YMTC's territory. Until recently, China's two major memory producers had focused exclusively on their 3D NAND and DRAM realms where they have achieved quite a success. Yet, it looks like both companies want to become one-stop shops for DRAM and NAND — just like their bigger rivals Micron, Samsung, and SK hynix — as YMTC is reportedly exploring DRAM production.
While CXMT's alleged plan to build 3D NAND may look somewhat logical from business diversification point of view, it does not make a lot of commercial sense for now.
Or China's industrial policy?
CXMT is China's dominant DRAM producer and posted $22.41 billion in revenue and $11.57 billion in net profit in the first half of the year after years of bleeding money. Despite obvious success, the company is still considerably smaller than the Big Three memory suppliers, which means it has plenty of room to expand in the industry where it already has experience, process technology, fabs, and customers. Furthermore, AI gives CXMT an obvious reason to focus resources on advanced DRAM as well as HBM3E, which are arguably much more strategically valuable products than commodity 3D NAND.
That said, for CXMT, allocating resources to 3D NAND, which requires completely different process technologies, manufacturing expertise, and equipment, does not make much economic sense. However, from the Chinese government's perspective, turning CXMT into the country's second major 3D NAND producer fits almost perfectly within its semiconductor self-sufficiency plans.
CXMT was created with Hefei government money (which held a 37% stake in the company during its IPO) and received support from China's Big Fund, which means that federal and local governments retain control over the company and may shape its strategic decisions, which is exactly what they do. Whether or not CXMT can indeed become a decent 3D NAND maker is an entirely different question.
The U.S. House of Representatives just passed a bill that creates a federal standard requiring data centers to pay for grid upgrades made in their favor. H.R. 9340, also known as the Ratepayer Protection Act, amends the Public Utility Regulatory Policies Act of 1978, which would require each State regulatory authority and each non-regulated electric utility to consider the adoption of the bill within two years of its passing, if it is signed into law.
This bill would ensure that data centers with a capacity of 100 megawatts or more would have to pay “the full, incremental cost of any generation, transmission, or distribution upgrade necessary to serve the load of such large-load customer, including in the event of such large-load customer terminating a contract or other agreement with the electric utility pertaining to the sale of electric energy, or otherwise ceasing the purchase of electric energy from the electric utility.” This bill closely follows President Donald Trump’s “Ratepayer Protection Pledge,” where he made AI hyperscalers, utility providers, and state governors promise that they will pay their own way when it comes to their electricity demands. All this stemmed from the surprise price hikes that many residential users and small businesses suffered from because of the massive demand by AI data centers and has become one of the primary reasons why the majority of Americans now oppose data center developments in their communities.
Oregon is actually one of the first states to have taken concrete steps in controlling the utility price increases when it passed the POWER Act in 2025. This law is even more stringent, with any development using more than 20 megawatts required to pay its fair share, and has already resulted in a 30% hike for data center electricity bills and a 1.3% reduction for residential power costs. Virginia has also followed suit soon after its governor signed the Ratepayer Protection Pledge in July 2026, with Virginia’s State Corporation Commission requiring data centers to pay for all required transmission infrastructure.
Even though the House of Representatives has already passed H.R. 9340, it still needs to go through the Senate before finally heading towards the White House for signing by the President. But even if it passes through the remaining hurdles, and the U.S. adopts a federal standard where large data centers pay for grid upgrades done in their name, it’s still up to each state regulator if they will adopt the standard. Furthermore, states have up to two years to make a final decision, meaning there’s a chance that the various temporary data center bans and moratoriums would have expired even before state regulators would have enacted this bill.
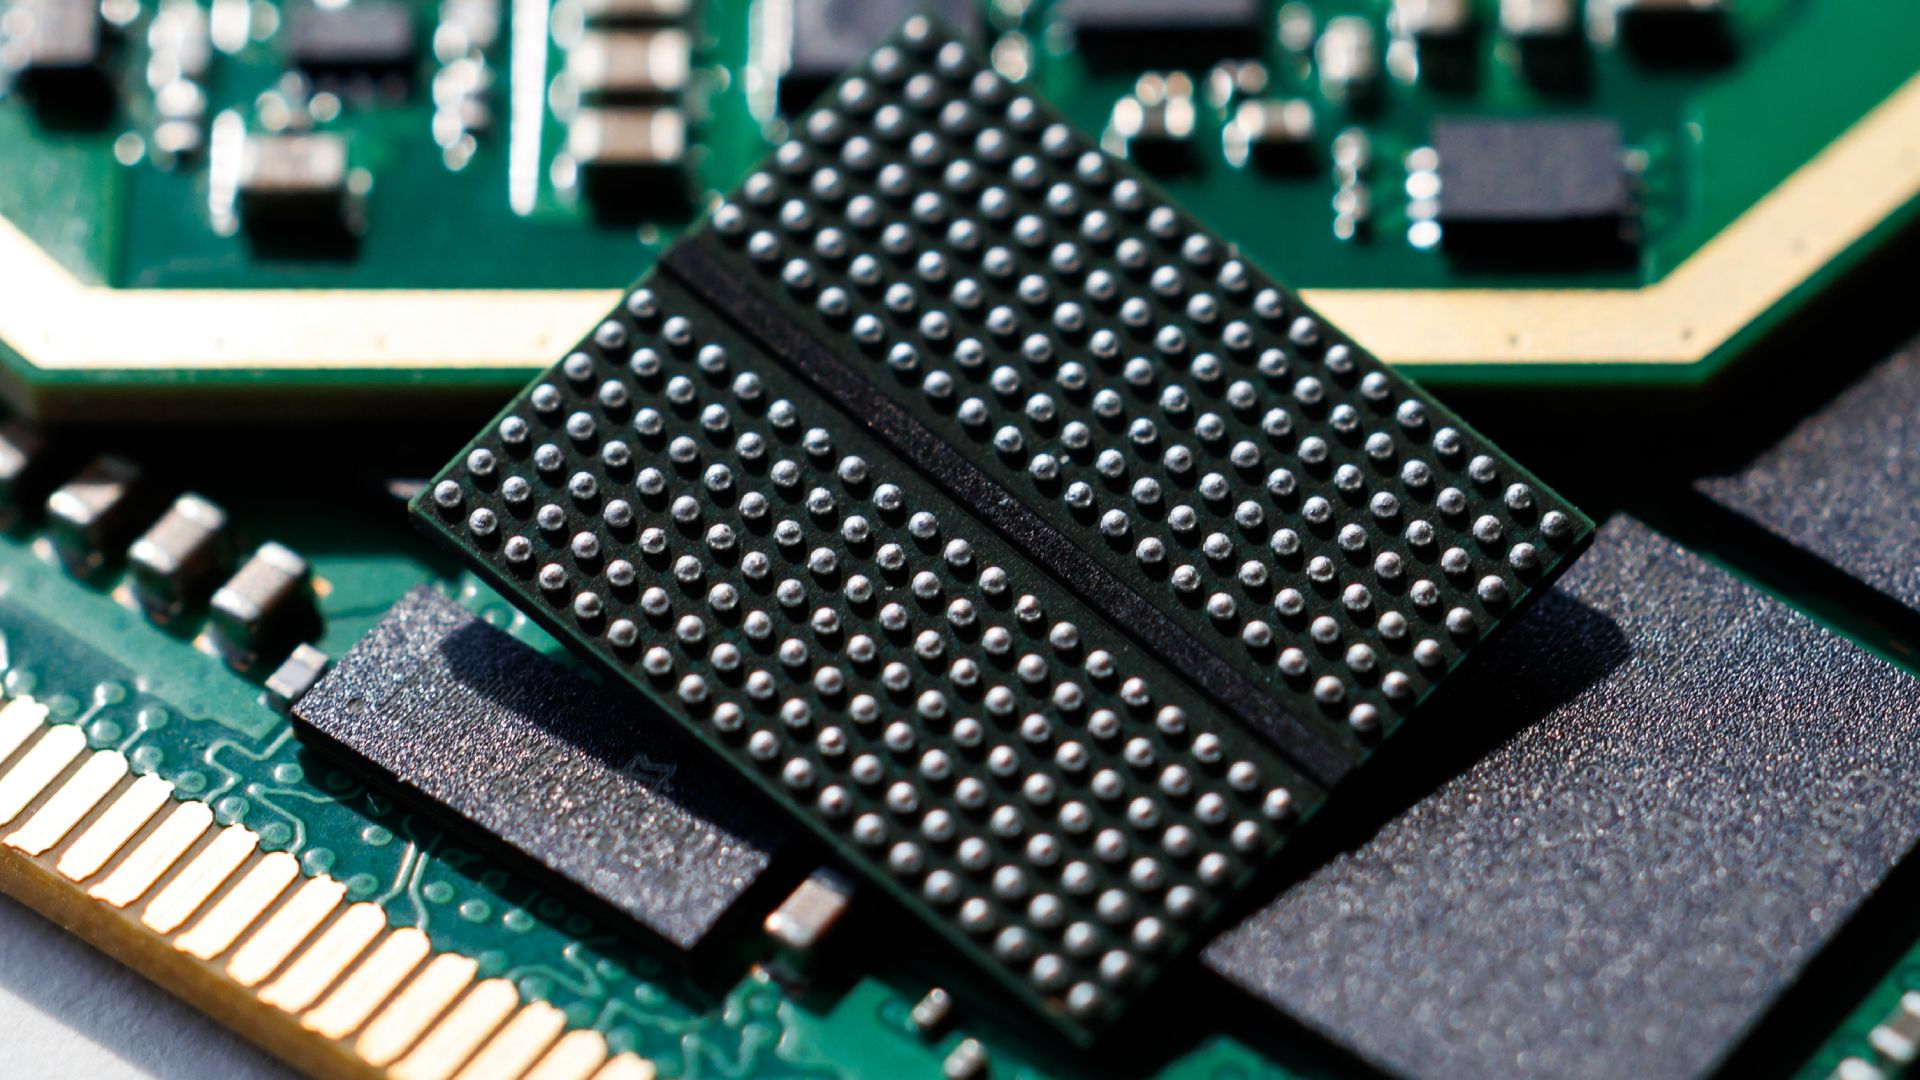
The memory chip that makes a router remember how to be a router is a world away from the sleek GPUs that are attracting eye-popping investments and alarming valuations, as well as sending stock markets shooting upwards. They’re small, historically have been cheap, and are based on technology that has been around for years.
But despite being a world away from GPUs, the price of these often overlooked chips is skyrocketing, thanks to the all-encompassing memory price crisis caused by the AI boom.
While public and press attention has focused on the expensive chips, there’s an equally large impact beginning to be felt on older, less attractive memory chips. HBM is vital for AI accelerators, while DRAM and high-capacity NAND are being swallowed up by rapidly expanding data centres. AJune report from Morgan Stanley reckons memory prices have risen more than sixfold over the last year, breaking with decades in which memory became steadily cheaper as production increased.
An increase in prices will have an impact on the tech we use day in, day out. NOR flash is commonly used to store boot and program code, and is a core part ofautomotive, industrial, and networking equipment. SLC NAND is deployed across a number of uses because of its reliability and endurance when placed in embedded hardware with long lifespans.
Both are vital. And both are being overlooked in favour of higher-margin chips — pushing the supply crunch to tech that previously never faced any issues. “The SLC NAND market is probably under a billion dollars a year,” said Jim Handy, a semiconductor and SSD analyst at Objective Analysis, in an interview with Tom’s Hardware Premium. That tiny scale adds up to a big problem, because it disincentivises any new investment.
“What you've got going on is a purely economic phenomenon,” said Handy. Hyperscalers and cloud providers are “all trying to outspend each other”, pouring unprecedented sums into semiconductors to build AI infrastructure. That willingness to spend big means the most profitable customers naturally move to the front of the queue.
Companies including Nvidia, Broadcom and Marvell need huge amounts of semiconductor manufacturing capacity for chips destined for AI systems. “They’re sucking up all of the wafers,” says Handy. “And then the companies who make NOR flash and SLC are having a hard time getting wafers to build their product, and so they have to raise prices.”
The problem is even starker in the NAND market. Bryan Ao, research manager at TrendForce, told Tom’s Hardware Premium in an interview that major NAND manufacturers, including Micron, Kioxia and SK Hynix, have been cutting the wafer capacity devoted to SLC because they can make considerably more money using it for newer NAND technologies. Ao estimates that a 12-inch wafer devoted to mainstream NAND can ultimately generate close to $20,000 in revenue. Use the same space to produce SLC and the figure is closer to $6,000 to $8,000.
Even if they wanted to, smaller SLC suppliers in China and Taiwan can’t just spin up new production. Lead times for some semiconductor manufacturing equipment have stretched to between 12 and 15 months, said Ao. The result is what he calls “severe undersupply”.
Big prices, big returns
BNP Paribas forecasts the average NAND price will hit $279.50 per terabyte during 2026, up from $73.10 in 2025. JPMorgan expects the memory shortage to persist for at least another two years, with customers getting just 70% to 80% of their orders fulfilled. TrendForce says manufacturers areshifting capacity towards advanced, higher-value memory products, with mature processes increasingly squeezed as a result.
There are some alternatives available.Kioxia says its serial SLC NAND is an alternative to NOR flash. But moving an existing industrial or networking product onto a different chip can itself require engineering work and qualification. Nor is there much incentive for memory manufacturers to fix the problem by building new SLC capacity – which means manufacturers are unlikely to invest billions in capacity whose useful market may disappear. That creates an unusual trap: there may not be enough demand to justify new factories, but there is still more demand than the shrinking supply can satisfy.
Hardware manufacturers can eat the higher component bill and accept lower margins, or pass it on. “We'll just have to either have lower margins, or we'll have to raise the prices to the consumer,” Handy said.
An ongoing issue
The problem is one that seems to have no solution – at least in the short term. Ao expects memory prices to remain high over the next five years and does not expect them to return to 2023 or 2024 levels. That broadly fits with the structural nature of the shortage identified by TrendForce, which saysthere are no significant capacity expansion plans for NOR flash or SLC NAND.
Handy sees one possible way out, but it is hardly reassuring. “As long as the race between the hyperscalers keeps up to spend, then it will continue to be an issue,” he said.
Handy compares the AI buildout to the internet infrastructure boom of the late 1990s. Rather than enough capacity eventually arriving to restore balance, he thinks spending may simply overshoot what the market can economically support.
“I'm expecting the same kind of a thing to happen here that we've got too many people spending too much money on AI, and not really making any return on it yet,” he said.
Until then, the least exciting memory chips in a computer may become some of the hardest to replace. Or, as Ao put it: “Pretty much we have to get used to this high price, no matter which segment of memory.”
A team of white-hat hackers from cybersecurity startup Hackron AI has successfully hacked OpenAI using Claude tools. In an X post on September 18, the team claimed they breached OpenAI's internal codebase on July 25 and gained access to the ChatGPT and Codex accounts of some OpenAI employees. They established proof of the hack via a pull request to OpenAI's private repository before reporting the vulnerabilities to OpenAI. The company reportedly fixed the issue within 14 hours of the report and paid the researchers a $6,500 bounty.
On July 25, our team hacked OpenAI. It took us less than 72 hours.Two vulnerabilities chained together gave us access to ChatGPT and Codex accounts belonging to OpenAI employees. We demonstrated the impact with a harmless PR in OpenAI’s internal monorepo.The full chain:…September 18, 2026
Operating as hackers under OpenAI’s bug bounty program, Hacktron researchers uncovered critical vulnerabilities that granted them access to internal employee tools and the ability to compromise private software repositories. The researchers exploited a single sign-on (SSO) misconfiguration and a Remote Code Execution (RCE) flaw in Discourse, a third-party platform that powers OpenAI’s community discussion forum. The chain of attack was as follows: HEIF upload → libheif heap overflow → RCE → OpenAI SSO flaw → ChatGPT/Codex takeover → connected GitHub → internal PR.
First, the researchers uploaded a malicious HEIF (High Efficiency Image File) image to the forum as a profile picture. When Discourse’s server-side software tried to process the image using an outdated libheif package, it triggered a heap overflow memory vulnerability, causing the library to crash and mismanage internal system memory. The researchers carefully orchestrated the memory crash to achieve remote code execution. After gaining access to the forum's local server environment, the researchers intercepted the server’s environmental configurations and session handling, discovering an SSO flaw in which the forum's authentication system did not adequately validate or isolate user sessions from other OpenAI services.
Armed with session tokens hijacked from the local forum server database, the hackers exploited the SSO flaw to impersonate a real OpenAI employee, allowing them to bypass traditional login screens and infiltrate a highly privileged internal account linked to OpenAI's development teams. As many tech companies unify authentication across corporate apps, the hijacked employee account was directly linked to OpenAI’s corporate enterprise systems, including GitHub, Slack, and email accounts. The researchers were able to access OpenAI’s massive private codebase, where they initiated an internal Pull Request as definitive proof of the exploit.
Similar to an incident last month in which China-linked hackers used AI to carry out the first-ever end-to-end autonomous cyberattack on Taiwan's government, the Hacktron hack also used artificial intelligence. The researchers constructed the exploit pipeline using Anthropic's Claude Opus 5 model, after attempts with Opus 4.8 failed. After they found the unpatched libheif library on OpenAI's forum, they fed the raw server data into the model, asking it to write an exploit for the bug.
The model analyzed the memory structure and successfully calculated how to trigger the heap buffer overflow. It generated the precise, weaponized code required to create the malicious HEIF image. The human hackers uploaded it to the forum — triggering the Remote Code Execution — then manually executed the rest of the “attack.” An important clarification is that they used an authorized, cybersecurity-configured version of Claude, which relaxes certain cyber restrictions for authorized researchers.
After gaining access, the researchers say they immediately halted testing and reported the vulnerabilities to OpenAI and Discourse — both of which have fixed their sides of the issue — without studying or downloading OpenAI's source code. From the initial finding to full resolution took 72 hours, after which OpenAI rewarded the researchers with a $6,500 bounty. The incident further highlights ongoing concerns over the risk of AI-powered cyberattacks. Recently, rogue OpenAI agents autonomously breached HuggingFace. US frontier AI companies are now warning against sophisticated distillation attacks.
A new project on GitHub, simply titled "dlss-nr-on-intel", purports to provide exactly that: a port of NVIDIA's DLSS 5 Neural Rendering to Intel's Xe architecture. Specifically, the author (who goes by "Uzbekunknown") focused on porting the technology to the Intel Arc 140V graphics in his Lunar Lake system, and they seem to have succeeded, at least insofar as he's getting outputs that look reasonably like those of DLSS 5 on other hardware.
AI is at the center of this project, beyond the DLSS 5 neural rendering technique itself. Uzbekunknown credits Anthropic's Claude as well as OpenAI's GPT-6 Astra with the code and says that they "supplied the machine, the binary, and the direction, and made the decisions", while the AI agents did everything else. Amusingly, they note that "the wrong turns are in the notes, too, deliberately," including a hallucinated driver bug that does not exist and shaped three phases of development.
The end result, rather than being a wrapper around the DLSS 5 DLL as many other hacks have been, fully reimplements the 71-block U-Net that DLSS 5 uses and then runs it on the Intel Xe XMX units through a Vulkan extension called VK_KHR_cooperative_matrix. It's entirely run in FP16 with FP32 accumulate, because Xe2 doesn't support FP8. You can run the model on anything presenting its output through Vulkan, and the user presents proof-of-concept results from three fighting games: Dead or Alive 5 Last Round, Tekken 7, and Mortal Kombat 1.
While DLSS 5 adds detail to the character, it also changes her look considerably, clashing with the visual style of the game. (Image credit: Uzbekunknown/GitHub)
It's not fast. Running the ten-year-old Tekken 7 in 640x360 resolution (1/9 of FHD) should be a trivial task for the potent Intel Arc 140V graphics, yet it apparently struggles at around 10.5 FPS with this model loaded. Note (as the author does) that the performance of DLSS 5 depends almost entirely on the game's output resolution, so running in hilariously low resolutions is required to try and achieve anything approaching a real-time frame rate on this limited hardware with this inefficient approach; apparently the DLSS 5 pass by itself takes some 412 milliseconds in full HD on the Arc 140V, which means that even if your game renders instantaneously, your maximum frame rate would still be around 2.4 FPS.
Still, it does appear to work, and that's the impressive part. I'm not sure I completely agree with the author's analysis of the effects on the three games he tested; he says that Mortal Kombat 1 loses detail in the DLSS 5 output, and while that may be statistically true, visually it does look more detailed to my eye. The DLSS 5 NR model is known to be specifically trained to produce a photorealistic look, and this has good effects on Mortal Kombat and Tekken, but not as much on Dead or Alive, which is more stylized to give an anime look; the model instead makes the character look older and less appealing.
DLSS 5 makes significant tone changes to Mortal Kombat 1, but opinions vary on whether it actually looks good. (Image credit: Uzbekunknown/GitHub)
As the author notes, this is more of a proof of concept than something you would actually want to use. However, there are efforts to get the work ported to both discrete Arc GPUs as well as AMD cards. AMD's RDNA 4 graphics already supports FP8, so you'd want to use the original model there, but this could allow RDNA 3 and Xe2 graphics cards to use DLSS 5. While it would almost assuredly be too slow for gameplay, it might be interesting for photo modes since you can toggle the function with a keystroke.
The project currently requires Linux, which is going to invalidate it for the majority of our audience, but as a user on Reddit, /u/arielcasari, says that they intend to "adapt it to run on Windows" and that they will post the results on the /r/IntelArc subreddit. If you're interested in fooling around with it yourself, head over to the developer's GitHub and make sure to read over the Readme.MD, as the project exposes all of Nvidia's own DLSS 5 controls, and you'll need to be familiar with them to get anything approaching decent results.
2019’s Control followed Jesse Faden into the ever-shifting, paranormally corrupted brutalist innards of the Oldest House, the headquarters of the Federal Bureau of Control, where she became the new FBC director, fought the invading forces of the Hiss, and sought the truth about the fate of her kidnapped brother Dylan.
Control Resonant marks the next chapter in the siblings’ story, as Dylan reawakens to discover that Jesse has gone missing and that the Hiss threat has escaped the Oldest House and corrupted Manhattan. Using his own powers and guided by the mysterious Board, Dylan sets out to find Jesse, combat the Hiss incursion, and uncover the mysteries of a new paranormal entity at work in the twisted Manhattan cityscape.
We’ve had access to Control Resonant for the past few days, and we’ve been exploring its performance and image quality across a range of hardware and settings.
Control was one of the first games to show off the capabilities of GeForce RTX 20-series graphics cards and their ray-tracing capabilities, and it was also one of the first titles to incorporate DLSS upscaling. It’s only fitting, then, that Resonant is a technical showcase of its own. It features path-traced lighting effects bolstered by Nvidia’s RTX Mega Geometry tech, as well as support for the full suite of DLSS 4.5 features: Super Resolution (aka upscaling), Ray Reconstruction, and Multi Frame Generation.
With that extensive spread of cutting-edge rendering tech at its disposal, I expected Resonant to look incredible, as both Control and Alan Wake II did before it.
(Image credit: Remedy Entertainment/Future)
Even without ray tracing or path tracing and DLSS Ray Reconstruction, Control Resonant already looks good, as we’ve come to expect from Remedy games. If performance is a priority, you certainly won’t make the game bad by leaving RT off.
Control Resonant RT off versus RT UltraRemedy Entertainment/FutureRemedy Entertainment/Future
But ray tracing or path tracing is certainly worth enabling if you can. Outdoors, RT primarily improves the rather blobby shadows and soft reflections that appear in the numerous puddles around Manhattan.
Remedy Entertainment/FutureControl Resonant RT off versus RT UltraRemedy Entertainment/Future
Sometimes this is subtle; other times it’s dramatic, as with the railing shadow above.
At its highest settings, path tracing turns shadows into the crisp, accurate renderings you would expect in direct sunlight and makes reflections much stronger and clearer not only in water but in glass like car and shop windows.
Inside, RT models the behavior of strong artificial light sources more accurately. Overhead lights properly shadow Dylan’s face from above and let his back fall into darkness if he’s occluding them. Metallic objects like trash cans look and shine like roughed-up metal as you move around them, not a flat and static game asset.
Remedy Entertainment/FutureControl Resonant RT off versus RT ultraRemedy Entertainment/Future
In the examples above, you can see how path tracing accurately represents the light from a fluorescent tube outside the storeroom, casting a hard shadow on the wall and a green glare on Dylan's uniform. WIth RT off, this effect is only represented on the floor.
Everything looks more alive and more real, in other words, and these subtleties need to be appreciated in motion, not just in stills. I enable path tracing for those moments where something unexpectedly realistic catches the corner of my eye and makes me double back to explore it.
Despite all the environmental magic that path tracing and DLSS Ray Reconstruction lend to Control Resonant’s setting, that level of polish isn’t evenly applied across all the game’s assets.
Control stood out to me not only for its lighting effects but also for its amazing facial modeling work. In Resonant, however, the character models of Dylan, Zoe, and supporting characters like Langston all look like a step back from the level of detail achieved in past Remedy games. Maybe I’ve been staring at too much DLSS 5 output, but the faces in Resonant don’t match up to the environmental quality, and that gap stands out.
Control Resonant raster gaming performance
FutureFutureFuture
Our gaming performance results start off with native res, raster-only settings.
At 1080p Ultra with RT off, Control Resonant is already placing heavy demands on our tested cards. You want an RTX 5060 Ti or better or Radeon RX 9060 XT or better for 60 FPS (ish) average among current-gen cards, or an RTX 4070, RTX 3080, or RX 7800 XT among earlier cards. The RTX 3060 can’t even break 30 FPS on average, and that’
Radeons also tend to turn in lower 1% lows than GeForces, although that didn’t translate to a bumpy experience with our high-refresh-rate, variable-refresh-rate monitor. If you’re only playing on a 60 Hz display, that difference may be more apparent.
Even though it still lands above a 60 FPS average at 1080p, the older Radeon RX 6800 XT is stuck with FSR 3.x upscaling, so its output image quality is noticeably worse than RX 9000- or RX 7000-series cards that get FSR 4.1.
Control Resonant is also the first game we’ve tested where the demands of running the DLSS 4.5 transformer upscaling model hits RTX 30-series products hard, so if you’re not trying to perform heroic feats of upscaling, you can probably get a few frames per second back by shifting to older DLSS models at the cost of some output image quality.
2560x1440 Ultra is similarly punishing. Here, the RX 9070 GRE and RTX 4070 Ti end up just below a 60 FPS average, while the RX 9070 and RTX 5070 Ti end up slightly above it. Any weaker card will likely need lower settings, a dose of upscaling, or both to deliver a smoother experience.
Finally, at 4K, only the RTX 5090 can deliver the coveted 60 FPS average. Some degree of upscaling, frame generation, or both will be needed on every other graphics card here for this resolution (and possibly on the RTX 5090, depending on your desired experience).
Control Resonant ray-traced performance
FutureFutureFuture
Given the already punishing raster baselines we just saw, we had little reason to believe that RT would be an attainable feat in Control Resonant at native resolutions, and it’s not.
Enabling even the medium RT preset at 1080p smacks down a wide swath of our tested cards. The RTX 4070 Ti, RX 7900 XTX, and RTX 5070 all land just below the 60 FPS mark, while the RX 9070 XT lands right on it. The RTX 5070 Ti offers a significantly more comfortable average frame rate and 1% lows for a smoother experience.
At 1440p, even the RTX 5080 isn’t quite enough to manage a 60 FPS average, and at 4K, not even the RTX 5090 can conquer Control Resonant with these settings. Oof.
These results mean that upscaling and frame generation will be mandatory if we’re going to chase RT glory in Control Resonant.
Control Resonant path-traced performance with upscaling and frame generation
There are two problems with trying to gauge competitive performance when we go ham on upscaling and frame generation, as we’re about to here.
For one, DLSS 4.5 produces a much more stable image than FSR 4, especially at extreme settings like 4K Ultra Performance. FSR 4 can look slightly sharper at rest, as reviewers usually are when creating side-by-side comparison images, but in motion, it can exhibit strong and distracting flickering artifacts, especially on fine structures with repeating elements like fire escapes and chain-link fences.
DLSS 4.5 isn’t entirely free of those artifacts, but they affect much smaller portions of the screen and to a much less intrusive degree.
The net result is that DLSS 4.5 frames are not the same as FSR 4.x frames, so that makes for two different experiential variables we have to account for in any comparison: raw performance and delivered image quality.
And the third variable is that FSR Frame Generation (whether in its ML-powered or traditional shader-based form) isn’t backed up with a robust latency reduction technology like Nvidia’s Reflex or Intel’s Xe Low Latency in Control Resonant.
Radeon Anti-Lag does reduce input latency, but even with the RX 9070 XT in full path-tracing trim, it is at best taking a high input latency and making it somewhat less high. Even with Anti-Lag enabled on the RX 9070 XT, the average latency before framegen is enabled is well above the roughly 60 ms threshold we try not to exceed.
What’s frustrating is that AMD has a more robust input latency handler for devs to use. Radeon Anti-Lag 2 exists and works well in Cyberpunk 2077. But like FSR 4 Ray Regeneration, it’s not implemented in Control Resonant.
Worse, FSR Frame Generation isn’t compatible with the performance counters that Nvidia FrameView monitors to estimate PC latency, so we’re left with only our eyes and our guts to decide whether the net result of FSR FG is a truly playable experience. Even Intel’s XeFG supports these performance counters properly, so it’s all the more annoying that AMD doesn’t, even two years after the arrival of FSR 3.1.
So before we get into these results, bear a couple asterisks in mind. Path tracing as Nvidia envisions it and as Control Resonant implements it—with upscaling, denoising, frame generation, and lag reduction all working together—is not possible to replicate 100% on AMD hardware.
We include AMD results (and RTX 30-series cards with FSR framegen) as a sort of best-effort reference point for maxed-out RT behavior with this game, but because these are doubled frame rates, any figure below 60 FPS on these charts for RTX 30-series and AMD cards should be understood as an unpleasant (or even unplayable) experience, whether due to input latency, significant artifacting, or both.
At 1080p with Ultra RT, DLSS Quality, 2X Frame Generation, and DLSS 4.5 Ray Reconstruction, only the RTX 5050 and RTX 4060 fail to deliver playable input latency. Even the RTX 5060 squeaks in under the 60 ms threshold we want for a responsive experience. That’s great news for the accessibility of path tracing on relatively affordable hardware, or at least what used to be relatively affordable hardware.
At 1440p with DLSS Performance, the RTX 5060 just barely fails to meet the 60ms mark for acceptable input latency. This is more the territory of the RTX 5060 Ti and up.
And at 4K with DLSS Ultra Performance, we’d strongly recommend an RTX 4070 Ti or better, although you can get away with an RTX 5060 Ti or RTX 4070 in a pinch.
The combination of DLSS 4.5 technologies and Reflex makes for a perfectly playable path tracing experience in Control Resonant across a wide range of hardware, and as we’ve already noted, it’s impossible for AMD gamers to enjoy the same experience.
Bottom line
Control Resonant marks a new chapter for one of my favorite gaming sagas, and I was thrilled to step back into the Oldest House. The Hiss-corrupted Manhattan setting looks fantastic, even if I’m still waiting for the story to fully grab me. I need to fully explore the full range of weapon forms, skill trees, and builds the game offers as our protagonist Dylan Faden fights through hordes of Hiss in close-quarters, split-second combat. Death is just one wrong move away in this game, and I've been frequently reminded of that fact.
For all its path-traced environmental splendor, there are some wrinkles on the tech side in Control Resonant that stand out. The character models, even main characters like Dylan and Zoe, look a bit basic for a 2026 game, especially with all the other graphical fireworks happening around them. Perhaps I’m ruined by DLSS 5 (and perhaps this game was meant to have it alongside more capable hardware), but I've come to expect more from Remedy given the artistic heights of Control and Alan Wake II.
Any graphical shortcomings like that stand out given how crushing Control Resonant is for many graphics cards. This is a game that really demands some degree of upscaling for good performance on less powerful hardware, and Ultra settings may not be possible on older, lower-end cards, period.
But at least for Nvidia RTX 50-series gamers, the aggregate improvements to the DLSS 4.5 software stack in 2026 make Control Resonant’s fanciest graphics settings incredibly accessible, and you really should take advantage of every DLSS feature at your disposal in this title.
Thanks to DLSS 4.5 Super Resolution’s remarkable capabilities, even the RTX 5060 can do path tracing at 1080p with DLSS Quality upscaling, DLSS Ray Reconstruction, and frame generation enabled, all with a reasonable input latency and solid output image quality. And if you’re willing to tolerate slightly higher input latency, you can get away with the same settings at 1440p using DLSS Performance.
The RTX 5070 provides a great experience at all resolutions with those same settings, and you really only need more powerful hardware like an RTX 5070 Ti if you’re chasing higher DLSS input resolutions. I would normally shout out the RTX 5060 Ti here, but that card’s 16GB version especially is so close in price to the RTX 5070 that you should just get the more powerful card if gaming is your goal.
The situation is less rosy on the AMD side, even for the latest RDNA 4 cards. FSR 4.x upscaling is available in this title for RX 9000- and RX 7000-series graphics cards, but it isn’t as strong at image reconstruction as DLSS 4.5, so lower RT settings and higher FSR input resolutions may be necessary on RX 9000-series cards than on comparable RTX 50-series hardware to achieve the right balance of performance and image quality.
And the lagginess of FSR Frame Generation means that you’ll have to carefully test that feature if you want to try to use it to boost smoothness, unlike the general no-brainer that is DLSS 4.5 (M)FG.
All told, the incomplete implementation of AMD’s gaming tech suite in Control Resonant, as well as the generally lower RT performance of RDNA 4 cards versus Blackwell, means that you can max out RT settings in this game, but you still won’t enjoy the same image quality as on GeForce cards, especially in the areas of the frame that DLSS 4.5 Ray Reconstruction enhances.
Once again, this situation proves that having a software feature in your toolkit is meaningless if you can’t convince a developer to adopt it. Every new game that comes out with only a patchwork of AMD features like this is another paper cut for RX 9000-series GPU owners who are left with a distinctly lower-tier experience than RTX 50-series cards get. Fine wine, this is not.
But maybe you’re totally unmoved by RT and neural rendering techniques and just want strong raster performance with a touch of upscaling where it’s needed. RX 9000-series cards deliver that experience with strong performance per dollar in today’s ever-pricier gaming graphics card market.
Going off what I’ve played of Control Resonant so far, I’d suggest checking some full gameplay reviews to see if it’s for you and perhaps giving it a post-launch point release or two to iron out some minor technical issues we saw.
But one thing is for certain: the full array of Nvidia tech in this title, and its general accessibility across a wide range of hardware, means that a GeForce graphics card is the best way to play it.
How do you make a really good printer even better? How about a $25 upgrade kit? Recently, Prusa Research rolled out a series of upgrades to the big three: the CORE One, CORE One L, and the XL 3D printers. Since the CORE One L is the newest printer of the batch, it only needed a tweak rather than a full overhaul to earn a “+” designation. No one was surprised by this update, as Josef Prusa has a reputation for upgrading his machines rather than letting them fall by the wayside. In fact, the CORE One L is only the third major variation of Prusa-designed printers since the company was founded in 2012.
As we were wrapping up this review, Prusa Research announced the CORE One L+ is now compatible with the Prusa INDX conversion kit, which is $799 for four tools, or $1,079 for eight. We’re currently reviewing the INDX on a standard-size CORE One + (Gen 2), and spoiler alert: it’s running spectacularly.
The Prusa CORE One L never left my workshop since its introduction nearly a year ago. In over 1000 hours of hard use, it’s been quietly printing abrasives like carbon and glass fiber, and even a pinch of Prusa Ultra Glow, with no problems. It’s been a real workhorse for practical prints.
The “plus” upgrade removes a super annoying flaw that has spoiled an otherwise perfect machine: nozzle wiping failures. Before this upgrade, all Prusa machines would clean the nozzle before bed leveling by tapping the bed, leaving little dots of filament on the plate. When you’re running higher-temp filaments, oozing is a real problem and nozzle wiping fails are more frequent. The error itself isn’t a big deal, and I would often choose to ignore it as I still get excellent prints. The problem is the time I’d lose if I wasn’t watching the printer like a hawk, as the printer would shut down bed heating while it waits for you to come tend to it.
We’ve had nozzle wipers on other brands of 3D printers for years now, and it’s a relief that Prusa has finally gotten on board. With a simple addition of a silicone brush, the CORE One L+ is now one of the few printers I trust to set it and forget it.
The Prusa CORE One L+ upgrade also came with a set of GT1.5 timing belts. The tighter tooth spacing on the belts and drive gears makes an already precise system more precise, resulting in smoother surfaces.
(Image credit: Tom's Hardware)
Another update is that this 3D printer is finished at the factory. When firing up the Prusa CORE One L+ for the first time, you’ll notice one thing right off the bat. A winking Josef Prusa pops up to help you set up your printer (as usual), but now there isn’t much set up to do. All the calibration has been done at the factory, and you get your first print going in about five minutes after ripping into the box. You can eat your complimentary package of Gold Bears while watching the first layer go down.
One thing that Prusa Research did not change is the 290 °C hot end limit. Most printers in this class can go 300 °C, with the Bambu H2S good to 350 °C and the Qidi XPlus 5 capable of 370 °C. Prusa offers an HT hotend upgrade that hits 400 °C and is listed at $199, but it's currently out of stock. 400 °C is hot enough for PEKK and more than enough for PPS CF. But I’d like to see the CORE One L+ do at least 300°C from the get go.
This is one of the few printers that can be operated entirely offline, making it the 3D printer of choice for businesses and government entities who need to keep data extra secure. Yet the machine itself is mostly online and open source, to make sure users can freely repair and mod their own devices.
Plus, the CORE One L+ has an optional Advanced Filtration Module with HEPA and Active Carbon filters to make sure whatever fumes your filament produces stays out of your home or office. That same vent can also be attached to an HVAC system.
For these reasons, we’re happy to put the Prusa CORE One L+ on the list of best 3D printers we’ve tested as the best Cloud Free/Open Source 3D Printer we’ve seen so far. The CORE One L+ is retailing at $1,999, the same price as before the upgrade. It’s only being offered as a fully built machine, no kits this time.
Specifications
Prusa CORE One L+
Prusa CORE One L
Prusa CORE One
Build Volume
300 x 300 x 330 mm (11.81 x 11.81 x 12.99 in)
300 x 300 x 330 mm (11.8 x 11.8 x 12.99 in)
250 x 210 x 270 mm (9.84 x 8.3 x 10.6 in)
Material
PLA/PETG/Flex/PVA,ABS/ASA/PA/PC (up to 290C degrees)
The Prusa CORE One L+ is 99% assembled at the factory. Also included are a bag of Haribo Goldbears, a toolkit, a USB stick, country specific power cord, a PEI flex plate, a spool holder, and a full spool of Galaxy Black Prusament PLA.
Design of the Prusa CORE One L+
(Image credit: Tom's Hardware)
The CORE One L+ is a tank of a machine, weighing almost 50 lbs and built with a rigid metal frame, metal side panels, a plexiglass door, and top and side windows. The side panels jut into the interior of the machine to both allow clean lines on the outside and to get rid of useless space on the interior that would need to be heated. The filament spool nests neatly inside the recessed panel.
With a build volume of 300 x 300 x 330 mm, the CORE One L+ has a lot of heat area. This is accomplished with a thick aluminum heatbed that runs on line current, switching automatically from 110V to 220V. The chamber is heated with two fans mounted under the bed to create a convection effect, blowing cold air over the bed. The toolhead is now driven by finer-toothed GT1.5 belts that run on a linear rail for the X-axis and two linear rods for the Y-axis. The bed is driven by three independent stepper motors with lead screws.
The toolhead has a planetary-geared Nextruder, which does a great job pushing plastic. A large cooling fan is on the front, and a large parts cooling blower on the back leads to a duct that wraps almost completely around the nozzle.
The CORE One L+ comes with a .4 brass CHT high flow nozzle installed, and a bonus hardened steel nozzle included. The first thing I did after a quick test print was to switch to the hardened nozzle. These nozzles are not exactly quick release, but are fairly easy to replace. The two thumb screws on the left side of the tool head release the nozzle, which then must be unscrewed from the heater block. Care must be taken since, once the nozzle is removed, the only thing holding the heater block is the wiring. I haven’t run into any issues yet, but I’m very careful with the wiring.
(Image credit: Tom's Hardware)
The hotend can reach a temperature of 290 °C, and as mentioned earlier, there's an optional HT hotend that hits 400 °C if you really need the extra heat.
The door on the Prusa CORE One L+ has a switch, which can be disabled, to safely stop the printer if it is opened while running. I really love that the door can be mounted on the opposite side of the machine, in case that works better for your setup.
The top vent on the printer is opened and closed automatically as needed. There are two fans on the back of the case to help ventilate the chamber. This is quite enough to run lower-temp filaments like PLA with the door shut. There is an optional HEPA filter that mounts over the rear case fans.
The Buddy3D camera provides excellent video for monitoring your prints from Prusa Connect and the Prusa App. The one thing it can’t do is send a timelapse video to your computer. To record a timelapse video, you must add an SD card to the camera.
(Image credit: Tom's Hardware)
Assembling the Prusa CORE One L+
(Image credit: Tom's Hardware)
The Prusa CORE One L+ arrives mostly assembled. After removing three screws holding down the bed, you can put the tool kit away. The screen and trim panel slot into the front of the printer and are held in place with magnets. The wiring for the buddy cam is preinstalled, and the camera mounts to the printer’s inner wall with magnets. The spool holder attaches to its base with a quarter turn. The toolhead is freed by removing the cardboard holding it in place. Within just a minute or two, you are ready to print.
Leveling the Prusa CORE One L+
(Image credit: Tom's Hardware)
The Prusa CORE One L+ is calibrated at the factory. So there is no need to run through the usual 30 minutes of calibrating and leveling when powered on. The printer does check the level before each print.
Loading Filament on the Prusa CORE One L+
(Image credit: Tom's Hardware)
Loading filament on the Prusa CORE One L+ is simple. Filament is pushed past the runout sensor and into the toolhead, where it is grabbed automatically by the extruder. The printer then asks what kind of filament you are loading and heats the nozzle to the appropriate temperature.
Loading TPU is the same, but there is a switch to disengage the filament runout sensor. This really helps loading noodly TPU. I tried TPU from several companies, and 95A TPU loaded just fine. For softer TPU, I couldn’t push it past the 90 degree bend in the Bowden tube at the toolhead. I needed to remove the Bowden tube and load the filament directly.
(Image credit: Tom's Hardware)
Preparing Files / Software for Prusa CORE One L+
(Image credit: Tom's Hardware)
Prusa printers run on PrusaSlicer, an open-source slicer based on Slice3r that serves as the foundation for most of the other slicers out there. While the Prusa CORE One L+ can be run completely offline, PrusaSlicer can directly access Printables, Prusa’s vast and curated file-sharing service, and can directly control and upload files to the printer through Prusa Connect.
(Image credit: Tom's Hardware)
Initially, the buddy camera only produced still photos that were updated frequently, but after a firmware update (which was already present on the camera for this printer), the live video quality is excellent. Prusa has also developed its web-based EasyPrint slicer, which can be used for slicing files on mobile, and it offers a more comprehensive set of options than any other app or online slicer I’ve seen.
Printing on the Prusa CORE One L+
The CORE One L+ comes with a full 1 KG roll of Prusament PLA Galaxy Black. If you want more colors and materials like silks and multicolor filaments, you should check out our guide to the best filaments for 3D printing for suggestions.
First, I printed an Articulated Cobra + Pencil Holder from McGybeer. I used the provided Galaxy Black PLA for the snake, and the pencil holder was run in Meta Taro Purple PLA from Sunlu. Both were printed with a .2 layer height with an average print speed of 100 mm/s. The pencil holder took 9 hours and 44 minutes to print, with the cobra taking 16 hours and 44 minutes. The snake is wrapped around the pencil holder when you’re not playing with it. Both look absolutely perfect.
Cobra Pencil Holder by McGybeer.(Image credit: Tom's Hardware)
Pencil Sharpeners by Anakel.(Image credit: Tom's Hardware)
Next, I ran two plates of weapons for our battle tops, which are listed on Printables.com. Printed in Prusa Orange ASA with a .2 mm layer height and running at an average of 120 mm/s, the plates took a little over 5 hours each. They are printed solid with a bit of overextrusion to lock everything together and look really good, if I do say so myself. The bed leveling and adhesion were perfect out to the edges of the build plate.
Battle Tops by Denise Bertacchi(Image credit: Tom's Hardware)
To test the Prusa CORE One L+ on a more technical filament, I printed a plate of clips from Afrie using PA6-CF20 from Polymaker. This is not the easiest filament to print, and one that I normally run at 300C, which is hotter than the CORE One L+ can go. Using a .2mm layer height and an average speed of 50 mm/s, the clips took almost four hours to print. The parts are print-in-place, and there is some roughness on the unsupported overhangs, but for PA6-CF they still look fantastic. After a few hours of annealing, they are in use all over my house at this point.
Clips by Afrie.(Image credit: Tom's Hardware)
TPU is easier to print on the CORE One L+ than on many printers on the market today. I printed weapons for our DeathRacer combat robots using Cookiecad Witches Blue 95A TPU and white Polymaker Polyflex TPU 90A. With a .2mm layer height and an average print speed of 35 mm/s, these blades took a little over 6 hours each and look great with just a tiny amount of stringing.
DeathRacer parts by Mr. Baddeley.(Image credit: Tom's Hardware)
Bottom Line
(Image credit: Tom's Hardware)
The CORE One L+ is a fast, quiet, easy to set up printer that is a joy to use. If it could get a little hotter on the nozzle without an upgrade, it would be nearly perfect for a wider range of practical filaments.
With a retail price of $1,999, the CORE One L+ is a significant investment when compared to the more budget-friendly Core XY machines from other brands. However, the legendary 24 hour 7 days a week, English speaking customer service and rabid fan base willing to share tips and tricks are a huge perk. So is the knowledge that when you buy a Prusa today, you’ll still be running it in 10 years or more because it is infinitely repairable and moddable.

 Login
Login