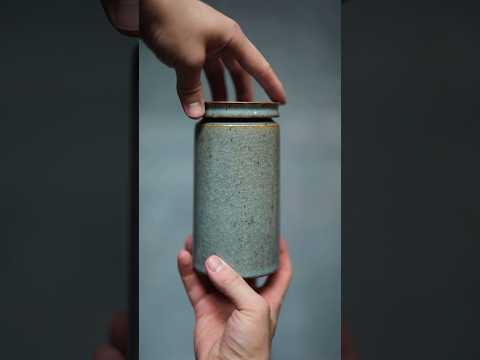
For the longest time I struggled to come up with a bud vase form I liked. In years past, I threw shapes that were more quintessential, they were rounded with a small belly and a narrow, tall neck, perfect for slotting in a stem or two, a budding branch of a single flower, yet as my overall style became sharper, more angular and precise, those ballooned vessels begun to feel out of place.
I needed something that felt sleek in comparison, something slightly unusual and more architectural and eventually I settled on these, shapes with an inward sloping rim and a narrow opening that’s hidden when viewed from the side, or if overly filled. The small opening keeps everything pinned upright and it makes for a relatively interesting form to throw as at some point, you have to fold the rim portion inward and somehow keep it stabilised without it collapsing any further.
What you’re watching here, the trimming once the parts have turned leather hard, is arguably the easiest part of the entire process, as there’s no risk of the vessel collapsing, (unless you trim that top angular change too thinly), rather it’s a process of refinement. The thrown forms themselves are relatively neat but it’s always quite surprising just how much further you can take them at this point.
Yes, getting turnings out of them is a pain, as is shaking out excess glaze when coating the interior forms and I recommend using dried foliage for these, or at least being attentive with emptying them and using fresh water, otherwise they can be quite hard to clean out properly.
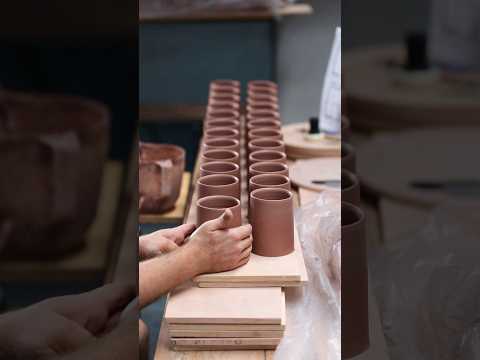
When I’m making mugs, I like to make lots at once. Generally, this means spending a week or two producing 100-200 pieces, whilst juggling a number of other tasks, mainly, as I feel as if by working on so many at once, they end up being more consistent and I become faster as I’m repeating the creation process so many times in a row. It sort of feels like practice and I can always sense a difference in my ability at the beginning of a mug making session, versus how naturally they are formed and handled towards the end, after I’ve warmed up, essentially.
I throw mine from 300 grams of clay, (plus or minus 10 for speedier weighing out), to 11 cm tall by 8.5 cm wide, give or take a few millimetres. I don’t mind if one is a smidge below my throwing gauge’s pointer as I pull up the walls, or if one is fractionally too wide, as these minute discrepancies will barely be noticeable once the pot has been trimmed, handled, glazed and fired.
What I do care about though are the proportions and the slightly tapering shape. It can hard to see, but these pots are marginally wider at the base and then they slope inwards ever so slightly as they reach upwards. It’s subtle but it makes a big difference and so, if I notice that a mug is too straight, or that it flared out towards the top, it’ll be instantly destroyed if I can’t fix that during the throwing process itself. It’s good to be brutal, you can never be too precious, essentially with vessels as simple as these are.
Lifting off these thinly walled pots in the perhaps the trickiest part. There’s a bit of a knack to it, (that’s better explained in my YouTube video that specifically covers this step), but it means I can heap more onto each ware board, which means I don’t have to use batts and for a pot like this that means I end up saving a bit more space in the studio.
Space, as you quickly realise, is perhaps one of the most importance things about a potter’s studio. It’s a bottleneck you’ll often run into and you need more space during the production stage, as pots need room to dry and components eat up shelves before they’re assembled.
One way to add a certain amount of cohesion to a body of work, is to have one aesthetic feature that appears in some way shape or form on a vast majority of the pots you make. So recently, I’ve been trying to incorporate this very simple angular section into more of my vessels and in this particular case, it actually makes the lid slightly more ergonomic to use, as the groove around the outside makes it easier to lift away.
Like mentioned in the video, I went from really disliking this pot, to the point where I considered destroying it at the bone-dry stage, to absolutely loving it, which is a rare event in many ways as typically, if I dislike a pot after it’s been trimmed, the chances are I’ll continue to shun it even when it has been glazed and reduction fired.
I like a pleasant surprise though, as this pot has made it onto my current “favourites” shelf, what do you think?
This week I’m taking you through the making of one of my larger urns, made as a commission for Sarah, a longtime follower who I’ve exchanged emails with over the years. I don’t often take on commissions, but occasionally something comes along that feels particularly meaningful, and this was one of those pieces.
The form grew naturally from my existing lidded pots, with its narrow base, wider body and prominent lid giving it an almost figurative, ceremonial quality. Alongside throwing and trimming the urn, I’m also talking about something I’m asked about surprisingly often: chattering, particularly when using tungsten carbide tools. What causes it, why does it happen, and how do I deal with it?
Despite having tens of thousands of hours of trimming behind me, chattering still happens. I’ve learned that rather than trying to eliminate it completely, it’s more useful to understand how to correct it. Tungsten carbide tools do most of my shaping, with steel tools and scrapers used for that final refinement and removing any remaining chatter marks. And if you actually like the texture, I think it can be beautiful when used deliberately.
More than anything, making this urn reminded me that behind all the photographs and videos are real people who have followed along for many years. It was a real honour to make this for Sarah, and I’m very grateful to have been trusted with something so meaningful.
I hope you enjoy the video, and as always, thank you for watching.
⚙️ • How to attach pots onto the wheel: https://youtu.be/mfTZU3lQsLY
⚪️ • How to make and use wadding: https://youtu.be/KCI_LQL3JIs
📚 • You'll find many more guides on how to centre and pull up the walls of clay here: https://www.youtube.com/playlist?list=PL2WJhtTF0eGhQwf8g2LHcom_KrvJpH_JT
📖 • ORDER MY BOOK: https://geni.us/bymyhands
📢 • Find out much more about my work here: https://linktr.ee/floriangadsby
⏱ • Timestamps:
0:00 - Introduction
0:49 - Talking about the urn I'm planning on making, (and throwing it)
2:30 - Throwing the lid
5:24 - Trimming the lid to fit the body
6:55 - How to fix a slight wobble in the rim
7:37 - Some information about tungsten carbide trimming tools
10:28 - Trimming the lid to be in-line with the body
13:55 - The infamous chin-trimming technique
17:13 - Packing the electric kiln for a biscuit firing
17:50 - Waxing the urn
18:09 - Glazing the urn
20:05 - Tidying up the glazed surface
22:10 - Wadding the lid for the reduction firing
22:42 - Loading & reduction firing the gas kiln
24:38 - Unpacking the kiln
26:04 - Grinding the lid smooth
27:53 - The finished urn
29:30 - Clean up
*I throw using both a Rohde HMT 500 & 600 potter's wheel and fire using Rohde kilns too, the electric is a TE-200 and the gas kiln is a KG-340.
____
I’ve been on the fence about fixing this coffee dripper.
Stylistically, it was my favourite from my second batch of these, it was thrown and trimmed with a sharper funnel, to direct the coffee into the cup this time instead of all over the table like those from my first batch… Likewise, the steps on the outside lend it character and the mossy green glaze coated the vessel in quite a beautiful way, although due to how much this particular glaze moves at top temperatures during the reduction firing, it plugged the drainage hole.
The result being perhaps the most useless coffee dripper that has ever been made, so, in this short video I demonstrate how I fix the issue.
The key is to keep the area drilled covered in water, this keeps dusts to a minimum and helps the diamond drill-bits to glide more smoothly. I started by piercing a hole right through the centre of the thick pane of glaze, then I carefully, and slowly, worked my way outward, widening then hole until it was almost back to its original width. Lastly, the ground area is polished smooth using very fine wet and dry sandpaper; to remove any sharp scratchiness and finally, the V60 style coffee dripper can be taken for its maiden voyage.
I do wonder though, whether I should have kept it as is, as a one-off anomaly, you’ll have to let me know what you think.

 Login
Login